Datasource Properties Dialog - Settings Tab (Datasource Settings)
Contains controls for defining the overall behavior of the datasource. For some of the datasource settings, such as audit trail settings, once they are configured here they can be further configured by editing the related user settings for each individual user.
Global delete restrictions
This setting controls at the datasource level who can and cannot delete documents.
Miscellaneous
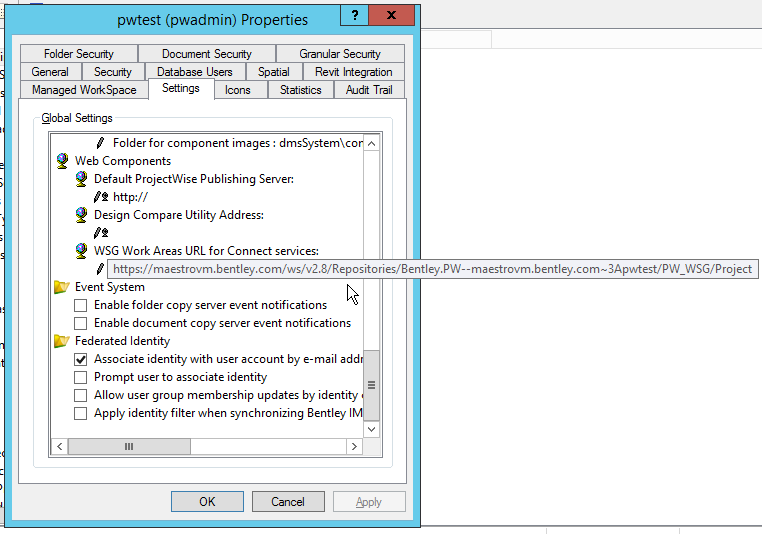
Work Areas
Network
Documents
Versions
| Setting | Description |
|---|---|
| Generate version string for first document version | New and imported documents will be assigned a version string (default uses an alpha character - A, B, C, and so on). |
| Use numeric version strings | Select to use a numeric string rather than the default of an alpha character. If this option is checked, you may specify the numeric string to be used. Double-click the # icon to set the version string prefix. |
| Put created version into first workflow state having create permission | When this setting is on, and Use current state if create permission is granted is off, and a user creates a new version of a document, ProjectWise places the new version in the first state in the workflow that the user has the Create permission. The original, now read-only document, remains in the workflow state it was in before it was versioned. For example, a workflow having four states is assigned to a folder. A particular user does not have the Create permission for the first state of the workflow, but does have the Create permission for the second state. If that user attempts to create a version of a document that is currently in the first state of the workflow, then the new version that gets created will be placed in second state of the workflow. |
| Use current state if create permission is granted | This setting becomes available when you turn on Put created version into first workflow state having create permission. When this setting is on and a user creates a new version of a document, ProjectWise places the new version in the same state that the original document is in, assuming that the user also has the Create permission for that state. For example, a workflow having four states is assigned to a folder. A particular user has the Create permission for both the first and second states of the workflow. If that user attempts to create a version of a document that is currently in the second state of the workflow, then the new version that gets created will also be placed in second state of the workflow. |
| Document having versions can be moved | When this setting is on, users can move documents that have versions. Specifically, when you move a document with versions, the versions will always move with the document — it is not possible to move a document and not move its versions. When this setting is off, users cannot move documents that have versions. |
| Lock flat set documents to versions | Next to each document in the set contents window for flat sets in ProjectWise Explorer, there is a check box called Lock to Version. When off, the active version of the document will always be included in the set. When on, the set locks to the sequence number of the document's active version. This way, as new versions of the document are created and the active version's sequence number slides forward, the set will always use a fixed version of the document (specifically, the version which now has the sequence number that the active version had when the document was originally added to the set). The Lock flat set documents to versions datasource setting, then, controls whether or not the Lock to Version check box is on by default when a document is added to a flat set in the set contents window in ProjectWise Explorer. When this datasource setting is off (the default), the check box in ProjectWise Explorer is also off by default. When this datasource setting is on, the check box in ProjectWise Explorer is on by default. |
| Lock reference documents to versions | When off (the default), the master document will always use the active version of a reference. (Off is the previous behavior, before the datasource setting was introduced.) When on, and the user attaches a reference to a master, the reference is locked to the sequence number of the reference's active version. This way, as new versions of the reference are created and the active version's sequence number slides forward, the master document will always use a fixed version of the reference (specifically, the version which now has the sequence number that the active version had when the reference was originally attached). |
| Prompt user to update master document's reference versions on open | If on, and the user opens a master document that is using a version of a reference that is not the active version, the Reference Version Manager dialog opens in ProjectWise Explorer to prompt them to update the master document to use the active version of that reference document. Only the reference documents that are not the active version are displayed in the dialog. The user can choose to update some, all, or none of the reference documents, and then open the master document. |
Most Recently Used Lists
At the bottom of most applications' File menu is a list of files that were recently opened in that application. This is referred to as the most recently used (MRU) list. When MicroStation is integrated with ProjectWise, the File menu MRU list is also integrated with ProjectWise, so that you can quickly access a DGN document recently opened from ProjectWise. Integration with the File menu MRU list in other integrated applications is not yet supported.
The Address bar in the Open Document dialog that opens in integrated applications also contains an MRU list. The Address bar's MRU list displays all documents recently opened from ProjectWise, not just those opened in the application you are working in.
| Setting | Description |
|---|---|
| Maximum number of recent items to show | This setting determines how many recently opened documents will be listed in the integrated application's MRU list. So for all integrated application, this affects the Address bar of the Open Document dialog, and for MicroStation it also affects the File menu MRU list. The default maximum number is set to 5. (For applications other than MicroStation, the File menu MRU list uses the application's own default maximum number.) |
| Time period to keep records | This setting determines how long a listing will be kept on the MRU list. The default is 20 days. |
Engineering Components
| Setting | Description |
|---|---|
| Display Components in ProjectWise Clients | To be used your datasource is using ProjectWise components indexing. If on, a Components node displays when a user logs in to this datasource from ProjectWise Explorer or ProjectWise Web Parts. |
| Folder for saved component searches | Sets the folder that relational searches will be saved to when searches are run and saved from ProjectWise Explorer. |
| Folder for component images | Sets the ProjectWise folder that contains the icons and gifs used for component classes. |
Web Components
Event System
By default, when a folder or document with spatial data is copied, the spatial data is not copied along with the folder or document. These settings let the administrator enable the copying of spatial data along with the copied folder or document.
| Setting | Description |
|---|---|
| Enable folder copy server event notifications | If on, then when a folder with spatial data is copied, the spatial data is copied along with the folder. |
| Enable document copy server event notifications | If on, then when a document with spatial data is copied, the spatial data is copied along with the document. |
Federated Identity
Settings related to associating ProjectWise user accounts with Bentley IMS accounts (also called Bentley Cloud Services profiles) when using Bentley IMS authentication in ProjectWise. These settings assume that Bentley IMS authentication is enabled in the datasource (see Enabling Bentley IMS Authentication and Bentley IMS Single Sign-On in the Datasource).
| Setting | Description |
|---|---|
| Associate identity with user account by e-mail address | If on, a person's
ProjectWise user account will be automatically
associated to their Bentley IMS account the first time they log in to this
datasource using Bentley IMS authentication, if the email address that is saved
in their
ProjectWise user account properties matches
the
identity (the primary email address) of
their Bentley IMS account.
Note: Use of this
setting assumes and requires that a
user identity filter is configured on
the
Users datasource node (Users node >
Users Properties dialog > Dynamic Creation tab) that specifies which
organization a user must belong to, in order for their account to be associated
(see
Adding Users with
Bentley IMS Accounts to the Datasource).
|
| Prompt user to associate identity | If on, and there is no user account in the datasource
that is currently associated to the Bentley IMS account of the person logging
in to this datasource using Bentley IMS authentication, then that person is
prompted to either:
Note: Use of this
setting assumes and requires that a
user identity filter is configured on
the
Users datasource node (Users node >
Users Properties dialog > Dynamic Creation tab) that specifies which
organization a user must belong to, in order for their account to be associated
(see
Adding Users with
Bentley IMS Accounts to the Datasource).
|
| Allow user group membership updates by identity claims | Turn this setting on if you want to allow
ProjectWise groups to be synchronized with
matching Bentley IMS groups.
For synchronization to work, the following must be true:
See Synchronizing a ProjectWise Group with a Bentley IMS Group. |
| Apply identity filter when synchronizing Bentley IMS users |
DO NOT TURN ON; INTENDED FOR FUTURE
USE
Synchronization of a datasource with Bentley IMS is optional. If you choose to synchronize, you must first contact Bentley in order to obtain a special Bentley email account called a service identity, and then add the service identity information to your server's DMSKRNL.CFG file. Upon synchronization, ProjectWise uses the service identity to search Bentley IMS for just the IMS accounts that belong to your organization, and then creates matching user accounts for them in ProjectWise. A service identity can only be associated to one organization, and Bentley will associate each service identity to the organization requesting it, therefore your own service identity will only ever have access to the Bentley IMS accounts that are associated to your own organization. At some point in the future, it might be possible to configure synchronization so that it only creates matching ProjectWise accounts for those users in your organization who belong to a particular group in Bentley IMS. In this situation, you would turn on this datasource setting, and then also configure a user identity filter that specifies which IMS group a user in your organization must belong to, in order for a matching ProjectWise account to be created upon synchronization. However, since ProjectWise synchronization with Bentley IMS does not currently support filtering by IMS groups, for now you should always leave this datasource setting turned OFF (it is off by default). |