Customizing How Attribute Values Are Displayed
You can customize how text, numeric, and date values are displayed.
Customizing How Text (String) Attribute Values Are Displayed
- Select an attribute that has a binding whose property type is text.
- Right-click the attribute
and select
Properties.
The Attribute Properties dialog opens.
- Select the
Bindings tab.
The icon to the left of each property listed on the Bindings tab identifies the property's value type. For example, 10 is numeric, 12:30 is date, ab is text.
- Double-click one of the
properties on the Bindings tab that has string / text formatting (ab), or
select the property and click
Format.
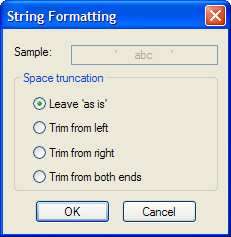
The String Formatting dialog opens.
- Select a Space truncation option and click OK.
- When finished, click OK on the Attribute Properties dialog.
Customizing How Numeric Attribute Values Are Displayed
- Select an attribute that has a binding whose property type is numeric.
- Right-click the attribute
and select
Properties.
The Attribute Properties dialog opens.
- Select the
Bindings tab.
The icon to the left of each property listed on the Bindings tab identifies the property's value type. For example, 10 is numeric, 12:30 is date, ab is text.
- Double-click one of the
properties on the Bindings tab that has numeric formatting (10), or select the
property and click
Format.
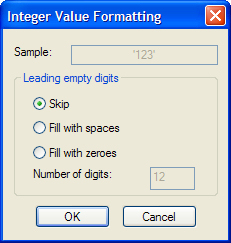
The Integer Value Formatting dialog opens.
- Adjust the formatting as required, then click OK.
- When finished, click OK on the Attribute Properties dialog.
Customizing How Date Attribute Values Are Displayed
- Select an attribute that has a binding whose property type is date.
- Right-click the attribute
and select
Properties.
The Attribute Properties dialog opens.
- Select the
Bindings tab.
The icon to the left of each property listed on the Bindings tab identifies the property's value type. For example, 10 is numeric, 12:30 is date, ab is text.
- Double-click one of the
properties on the Bindings tab that has date formatting (12:30), or select the
property and click
Format.
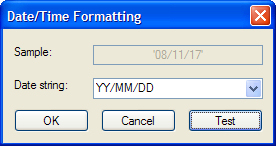
The Date/Time Formatting dialog opens.
- In the
Date string field, select one of the suggested
date format options to apply to this property, or enter your own format. After
selecting or entering the format string, click
Test to see what the current date would
display as, using your string.
When entering your own date strings, you can use any of the following format strings listed below along with the necessary punctuation (: \ , -) to create your date string. You can also use spaces in between each format string you enter. Again, after entering the format strings, click the Test button to see what the current date would display as, using your custom string.
YY or yy year, short format ("12" for 2012) YYYY or yyyy year, long format ("2012") MM month, short name ("09" for September) MMM month, abbreviated name ("Sep" for September) MMMM month, full name ("September") DD or dd day of the month ("28") DDD or ddd day of the week, abbreviated name ("Wed" for Wednesday) DDDD or dddd day of the week, full name ("Wednesday") HH hour, in 24-hour format (00 - 23) hh hour, in 12-hour format (01 - 12) mm minute (00 - 59) TT or tt current locale's a.m./p.m. indicator (displays as "AM" or "PM") SS or ss seconds (00 - 59) - When finished, click
OK on the
Date/Time Formatting dialog.
Tip: If you make a change to the formatting that you would like to undo, select the property again on the Bindings tab and click the Default Format button to restore the default date format string (YY/MM/DD). Note that if you entered a custom date format string, clicking Default Format will also remove that string from the list of options.
- Click OK on the Attribute Properties dialog.