Adding Datasource Connections to ProjectWise Web View
ProjectWise Web View is technically not one of the ProjectWise 365 Services (which are project-based), but is a Bentley cloud service that provides ProjectWise Design Integration users with secure, read-only web access to their ProjectWise datasources. ProjectWise Web View is intended for users who do not need to create, edit, or review documents, but rather only need to view or download documents for informational purposes. Any user with an active account in the datasource can log in to the datasource from ProjectWise Web View. The cloud service administrator configures which datasources are available inside ProjectWise Web View.
Datasource Connection Requirements
Creating and using a datasource connection requires the following external configuration:
- ProjectWise Design Integration Server
ProjectWise Design Integration Server (or servers) must be set up and running and your datasource (or datasources) must be fully-configured. See ProjectWise Design Integration Server Configuration.
- Bentley IMS Authentication
in ProjectWise
The datasource that you plan to use for your datasource connection must have Bentley IMS authentication / single sign-on enabled:
- Bentley Web Services Gateway (WSG) and the ProjectWise Plug-in
Bentley Web Services Gateway and the ProjectWise Plug-in must be set up and running and configured to access the datasources on your ProjectWise Design Integration Server (or servers). See Deploying the ProjectWise Plug-in for Bentley Web Services Gateway.
- Access to
https://ims.bentley.com/
In order for users to be able to log in with their Bentley IMS account, an outbound rule that allows access to https://ims.bentley.com/ must be added to every firewall between Bentley Web Services Gateway and https://ims.bentley.com/.
- CORS Configuration
Part of setting up Bentley Web Services Gateway (step 3 above) for ProjectWise Web View involves configuring Bentley Web Services Gateway to allow CORS (cross-origin resource sharing) requests coming from ProjectWise Web View and integrated Office for the web. This means that you must enter the URL of each of these services (separate each URL with a comma) when you are deploying Bentley Web Services Gateway (in the deployment wizard):
For this service Enter this URL Purpose ProjectWise Web View https://connect-projectwisewebview.bentley.com The ProjectWise Web View URL is required to create datasource connections. When this is configured correctly and you go to ProjectWise Web View and click Datasources > Manage Connections > New Connection and enter your deployed Bentley Web Services Gateway address in the Server URL field, it will validate the address and give you a list of datasources that Bentley Web Services Gateway has access to. If your deployment is NOT configured to allow CORS requests from ProjectWise Web View, then when you enter your deployed Bentley Web Services Gateway address in the Server URL field, it will not be able to validate the address and will not give you a list of datasources.
integrated Office for the web https://connect-mswopiclient.bentley.com Required to open Office documents in Office for the web (users will get an error when they try to open an Office document from ProjectWise Web View, if this is not configured). If you have already deployed Bentley Web Services Gateway and the ProjectWise plug-in and you need to add these URLs, you can either manually edit the web.config file for this deployment, or can just redeploy Bentley Web Services Gateway (recommended) to the same website and append these URLs to the list of allowed URLs when you get to that page of the deployment wizard. For example:
https://connect-projectwisewebview.bentley.com,https://connect-mswopiclient.bentley.com
These other configurations are recommended, but can be skipped if you do not need the feature:
- Bentley Web Services Gateway must be public facing, if your users need to open Office documents in Office for the web.
Requirements for Opening Office Documents
In order for a user to be able to open Office documents in Office for the web, the following must ALL be true:
- Bentley Web Services Gateway must be configured to allow CORS requests from this integrated Office for the web URL: https://connect-mswopiclient.bentley.com
- Bentley Web Services Gateway must be public facing
- The user opening the Office document must be logged in to the datasource connection with a Bentley IMS account
- The user must have a Microsoft 365 subscription
Creating a Datasource Connection
- Go to the CONNECT Center (https://connect.bentley.com/).
- Click the ProjectWise Web View tile to enter ProjectWise Web View.
- Click the
Manage Connections icon
 (upper left) to open the
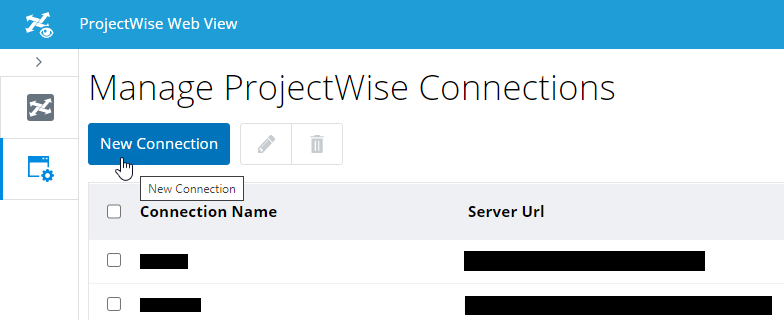
Manage ProjectWise Connections page.
(upper left) to open the
Manage ProjectWise Connections page.
- Click New Connection.
- In the
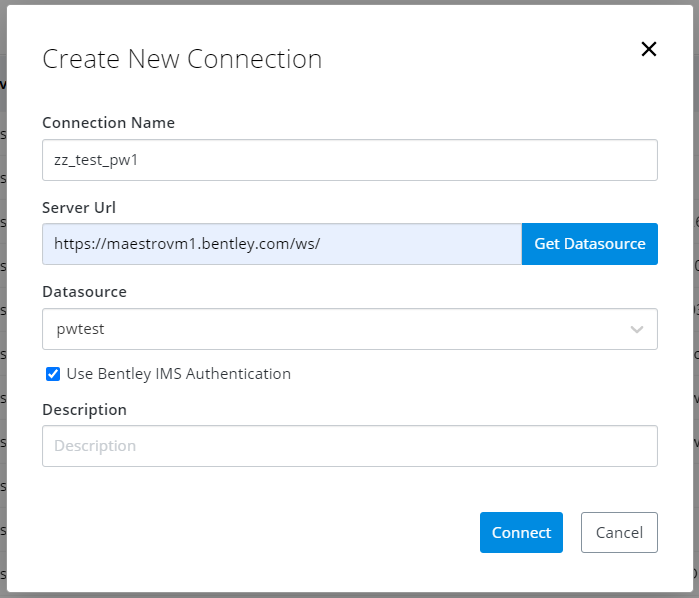
Create New Connection window,
configure the following:
- Connection Name - Enter a name for the connection.
- Server URL - Enter the URL address of where Bentley Web Services Gateway is deployed (for example, https://<server_name>/ws), where <server_name> is the name of the computer on which Bentley Web Services Gateway is installed (for example, maestrovm1.bentley.com), and ws is the name that was given to the virtual directory that Bentley Web Services Gateway and the ProjectWise plug-in were deployed to.
- Get Datasource - Click Get Datasource after you enter the Bentley Web Services Gateway address. This populates the Datasource list mentioned in the next step.
- Datasource - Select the datasource that you want to make a connection to
-
Use Bentley IMS
Authentication - (recommended) Turn this setting on if you want
users to be automatically logged in with their Bentley IMS accounts when they
click this datasource connection. Also, the Bentley IMS user that you are
currently signed in as will automatically be used to create the connection.
Users who do not have a Bentley IMS account in the datasource will be prompted
to log in manually when they click this datasource connection (they can enter
the user name and password of their logical (ProjectWise native) account or
their Windows-based account).
This setting does not display at all if BentIey IMS single sign-on is not enabled in the datasource, or if Bentley IMS single sign-on is enabled but there are no Bentley IMS accounts in the datasource.
or
User Name and Password - The User Name and Password fields are only used if the Use Bentley IMS Authentication setting is turned off or does not display at all. If either of these is true, then you must enter the user name and password of a ProjectWise user who has access to this datasource. When configuring a connection that does not use Bentley IMS authentication, any user who tries to open this datasource connection will be prompted to enter their user name and password, which can either be a logical (ProjectWise native) account or a Windows-based account.
- Description - (Optional) Enter a description of this connection. The name of the datasource is used as the description if no description is entered.
- When finished, click Connect.
Editing a Datasource Connection
You can edit some of the properties of an existing connection.
- Click the
Manage Connections icon
(upper left) to open the
Manage ProjectWise Connections page.
- Click the check box next
to a connection in the list and click the
Edit icon (pencil).
The Edit Connection dialog opens.
You can change the name or description of the connection.
To change anything else, such as the server URL, datasource, or authentication type, you need to delete and re-create the connection.
- Make the necessary changes and click Update.