Setting Up Attribute Classes for MicroStation Attribute Exchange
For users to be able to work with attribute exchange in integrated MicroStation, you first need to set up an attribute class for MicroStation attribute exchange in ProjectWise Administrator. You can do this by manually creating a new attribute class for MicroStation, or by importing the Example Attribute Exchange Rules.ini file delivered with the example dataset. (The example dataset is installed through the ProjectWise Administrator installer (ProjectWise Admin Setups.)
The Example Attribute Exchange Rules.ini file can be imported as part of the datasource creation process, or it can be imported after the datasource is created. When the Example Attribute Exchange Rules.ini file is imported, it populates the object in ProjectWise Administrator with three preconfigured attribute classes: Building, Civil, and Geospatial. These attribute classes are designed to work with the example environments and the MicroStation border files which are also delivered with the example dataset (they are imported through the Example Template.aam file). If you do not import the Example Attribute Exchange Rules.ini file, you can manually create the necessary attribute class. You can also copy an existing MicroStation attribute class from another datasource, or you could even copy an attribute class from the AutoCAD Title Blocks object if one exists, from this or another datasource.
- If you have imported the Example Attribute Exchange Rules.ini file and the Example Template.aam file, and the example attribute classes are sufficient for your needs, then you can skip this section, and users can get started creating a corresponding tag set in MicroStation that match the example attribute classes.
- If you have not yet imported the Example Attribute Exchange Rules.ini file, or if you need to add attributes to an existing attribute class, or if you need to create a new attribute class altogether, then continue with the procedures in this section.
The process for manually setting up a MicroStation attribute class involves:
- Creating a new attribute class for MicroStation attribute exchange.
- Adding attributes to the new attribute class (using the New Attribute Wizard).
- Binding one or more ProjectWise properties to each attribute you add (using the New Attribute Wizard, or the Attribute Properties dialog).
- (Optional) Defining the display format for the properties bound to each attribute (using the New Attribute Wizard, or the Attribute Properties dialog).
The type of property (numeric, date, or text) that you select to bind to the attribute determines the formatting available for that property. Use one of the following procedures to change the way your attribute values get displayed.
To Import the Example Attribute Exchange Rules.ini File
-
Right-click the
Attribute
Exchange Rules
node and select
Import Mappings.
The Import Mappings warning window opens. This window states that the import will delete all existing classes, attributes and bindings for mappings that exist in the import file. Are you sure you want to continue?
- Click Yes.
-
In the Open dialog, navigate to
C:\Program Files (x86)\Bentley\ProjectWise\Example
Datasets\Example Template, select the
Example Attribute Exchange Rules.ini file, and
click
Open.
The Building, Civil, and Geospatial attribute classes are added to the MicroStation Title Blocks object in the datasource.
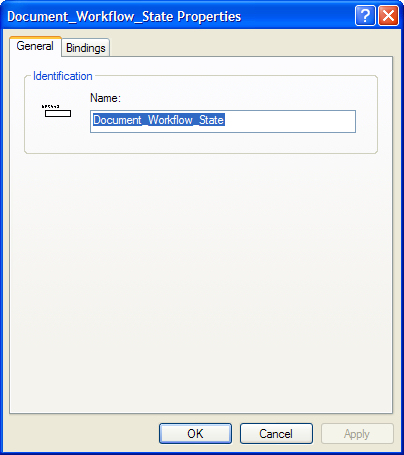
To Create a New Attribute Class for MicroStation Attribute Exchange
-
Right-click
MicroStation Title Blocks and select
.
The New Attribute Class Properties dialog opens.
-
Enter a name for the new attribute class.
When you go to create your corresponding tag set in MicroStation, you must use the same name that you entered here in ProjectWise Administrator.
-
Click
OK.
The new class is added under MicroStation Title Blocks. You can now add attributes to it as needed using the following procedures.

To Add an Attribute to a MicroStation Attribute Class
- Under MicroStation Title Blocks, right-click an attribute class (for example, Civil) and select .
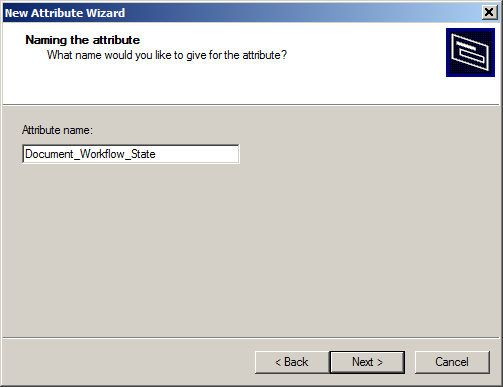
- When the New Attribute Wizard opens, click Next.
- When the Naming the attribute page opens, enter a name for the attribute and click Next. The name you enter must be unique in the class you are adding it to. Whatever name you use here will be the name that your users must use when creating the corresponding tag in their tag set in MicroStation (for example, Document_Workflow_State).
- When the Binding the attribute page opens, click Next.
-
When the
Finish New Attribute Wizard page opens, click
Finish.
The new attribute displays under the selected attribute class.
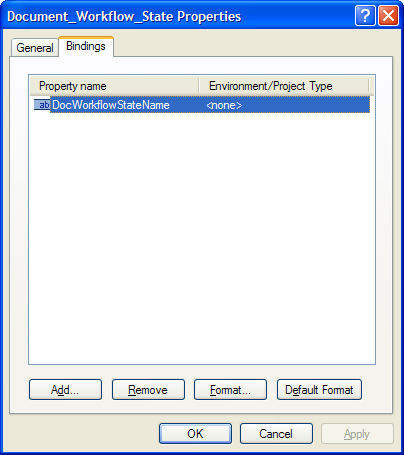
To Add Bindings to Your New Attribute
-
Right-click your new attribute and select
Properties.
The Attribute Properties dialog opens.
- Select the Bindings tab.
-
Click
Add.
The Add Binding dialog opens, which is used to select which ProjectWise property you want to bind to this attribute. In other words, you will select the ProjectWise property that will define the content that gets displayed when the corresponding tag gets placed into the MicroStation document.
-
In the
Add Binding dialog, first select a property
type:
Document Property,
Folder Property,
Work Area Property, or
Environment Property. If you selected Work
Area Property or Environment Property, then select the work area or environment
containing the property you want to bind to this attribute. Finally, select a
property from the list and click
OK.
The selected property is added to the Bindings tab.
You can bind more than one property to an attribute, but each binding must be created one at a time. Also, while you can bind multiple properties to your attribute, there are some limitations. In total you can add:
- Repeat steps 3 and 4 to bind more properties to this attribute. When finished, click OK.