Working with User-Defined Cells
When you apply user-defined cells, it is possible to create any handrail constructions you like which would be difficult to seize by means of parameters. Posts and fillings behave differently so that as many forms of handrails as possible may be created.
The main problem is that the program has to select or modify the cells defined by you in a suitable way to generate the handrail out of the determined poly-line. When the cell templates are defined, you can add rules via part properties and cell tags how the component parts may be modified later.
Any ProStructures component part or plain element can be used for the definition of cells. Additional ProStructures parts list information has to be added to the plain elements.
Posts
Posts are inserted at any possible corner and intermediate points of the poly-line. You can specify different cells for start, end and the straight intermediate points of the poly-line. In addition, you can determine different cells for right-angled corners (+90° and -90° each) and for the angles deviating from this (positive and negative as well).
However, only one deviating intermediate angle is possible. You could use corners of 45° beside the right-angled corners for your handrail, but not corners of 45° and 30° at the same time.
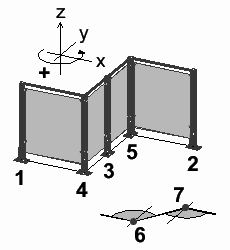
The neighboring figure shows the selection of the different post cells.
You see the beginning (1) and the end (2) of the poly-line as well as the intermediate post (3). The corner post (4) is a +90° corner, the corner post (5) is a -90° corner, corresponding to the UCS and the running direction of the poly-line. .
For all other angles the corner rotating in positive direction (6) or the corner rotating in negative direction (7) is selected.
The post has to be defined in WCS, the positive z-axis corresponds to the height of the handrail. At insertion on a staging post, the positive x-axis is always aligned towards the running direction of the previous poly-line segment (except for the initial post) – the origin (0, 0, 0) of the WCS corresponds to the later insertion point on the staging post.
Indicate the code P in the parts properties of the actual post shape under ‘Note 2’.
If you are working with fillings, all connecting elements, which have to be connected with the fillings later, get the code C here. Define a cell attribute with the name DP for initial and final post to be able to place these fillings correctly (at intermediate and corner post, you have two cell tags DP1 and DP2). The filling is created later in a way that its cell tags are laying exactly one above the other as counterparts.
Handrails, Knee-High Guardrails, and Kick Boards
These are defined in the post cells as well as they are in general connected to them. They are short shapes which have to be aligned parallel towards the x/y-plane and which contain the code R in the parts properties under ‘Note 2’.
After insertion of the post cells these marked parts are connected to common elements if possible. Enter the code R,NC if you don’t want to combine them.