Walk
 Used to interactively "walk" through a 3D view of a building, plant, or other design.
You can access this tool from the following:
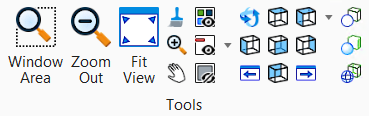
- Ribbon: split button
- Ribbon: split button
- Ribbon: split button
- Ribbon: split button
- View control bar
- Toolbox: View Control
The key characteristic of the Walk operation is that the elevation (Z position) of the camera (eye point) generally does not change as you move or turn. For example, if the camera is tilted upward or downward and you move forward, the camera’s elevation does not change. (If you want to change the camera’s elevation, you can use the Shift key in conjunction with mouse or arrow keys to do so.)
In design files with elements representing the floor or ground, you can perform even more realistic walking simulations by enabling the Camera Height tool setting. When that setting is enabled, the camera maintains a specified height above the underlying elements, enabling you to walk up or down stairs, ramps, or slopes.
The view cone, for the view being navigated, displays in all other open views. It shows the position and orientation of the camera in the view and can help with navigation.
Clip volumes and view clipping planes can affect the display in a view that you use as you are "walking" through a model. If a clip volume is present in the view being used to walk through, then only those elements within the clip volume will display. When clipping planes are active in the view, elements or parts of elements disappear when they are located outside the range of the clipping planes. You can disable clip volumes and or clipping planes by turning off Clip Volume, Clip Front, and Clip Back, for the view. These settings are located in the View Attributes dialog.
When using the mouse to navigate, you can use either of two methods:
- Click-and-drag — click and hold the button on the mouse as you move it. Releasing the button completes the operation.
- One-click operation — click in the view to commence the navigation. Move the mouse as required (without holding down the button), then click again to complete the operation.
When you click to walk, the origin is set to the center of the view.
When using the mouse to walk, the following assignments are available.
| Key | Mouse Movement | Effect of view camera |
|---|---|---|
| Forward | Walk forward. | |
| Backward | Walk backward. | |
| Left | Turn to the left. | |
| Right | Turn to the right. | |
| <Shift>+ | Forward | Move upward (increase elevation). |
| Backward | Move downward (reduce elevation). | |
| Left | Shift to the left (side step). | |
| Right | Shift to the right (side step). | |
| <Ctrl>+ | Forward | Look upward. |
| Backward | Look downward. | |
| <+>/<-> | Increase/decrease movement speed. | |
| <?> | Display mouse/keyboard help summary. |
You can control the mouse navigation speed with key-ins as follows:
where <value> is a number that is interpreted as MPH (English) or KPH (metric) depending on the model's units. If no value is supplied then a default value of 3 MPH is used.
When using the keyboard to walk, the following assignments are available:
| Key(s) | Effect of view camera | |
|---|---|---|
| Up Arrow, <W>, or <I> | Walk forward. | |
| Left Arrow, <S>, or <K> | Walk backward. | |
| Left Arrow, <A>, or <J> | Turn to the left. | |
| Right Arrow, <D>, or <L> | Turn to the right. | |
| <Shift>+ | Up Arrow, <W>, or <I> | Move upward (increase elevation). |
| Down Arrow, <S> | Move downward (decrease elevation). | |
| Left Arrow, <A>, or <J> | Shift to the left (side step). | |
| Right Arrow, <D>, or <L> | Shift to the right (side step). | |
| <Ctrl>+ | Up Arrow, <W>, or <I> | Look upward. |
| Down Arrow, <S>, or <K> | Look downward. | |
| Page Up/Down | Increase/decrease elevation (along design Z-axis). | |
| <+>/<-> | Increase/decrease movement speed. | |
| <?> | Display mouse/keyboard help summary. | |
You can control the keyboard navigation speed with key-ins as follows:
where value is a number that is interpreted as MPH (English) or KPH (metric) depending on the model's units. If no value is supplied then a default value of 3 MPH is used.
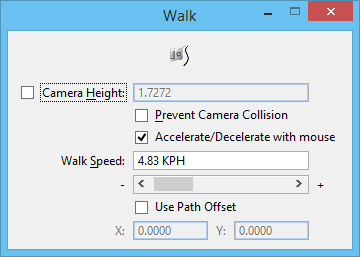
| Setting | Description |
|---|---|
| Select Element on which to Lock Camera Motion icon | It lets you select the element on which to lock the camera path as you walk through the view. When you select the path, the camera will be placed on the element and oriented so that the camera is looking along the path element. |
| Camera Height | If on, lets you type a value to set the height of the camera above the geometry in the model. When this setting is enabled, the camera will move forward/backward at a constant height above the geometry, rather than maintaining a fixed Z-position. This setting is useful for simulating walking up or down stairs, ramps, or slopes. |
| Prevent Camera Collision | If on, camera detects collision with elements in its way and stops further movement. This setting prevents you from walking through walls or other objects. |
| Accelerate/Decelerate with mouse | If on, the speed will be scaled based on the distance of the current cursor position to the anchor position of the cursor. If off, the speed is not scaled and the speed value is based on the mode used. |
| Walk Speed | Sets the Walk speed from 0 to 100 miles/kilometers per hour. |
| Use Path Offset | If on, lets you set the x and y axes offset values for the camera path. |
