| Select Block Exchange XML
|

Opens the Select Block Exchange
File dialog from where you can select the browse to a Block Exchange file or
provide a URL of the file.
|
| Browse Reality Mesh Images
|

Starts the
Browse Photo tool. With this tool, moving
the cursor over a photo origin will display the camera frustum in the view
window. Clicking on an origin point will also select the photo in the list box.
To open the photo viewer for a particular
photograph, place the cursor over a camera origin point and press
<Ctrl+data point>. The photo will be downloaded and the viewer will
open. You can also double-click the photo name in the list box to open the
photograph in the photo viewer.
|
| Frustum Display Control
|

Toggles the display of a small frustum in addition to the photo
origin point.
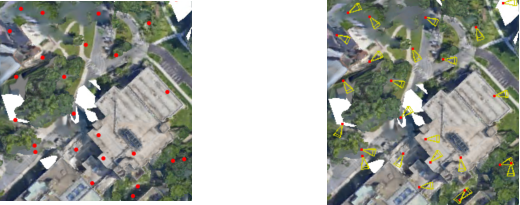
Left:
Frustum Display Control off, Right: Frustum Display Control on
|
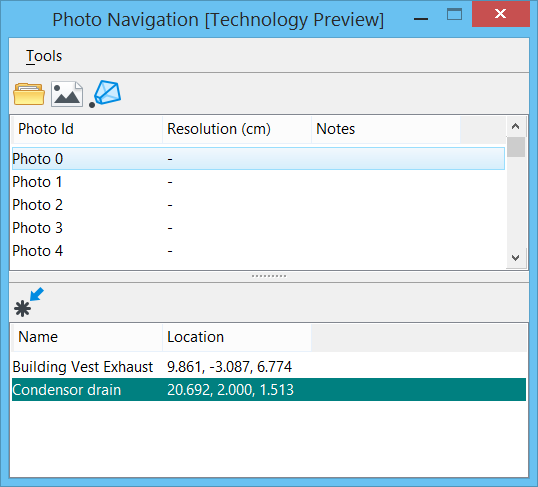
| Photo ID List Box
|
Lists the photographic images used to create the
images. The list box contains the following columns:
- Photo Id - Lists the
name of the photo file.
- Resolution -
Displays the smallest sized object that can be seen in the photo (pixel size in
centimeters). The value in this column is populated after you define an
Interest Point.
- Notes - Displays
notes, if any, added to the photo file.
|
| Tools > Select Block Exchange File
|
Opens the Select Block Exchange File dialog from
where you can select the browse to a Block Exchange file or provide a URL of
the file.
|
| Tools > Browse
|
Starts the
Browse Photo tool. With this tool, moving
the cursor over a photo origin will display the camera frustum in the view
window. Clicking on an origin point will also select the photo in the list box.
To open the photo viewer for a particular
photograph, place the cursor over a camera origin point and press
<Ctrl+data point>. The photo will be downloaded and the viewer will
open. You can also double-click the photo name in the list box to open the
photograph in the photo viewer.
|
| Tools > Interest Point > Create
|
Used to create an interest point in the field of
view. Once created, the interest point will display as a yellow point.
After an interest point is defined, the
Resolution column will display the
smallest sized object that can be seen in the photo (pixel size in
centimeters).
When an Interest Point has been defined, the Photo
Viewer dialog can be configured to show the region of the photo that contains
the Interest Point. To enable this feature, right-click within the photo to
open the context menu and select Mark Interest Points.
|
| Tools > Interest Point > Clear
|
Removes the interest point.
|
| Tools > Interest Point > Calculate Visibility
|
When an interest point is defined, the photo list
will be filtered to only include those photographs which have that particular
point in their field of view. However, this does not account for the
possibility that the point is obscured in certain photographs by other
geometry. When you select this option, visibility calculation is performed to
remove obscured photos from the list
|
| Tools > Cache Settings
|
TBD
|
| Photo ID Right-click menu
|
Right-clicking a photograph in the list box opens a
pop-up menu with following options:
- Open - Downloads and
opens the file in the photo viewer.
- Flash - Shows the
camera frustum of the selected photo in the view window. This also starts the
Browse Photo tool.
- Orient View -
Orients the selected view to match the camera position for the selected photo.
- Notes - Selecting
Open Note opens the Add Image Note
dialog in which you can add a text note to be associated to the selected photo.
Selecting
Copy to Clipboard, copies a summary of
the note to the Windows clipboard for inclusion in a separate document.
- Properties -
Provides basic information about the photo.
|
| Create Interest Point
|

Allows you to create multiple,
named interest points that will be persisted in the DGN file. If the DGN file
is published to an i-model, the interest point information will be transferred
to the i-model.
|
| Interest Point List Box
|
The list box contains the following columns:
- Name - displays the
name of the interest point.
- Location - Displays
the coordinates of the interest point.
|
| Interest Point Right-click menu
|
Right-clicking an interest point in the list box,
opens a pop-up menu with following options:
- Activate - Makes the
selected interest point visible in the view(s). Filter the photo list and
origin points to only show photos that contain the interest point within their
field of view.
- Deactivate - Hides
the active interest point and shows all photos.
- Rename - Allows you
to change the name of the interest point.
- Delete - Removes the
interest point. You can undo this operation.
- Zoom - Activates and
centers the selected interest point in the last active view. The view will be
zoomed such that there is a margin of about 10 meters around the interest
point.
- Calculate visibility
- Runs the Visibility Calculator to determine occlusion information for the
selected interest point. You can use this information to filter the photo list.
|
 Used to navigate through the
photographic images that were used to create the mesh.
Used to navigate through the
photographic images that were used to create the mesh.