Assigning Detail Styles
Partial views and thus details can be created from every component part with a style. These different sortings help you to link the correct parts with the necessary style in a rapid way.
You can only detail parts having a detail style. Which details you get can already be determined here.
Associate a Style
In the list, select the parts and then use drag&drop to pull them onto the detail style – and you are finished! You can also select the parts and use the context menu to select the option Link with Detail Style.
If you want to pick the parts directly from the model, you have to select a detail style first. Then, you call the entry Pick Parts to be Linked in the Model in the context menu, followed by picking the parts in the model (or you select them by a window). However, you can assign only single parts with this method.
Recursive Association
If a single part has a detail style, this part is detailed with this style in the form of a single part detail. If, however, a construction group has a detail style, this style becomes the detail style for the entire construction group detailing.
If you want to generate only group details, the associated single parts do not really require their own detail style because the group style also applies to the parts within that group.
Use the recursive or non-recursive association to assign styles to the parts you want to detail. If you selected the recursive association (the 'Recursive Processing’ button is pressed) and you assign a style to a group, this style also applies to the single parts of that group. If in this case you pull the entire model onto the detail style via drag&drop, all groups and all single parts are assigned the same style.
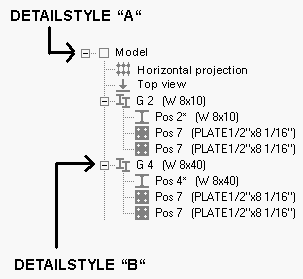
If you assign style "A" to the model and 'Recursive' is activated, every entry is linked with this style. If 'Recursive' is deactivated, only the entries Outline, Complete Plan View, BG 100 and BG 101 are linked with this style, because they are located hierarchically immediately underneath the model. Since the model itself is only a sorting entry, it passes the association along to its subordinate entries.
If you assign style "B" to the BG 101 and 'Recursive' is activated, every single part of this group is linked with this style as well. If 'Recursive' is deactivated, only this construction group is assigned style "B".
Separate Detail Styles
Select the parts in the list and then use drag&drop to pull them towards the top and away from the DetailCenter – and you are finished! You can also select the parts and use the context menu to select the option Separate from Detail Style.
Remember that parts without a detail style cannot be processed unless the parts belong to a group and you want to detail only the group views.
Write-Protection
Use the Set Write-Protection command in the context menu to write-protect certain entries. The entries are highlighted and cannot be overwritten with a new style or separated from a style. You have to remove the write-protection before change or delete the style of such an entry.
Hide Parts
You can temporarily remove undesired parts from the component parts list to get a better survey. To do this, select the corresponding parts and then activate the menu point Hide Entry in the context menu.
Visibility only refers to the component parts list. Don’t mix up this function with the visibility classes in the 3D-model, which really hide the parts visually and thus switch to permanently invisible parts.
When the DetailCenter is started anew or when you use the command Update, all hidden entries will be visible again.