PlantWise Help

Boundary Editor

You can move boundary components in two ways:
  1. by using the Move tool icon in the Plant Toolbox, or
  2. define exact placement of the component in the Boundary Editor.

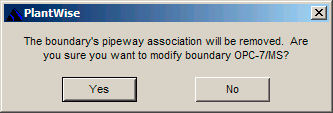
If you manually place, or re-locate, a pipeway boundary component, it is no longer considered to be “on” the pipeway. If the boundary is still in the routing space of the pipeway, this can produce awkward routing. Because of this, you will be prompted with the message on the left to confirm the change.

The router will then treat the boundary component in the same manner as a nozzle.

The Boundary Editor can be opened from the PlantWise > Plant > Boundary menu selection.

Boundary Editor Properties tab.

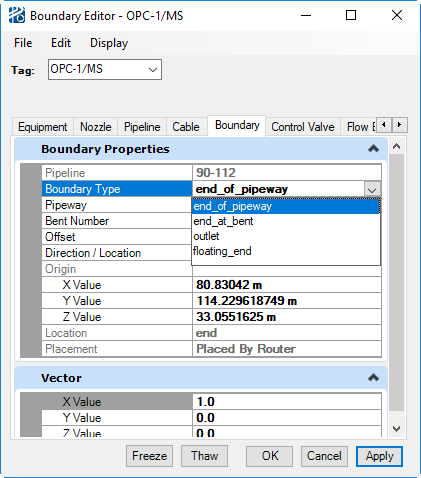
At the top of the Boundary Editor is the Boundary selection drop down, the name of the pipeline the boundary is connected to, and the placement method.

There are three ways a boundary can be placed:
  1. Placed By Router – indicates that the router placed the boundary based on the boundary’s properties as well as those of the pipeline.
  2. Placed by User – indicates that you have either dragged the boundary component or entered and Accepted a location in the editor.
  3. Frozen By Pipeline/Cable – means that you have frozen the pipeline or cable and, thus, the connected boundary as well..

Boundary Editor Location tab and Vector Direction selected.

From the Boundary Editor, you can change the boundary’s properties or location.

SettingDescription
Boundary Properties Boundary properties are those set in the Boundary List:
  • Type,
  • Pipeway, and
  • Location.
If the boundary is placed, changing any of these values will cause the attached pipeline to unroute.

If you have set boundary placement, either directly or by manipulating the pipeline, the contents of the Properties tab are disabled.

Boundary Location

You can relocate a boundary’s position by entering the desired coordinates for the center of the boundary and/or direction from the Location tab of the Boundary Editor.

Direction options are:
  • North,
  • South,
  • East,
  • West,
  • Up,
  • Down, and
  • Vector,
If Vector is selected, then a new Vector container opens so that you can define unit rotation around the X-, Y-, and Z-axes to define the angle of the boundary.
Freeze Implements new location values.
Thaw Removes user placement.

Menus

The File menu allows you to:
  • save the model (Save Model),
  • save the model under another name (Save Model As), and
  • exit the dialog (Close).
The Edit menu allows you to:
  • Update Dialog – show current placement values after the boundary’s connected pipeline is re-routed.
  • Rename Boundary – rename a boundary.
  • Delete the boundary.
  • Open the Pipeline/Cable Editor.
  • Open the Connectivity Editor.
  • Open the Boundary List.
  • Open the Exception List.
The Display menu allows you to:
  • Zoom To the selected boundary;
  • Highlight the selected boundary;
  • UnHighlight the selected boundary.