To Aggregate Data Using Fuzzy Match
Often when merging
data from other sources into the digital twin, there are acquired tags and
classes that do not match up exactly to any project tags or classes in the
digital twin. This could be due to different naming schemes, outdated
information, or other reasons.
PlantSight's Data Aggregation
feature allows you to use a Fuzzy Match process to examine the data and either
apply a user-determined confidence level, or let you define rules that find or
create similarities in the datasets.
Follow these steps to aggregate data using the Fuzzy Match process.
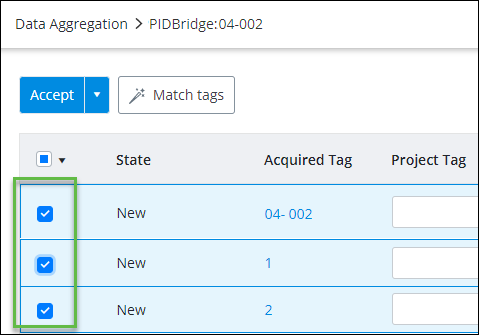
- From the Data Aggregation grid, select the tag rows that you want to match. For example,
-
Click
Match tags (
 ).
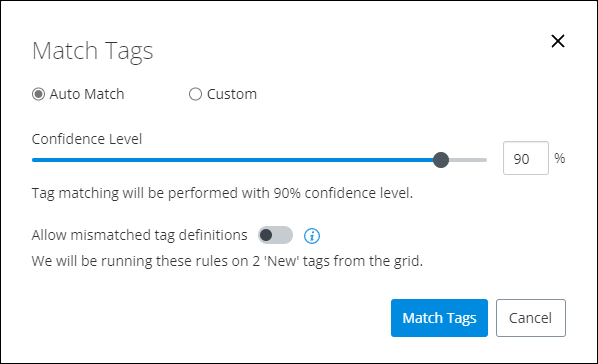
The
Match Tags dialog appears. For example,
).
The
Match Tags dialog appears. For example,
-
Select one of the following:
Auto Match: Allows you to automate matching up tags that are not an exact match by using a string search. The confidence level determines how closely the tags must match in order to be accepted.
or
Custom: Allows you to create rules based on regular expressions that manipulate a tag so that it is accepted.
-
If you selected
Auto Match in
Step 3,
- Accept or adjust the confidence level using the slide control.
- If you want to allow tag definitions that do not match, enable Allow mismatched tag definitions.
- Click Match Tags. A dialog displays how many selected items are successful matches based on the confidence level. There are entries in the Existing Tag column and the Existing Class column for each of the selected and matched items.
- Click Publish. A summary of the number of accepted and rejected tags appears.
- Enter a Description in the box.
- To publish the changes to the digital twin, click Publish. A progress bar appears.
-
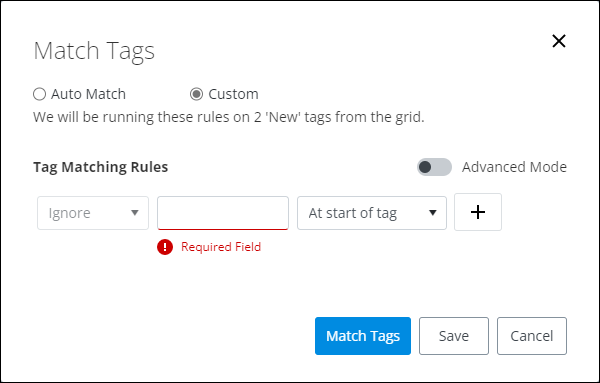
If you selected
Custom in
Step 3, the Match Tags dialog changes. For
example, you can create a basic rule by doing the following:
- If no rules exist, click Create New Rule. The Match Tags dialog changes. For example,
- Enter the field for which you want to apply the rule (required).
- To create a basic rule, select the parameter for which the rule applies, from the list. For example, you can select that you want to Ignore a specific prefix that exists on tags in the acquired data, otherwise go to Step 6 to create an advanced rule.
- Select the location that this string content would appear.
- Repeat Steps 5 (b) to 5 (d) for each Tag Matching Rule that you want to create.
- Click Match Tags.
-
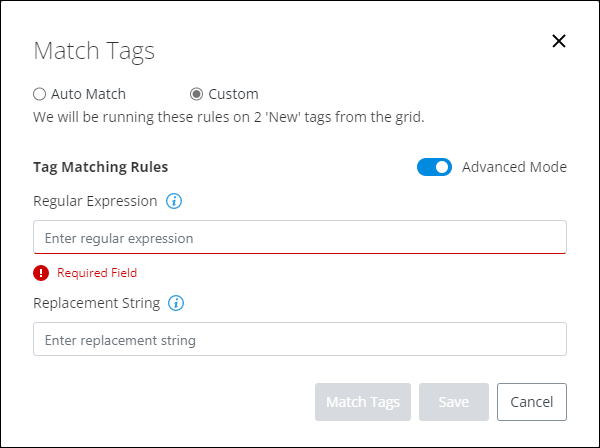
If you selected
Custom in
Step 2, you can create an advanced rule by
doing the following:
- Click Create New Rule.
- Click to enable Advanced Mode. The Match Tags dialog changes, for example,
- Enter the Regular Expression (also referred to as Regex), that is used to either locate a specific substring in a tag name, or segment the tag name.
- If you want to replace instances of the Regular Expression with alternate text, enter a Replacement String. For more information about defining a replacement string, see Using Replacement Strings.
- When you are finished, click Match Tags.
- Repeat Steps 6 (a) to 6 (d) for each custom rule that you want to create.
- When you are finished, publish the data to the digital twin.