To Add Product Groups and Dialogs to Panduit Database
- Create the new part tables in the Panduit.mdb database.
- Create a query to link the new table to the main OpenUtilities Substation parts database
-
Enter a record for the new dialog in the Button table. You can do
this either directly in MS-Access or by using the Button Table Editor.

- Select a Button Name from the drop down list.
- Enter a Dialog Title in the field.
- Place a check box in the Show field to make the button appear in the dialog.
- Click Apply and Exit the dialog.
- Open the Index Table Editor.
-
Enter all of the fields from the query just entered in the
Button table into the
Index table. You can do this either
directly in MS-Access or by using the
Index Table Editor.
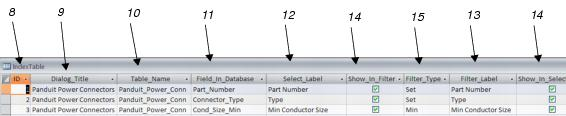
- Enter a unique number ID for the field to be displayed in the dialog.
- Enter the same dialog title used in the Button table.
- Enter the name of the table that the data is coming from.
- Enter the field name from the database or query listed in the button table.
- Enter a column heading for the field in the select (lower) portion of the parts dialog.
- Enter a label for the Filter field in the filter (upper) portion of the parts dialog.
- Turn on the fields that are to be displayed as Show_In_Filter and Show_In_Select columns.
-
Enter the type of filter to use:
- Text - allow the user to enter any text and return records that contain that text.
- Max - Return all records that have values under the user-entered number.
- Min - Return all records over the user-entered number.
- Set - Display all possible entries in a list and return the records that match the user's selection.
- CSV - Allow the files to contain comma-separated values. The values are displayed separately in a list and all records containing the selected value are returned.
- URL - A hyperlink is used in the column ( Show In Filter should be set to on).