The Lookup Table Editor,
available as a toolbar selection, displays the dialog shown below. The
OpenPlant Specification Generatorrefers to its
lookup tables when displaying selection lists. Since some record fields can
only be filled with pre-defined types of information (or with a set of
preferred inputs), the program presents these options to the user inside a
list. When the user places the cursor inside a cell for editing, a selection
list is displayed if there is one available. The user may then select an option
from the list to populate the field with that value. The codes which get
transferred into a field, along with the description that appears in the
selection list, can be modified by the user from the Lookup Editor. You can
also select which fields display selection lists.
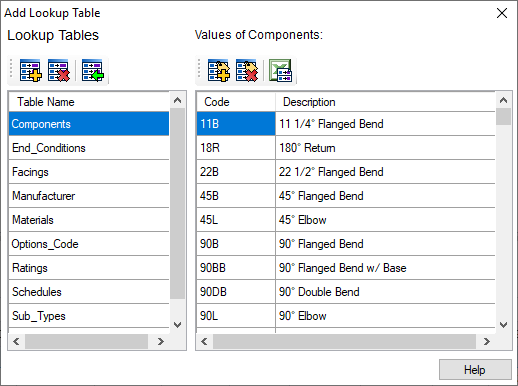
The Lookup Table Editor allows you to define new, or edit
existing, lookup tables which can later be used in the customization of
existing user fields. Specgen is shipped with some default lookup tables which
can be modified as per requirement. The lookup tables are stored separately at
%Local_Install%\\OpenPlant CONNECT
Edition\Configuration\Workspaces\WorkSpace\WorkSets\OpenPlantImperial\Standards\SpecGen\Mappings.
Lookup
Tables
The left pane in the dialog lists the available lookup
tables in database. There are three options which apply to the Lookup Tables
pane:
Note: You are able to
add/remove tables but cannot modify the name of an existing one.
Add Lookup Table

|
This option adds a new entry at the bottom of
the list which user can edit to give a unique name to the table. If the name is
a duplicate of an existing table, a message box displays prompting you to enter
a different name for the table.
|
Delete Lookup Table

|
This option deletes the selected table from
the database. A message box displays prompting you to confirm the deletion
before the process is completed.
Note: Any custom
changes that may have been made to the lookup table will be lost upon deletion.
|
Import Lookup Table

|
This option will first prompt you with a file
selection dialog to select a spec database file from which to import the lookup
table(s) from. Select the database file to open and t he following dialog
displays:
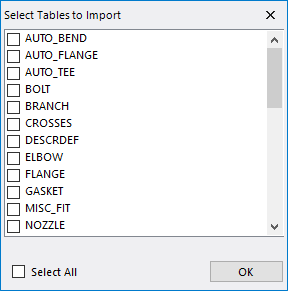
Select the tables you want to import, and click
OK to import the tables. The tables are added to the Table Name list.
Note: To
import all of the tables, enable the Select All option.
|
Values of
Components
The right pane of the editor allows you to add, remove or
edit values for the selected lookup table.
Add Lookup Value

|
Clicking this option would add a new entry at
the bottom of the list which user can edit to give a unique Code and
Description for the new value. If the name conflicts with existing tables, user
will be promoted with a message box to change it to a unique name.
|
Delete Lookup Value

|
Clicking this option would delete the selected
lookup value without asking for confirmation. The changes cannot be undone and
the value would be permanently deleted from database table.
|
Paste Excel Data

|
Using this option user can copy Code and
Description values from an excel sheet and paste them as the values of selected
table. The copied data in valid, it will create new values at the bottom of the
list.
The Copied data should adhere to the format
(nx2) i.e. 2 columns and any number of rows. The values in the first column
should be unique as they will be pasted as the Code of the Value and second
column as the description.
If the copied selection contains duplicate
values for codes, or codes already defined in the table, then a message box
displays alerting you to this and the process is aborted.
|
|
Editing Existing Values
|
You can edit any Code/Description by double
clicking on it and entering a new value.
Note: Remember
the Code value must be unique.
|