Branch Editor
 The
Branch Editor command displays the dialog shown
below.
The
Branch Editor command displays the dialog shown
below.
A spec branch table populates the specs's AUTO_TEE table used by the AutoFit function in OpenPlant Modeler. AutoFit helps automate the task of placing fittings while routing components by determining what type of fitting matches the intersection then placing the correct branching component. The Branch table is used to select which tees, olets, etc. are automatically inserted.
How the Branch Table is Used
When placing a piping component in OpenPlant Modeler, the Component Placement dialog has an AutoFitting tab, which allows you to set Branch Options defining how the Branch Table is to be used when using the AutoFitting method of placing components.
- Use Branch table: With this option enabled, whenever there is a branching connection in Modeler, the component defined in Branch table will be inserted automatically. If multiple components are defined in branch table, component with its priority set will be inserted.
- Show spec Selection Grid: This option will only be considered by Modeler if multiple components are selected in branch table. Then a Spec Record Selection is displayed allowing you to select a component from the list.
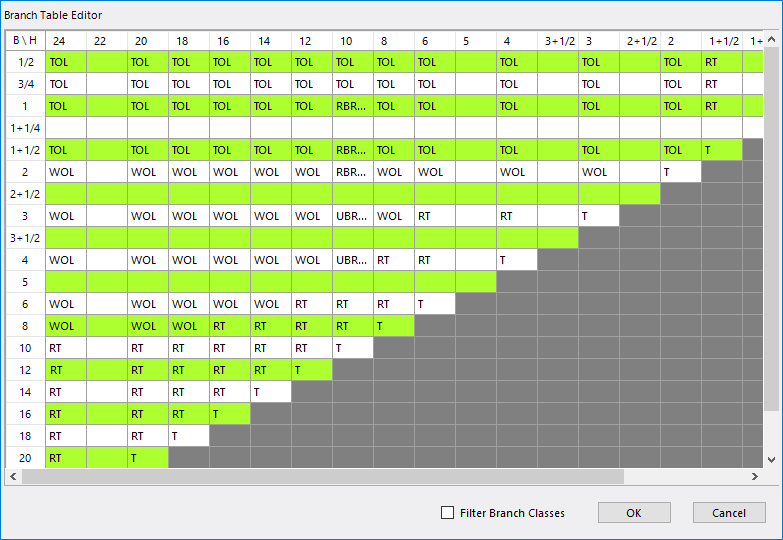
Branch Table Interface
The sizes shown in the branch table are derived from the pipe sizes that have been defined in the spec. Each cell in the Branch Table grid contains a drop down list to enable the user to select which type of component to use for that combination of pipe sizes. The contents of the drop down is not a class name, but a Branch Code that represents one or more classes. The list of codes available in the drop down is filtered by the valid components for that size in the current spec. For example, if there are no reducing tees in a spec for a given size, they will not be available in the pull down.
The Branch Codes displayed in the Branch Table are edited with the Branch Code Editor. This is accessed by selecting Tools > Branch Code Editor.
When you finish defining the settings in the Branch Table press OK.
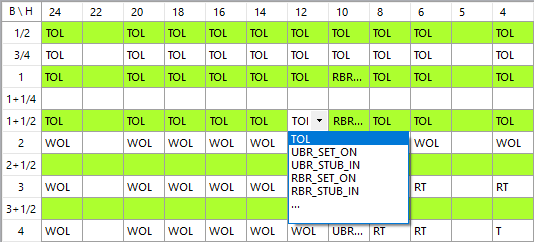
Select a Component for Branch Connection
To define a Branch Code for a particular branch size, click in the size grid and select the branch code from the list as shown below:
Define Multiple Branch Codes
To select multiple branch codes for a branch size, select the '...' option from the list to display the following drop down dialog.
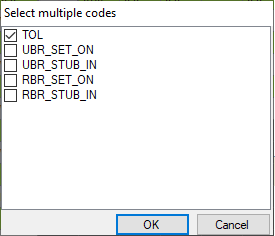
Enable the checkbox next to the branch codes to include for the size and click OK.
Set Priority Component for a Branch Size
A priority component is the default component placed when multiple branch codes are assigned to a common branch size.
To set the priority component, right-click in the grid and select a component from the list to set as the priority component.
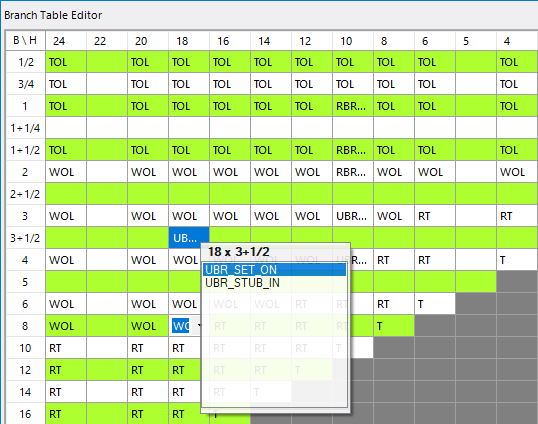
Once a component has been selected, click outside of the list box to save the change.
To clear a selection, double-click on the selected component.
Filter Branch Class
The Filter Branch Classes option allows you to limit the branch classes in the spec to the ones selected in the branch table.
For example, if the user selects multiple branch classes for Tees, Laterals and Reducing Tees in the spec section, but only selects Tees is the branch table, the Laterals and Reducing Tees will be ignored for the spec, preview, count and in the final spec.
To reset this, you will need to re-open the branch table and disable the Filter Branch Classes option.