Click this option to insert trench fittings, such as
tees, elbows, crosses etc. into an existing trench run.
When you click the icon, you are prompted to select the
trench component to insert the fitting into. Once you have selected the
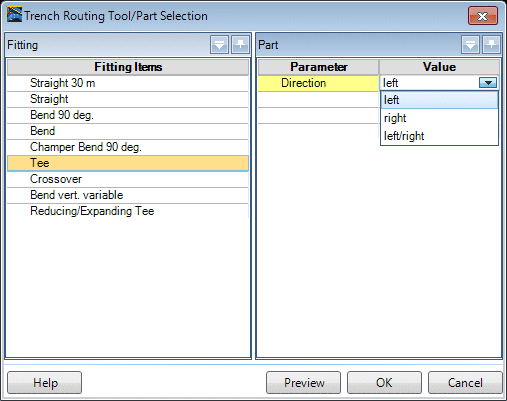
component, the following dialog displays:
Once you have determined which part to place and defined
the parameters for it, click OK to continue with the placement procedure. The
part will be affixed to the cursor and allows you to slide the part along the
trench to the correct placement point. Left click to complete the placement.
| Setting | Description |
|---|
| Fitting
|
Select the fitting from the list. As you select a
fitting, the parameters for that fitting which can be defined are listed in the
Part section beside it.
|
| Part
|
In the Part section, you can define certain
parameters for the part. Each part has its own parameters which can be defined.
Parameter values can be defined using one of the following methods depending on
what type of value is needed.
- Enter a value
directly into the field.
- Select a value from
a drop down list.
- Use the incremental
arrow buttons to change the value in the field.
|
| Preview
|
Provides a preview of how the part is displayed in
the drawing.
|
| OK
|
Saves the changes and returns to the drawing area to
continue with the part placement.
|
| Cancel
|
Closes the dialog without saving the changes.
|
Key-in:
RCMTRENCHINSERTPART