Adding Columns
To add columns to your model:
-
Select
 (Add
Column).
The
Columns dialog opens to the Shapes tab.
(Add
Column).
The
Columns dialog opens to the Shapes tab.
-
Select
Shape type; either
- Parametric Shapes —(Rectangle or Circle)
- or
- User Shapes.
-
Select
Shape class; either
- Rectangle or Circle —(Parametric Shapes)
- or
- "Custom" User Shape —(User Shapes).
-
Set the shape dimensions:
- Width and Depth —(Rectangle)
- or
- Diameter —(Circle).
- Complete the Options group of the Shapes tab to set the Assignments for your column (refer to Working With Assignments).
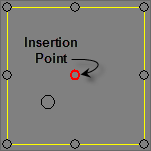
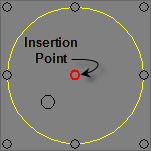
- Select the insertion point by clicking the appropriate circle in the cross-section diagram (select point will turn red).
- Either:
- (Optional) Enter a dimension for Setdown depth, the distance from the concrete edge.
- For additional options (Height, Start Offset, End Offsets & etc..), select the Options Tab.
-
Place your
shape (beams or columns) around the work
frame using one of the following methods.
 Insert Concrete Shape by a Line – Click on a
line to place the
shape along the line. Length is determined
by the line; you do not need to enter a length dimension.
Insert Concrete Shape by a Line – Click on a
line to place the
shape along the line. Length is determined
by the line; you do not need to enter a length dimension.
or
 Insert Concrete Shape by 2 Points – Click
beginning and ending points to place the
shape to the length you choose. Length is
determined by the points you select; you do not need to enter a length
dimension. This method is commonly used to place beams and columns by clicking
on grid line intersections.
Insert Concrete Shape by 2 Points – Click
beginning and ending points to place the
shape to the length you choose. Length is
determined by the points you select; you do not need to enter a length
dimension. This method is commonly used to place beams and columns by clicking
on grid line intersections.
or
 Insert Concrete Shape by 3 Points – Click
beginning and ending points to place the
shape to the length you choose. Length is
determined by the points you select; you do not need to enter a length
dimension. The third point determines the shape rotation.
Insert Concrete Shape by 3 Points – Click
beginning and ending points to place the
shape to the length you choose. Length is
determined by the points you select; you do not need to enter a length
dimension. The third point determines the shape rotation.
or
 Insert Concrete Shape on Multiple Lines –
Click on a line to place the
shape along the line. Length is
determined by the line; you do not need to enter a length dimension.
Insert Concrete Shape on Multiple Lines –
Click on a line to place the
shape along the line. Length is
determined by the line; you do not need to enter a length dimension.
or
 Insert Column at selected Points – After
selecting command, it opens and
Options dialog, specify the Start and End Heights.
Select your insertion method. Follow command prompts for selected insertion
method.
Insert Column at selected Points – After
selecting command, it opens and
Options dialog, specify the Start and End Heights.
Select your insertion method. Follow command prompts for selected insertion
method.
-
Click
 to apply settings and
close the dialog.
to apply settings and
close the dialog.