The administration tools are delivered within the
AdvisoryLocks.dgnlib file. Copy this file to the dgnlib folder found inside the
project folder in the shared Workspace project folder:

After copying this file to the correct folder, when you open OpenComms,
the following Admin Tools toolbar should load:

Note: The OpenComms Admin password will need to be entered to use any of
these tools.

EnterAdmin Mode
|
Use this tool to enter the Admin mode. This mode requires a
password setup by the OpenComms administrator. Once this mode is entered, the
place/edit/delete advisory boundary tools are available.
Note: Edits/deletes require locking of the boundary features
and the ‘EnterAdmin’ mode should be enabled before attempting to lock. (See
caption 1 below.)
|

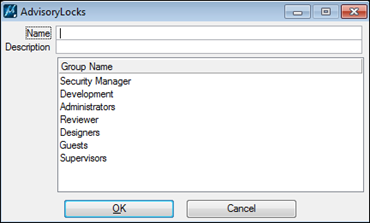
Place AdvisoryLocks Boundary
|
Use this tool to create a new boundary. After
the boundary points are defined, a dialog will appear to name the boundary and
to define theWorkFlowManagerComms ‘groups’ authorized to place/edit within its
perimeter. (See caption 2 below.)
|

Edit AdvisoryLocks Boundary
|
Use this tool to edit theWorkFlowManager
‘groups’ authorized for the boundary. The boundary must be locked before this
tool will allow its selection.
Use standard MicroStation tools to edit the boundaries
vertices.
|

Delete AdvisoryLocks Boundary
|
Use this tool to delete the boundary. The
boundary must be locked before this tool will allow its selection.
|
Caption 1

Caption 2