Add User Defined Boundary
- After Logging into CPVExtract, click Add/Edit to open the Edit Tasks dialog.
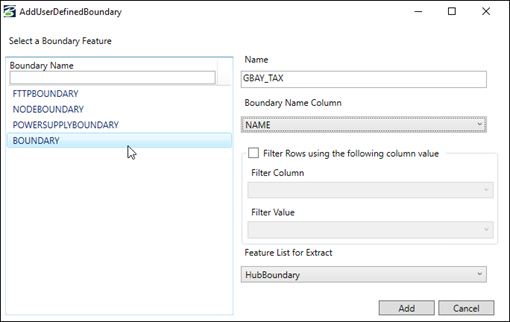
- Select the Add User Defined
Boundary on the Define Task dialog to display the AddUserDefinedBoundary
dialog:
This dialog displays any boundary tables that have been created in the database.
- Select and highlight one of the Boundary tables to use for the user defined boundary.
- Enter the Name of the Boundary type definition. (GBAY_TAX for this example.)
- Click the dropdown arrow on the Boundary Name Column to select the appropriate table column which will display the ‘Boundary Name’.
- Use the filter column name and value to limit the display of boundary instances displayed when this boundary definition is selected in the Define Task dialog. (Not used with the Command Line.)
- Use the Feature List for Extract (required) dropdown to activate the appropriate FeatureList to be used for the boundary.
- Click Add to create the new
Boundary definition—click the dropdown for Boundaries to view the new Boundary
type definition:
The new user defined boundary definition can be used for Command Line Extracts for any user defined boundaries.