A Simple Example of Using AccuDraw
To help you understand what AccuDraw does, the following is a description of a simple design session using AccuDraw and the Place SmartLine tool. The task presented is the creation of a simple bracket. If a 3D file is used, the Top view is assumed in the exercise.

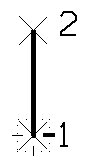
With AccuDraw activated (Toggle AccuDraw tool in ), select the Place SmartLine tool ( split button). When you enter your first data point for the lower left corner of the bracket, AccuDraw displays a square or circular shaped "compass."

Next, you need to draw the left edge of the bracket. As you move the dynamic line around the view window nothing interesting happens until you get close to one of the axes of the AccuDraw compass. In this case, because you want a vertical edge, you should move the line close to the Y axis. When AccuDraw senses the axis, the line snaps or indexes to it. While the axis is highlighted you can key in a number for the vertical distance, in this case, 2 inches. Don't worry about telling AccuDraw the direction, it has already figured that out and also has placed the input focus (where the key-in data will appear) in the correct field, in this case the Y field. After keying in the distance value, entering a data point results in what you would expect, a line segment oriented along the vertical axis and exactly two inches long.
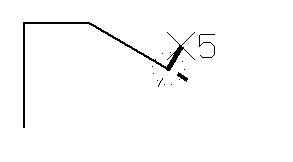
At this point the AccuDraw compass moves to the end point of the line you just placed. Moving the dynamic line segment around, it acts as before. This time you need to place the line with a fixed length of 1.25 inches in the horizontal direction. You do this by moving the dynamic line so that it snaps onto the positive horizontal axis, key in 1.25, and enter a data point.

The next part of the bracket involves going off at a 30 degree angle for a given distance. Pressing the Space bar changes the AccuDraw compass to its polar mode (indicated by a circular compass), which lets you enter an angle and a distance. Entering 30 degrees in the Angle field and 1.75 inches in the Distance field locks the line in the right direction. A data point accepts the new location.

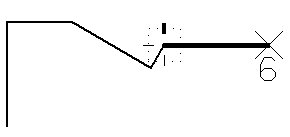
Note how the compass orients along the 30 degree line. This illustrates AccuDraw's context sensitivity. AccuDraw provides a method for associating coordinate information with respect to existing elements. To place the half inch line at a right angle to the 30 degree line only requires indexing to the appropriate axis, keying-in 0.5 and entering a data point to accept.
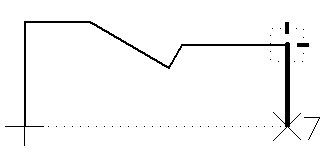
With the bracket's notch complete, all that remains is the completion of the bracket's right edge. Currently, however, the compass still is rotated to the 60 degree angle of the notch and not the horizontal direction you need. To override the context nature of AccuDraw you press <T> to orient the compass to the Top view (the default). Pressing the Space bar brings up the rectangular compass. Indexing, again, to the X axis and keying in 2 inches followed by a data point locks the final known dimension of the bracket.
To "close out" the bracket's bottom edge, you use the smart axis locking feature of AccuDraw. Moving the pointer down the Y axis you press <Enter> for the smart lock feature. Recognizing that you are indexed along the Y axis, AccuDraw locks the Y direction but allows you to move up and down this axis. A tentative point on the beginning point of the bracket (the Place SmartLine tool allows you to snap to an element under construction) followed by a data point locates the lower right corner of the bracket. A final tentative point and data point on the origin of the bracket completes the job.


An isometric depiction of the bracket construction shows the orientation of the AccuDraw compass upon the entry of each data point.
The preceding was a very simple example of AccuDraw in action. There is much more to this drafting aid. AccuDraw has been designed with ease of use and a certain intuitive feel to it. As with any drafting aid, you need to try it out first. As you get the hang of it, the various options begin to make sense.
In the following sections, the user interface features of AccuDraw are presented followed by the settings and directives that control its operations.