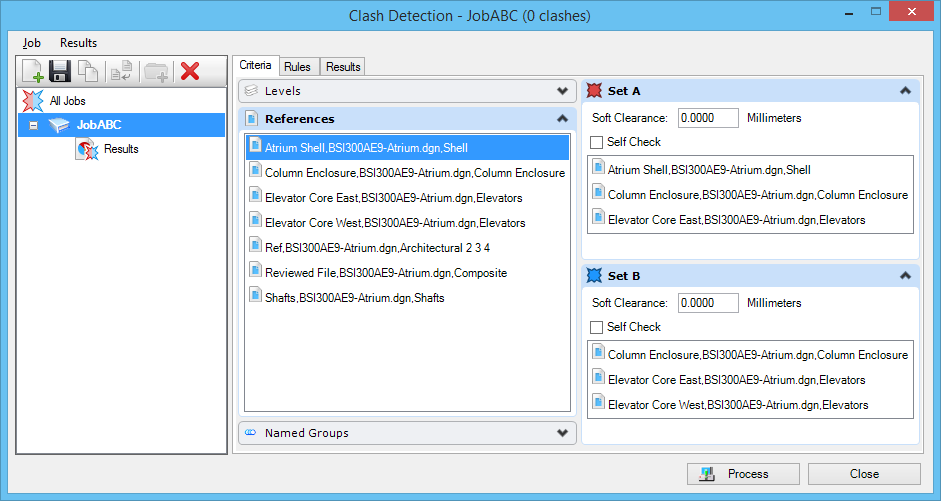
Clash Detection Dialog
 Allows you to
identify sets of elements to be used for the detection of physical clashes and
clearance problems between the elements. Also used to review, track, manage,
group and save clashes. All jobs that you create are stored in the active
file along with the results of the clash detection operation. You can also
store the job in a DGNLib.
Allows you to
identify sets of elements to be used for the detection of physical clashes and
clearance problems between the elements. Also used to review, track, manage,
group and save clashes. All jobs that you create are stored in the active
file along with the results of the clash detection operation. You can also
store the job in a DGNLib.
| Setting | Description | ||||||||
|---|---|---|---|---|---|---|---|---|---|
| Create a New Job |
Adds a new entry to the job list with the default name,
Untitled Job. Untitled Job is highlighted and ready to be renamed.
|
||||||||
| Save the Selected Job to Disk |
Saves the job setup for future use. The job is saved in the
active local file.
|
||||||||
| Duplicate the Selected Job |
Copies the selected job. When you click the icon, a new
entry is added, ready for a name change.
|
||||||||
| Update the Selected Job from the Library |
Synchronizes the local job to match the one in the DGN
library.
|
||||||||
| Create a New Group | Creates a new group to which you can add clashes. When you click the icon, a new entry is added, ready for a name change. | ||||||||
| Delete |
Deletes your selection from the All Jobs list box. Deletes
the selected job, the results, or a selected group. If a group with results is
selected for deletion, all the clash results in that group, move to the parent
directory. This icon is not available if the selected job is a library job.
|
||||||||
| All Jobs List Box | Lists the jobs created for clash detection. Once you
run a clash detection job, a Results directory displays in the list box under
the job name. Pause the pointer over the Results entry to see if the clash
detection is successful, the number of clashes detected, and when the clash
detection was last run. If any clash groups are created, they also display
under the results of that job.
Jobs can be local or from a library or a job whose local and library copies match. You can save and then modify local copies of the jobs. Once a job is copied locally, it is not automatically synchronized with the library job. It can, however, be manually synchronized.
Right-clicking the Jobs list box opens a menu with options identical to the items on the Job menu. |
||||||||
| Same as clicking the New Job icon. | |||||||||
| Same as clicking the Save Job icon. | |||||||||
| Same as clicking the Duplicate Job icon. | |||||||||
| Allows you to rename the job.
|
|||||||||
| Deletes the job. | |||||||||
| Same as clicking the Update From Library icon. | |||||||||
| Same as clicking the Process button. | |||||||||
| If on, highlights the elements in the color (red or
blue) set on the Criteria tab for Set A and Set B.
|
|||||||||
| Opens the Advanced Settings dialog, which includes settings for touching tolerance, element clearance, and clash discovery limit. | |||||||||
| Closes the Clash Detection dialog. | |||||||||
| Deletes all the clash information from the Results
tab.
|
|||||||||
| Exports the clash results to an Excel spreadsheet,
including groups of clashes.
|
|||||||||
| Opens the Export GPS File dialog, which allows you
to export the clash location(s) to a GPS system. To allow this export, you
first need to define a
Geographic Coordinate
System.
Controls on
this dialog are analogous to those on the
Save As dialog.
|
|||||||||
| Opens the Clash Display Settings dialog, which allows you to set color, transparency, highlight and zoom values for clashes. | |||||||||
| Criteria tab | Used to select levels, references, or named groups to be included in the clash detection job. | ||||||||
| Rules tab | Used to turn on or off and manipulate suppression rules for the clash detection. | ||||||||
| Results tab | Displays the details of each clash as well as the properties of the clashing elements. | ||||||||
| Process | Click Process to begin the clash detection. A Clash
Detection Progress bar opens, informing you of the number of clashes found.
After the initial opening of the Clash Detection dialog and creating and processing a job, you can use the key-in CLASHDETECTION PROCESS <job name> to process a clash detection job and save the results without opening the Clash Detection dialog. |
||||||||
| Close | Closes the Clash Detection dialog. If you close the
dialog without saving the job, you will lose all changes.
|


