Notch
Used to insert simple geometrical shapes of notches and countersunk parts into your shapes.
Accessed from:
You can create square, wedge-type, and circular notches. The dimensions are entered in the Notch dialog. After selecting the part and the insertion point on the part, the Notch dialog opens. Select the desired basic forms by selecting the corresponding dialog tabs.
Dialog Controls
| Setting | Description |
|---|---|
 OK OK
|
Closes the dialog and save your changes. |
 Cancel Cancel
|
Closes the dialog without saving changes. |
 Help Help
|
Opens online help. |
 Template Template
|
Saves and retrieve (Using Templates) settings to be used on other projects. |
| Favorites |
Rectangular tab
Used to create a rectangular shaped notch.
| Setting | Description |
|---|---|
| Width | Specifies the width of the notch. |
| Height | Specifies the height of the notch. |
| Depth | Specifies the depth of the notch. |
| Position Width | Selects the relative width position to the insertion point. |
| Position Height | Selects the relative height position to the insertion point. |
| Position Depth | Selects the relative depth position to the insertion point. |
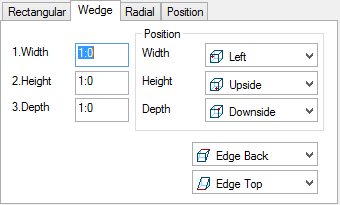
Wedge tab
Used to create a wedge-type notch.
| Setting | Description |
|---|---|
| Width | Specifies the width of the notch. |
| Height | Specifies the height of the notch. |
| Depth | Specifies the depth of the notch. |
| Position Width | Selects the relative width position to the insertion point. |
| Position Height | Selects the relative height position to the insertion point. |
| Position Depth | Selects the relative depth position to the insertion point. |
| Horizontal | Selects the position of the wedge tip in horizontal direction. |
| Vertical | Selects the position of the wedge tip in vertical direction. |
Radial tab
Used to create a circular outlet.

| Setting | Description |
|---|---|
| Width | Specifies the width of the notch. |
| Height | Specifies the height of the notch. |
| Angle | Specifies the angle of the notch. |
| Position Width | Selects the relative width position to the insertion point. |
| Position Height | Selects the relative height position to the insertion point. |
| Position Depth | Selects the relative depth position to the insertion point. |
| Radius | Selects whether the outlet has to be carried out as outer circle or as inner circle. |