Parts List Menus
File Menu
| Menu Item | Description |
|---|---|
| Open | Used to open one or several files of a parts list for processing. The open files are displayed in the list on the left of the main dialog. When being clicked, the selected list becomes the current working file. |
| Delete | Delete a stored file. |
| Close | Closes the current working file and removes it from the list. |
| Sort | Used to sort the current working file
according to two layers of a parts list in an ascending or descending order.
For this purpose, a further dialog box will be displayed, where you can select a primary and a secondary layer. The data will first be sorted according to the contents of the primary layer and then, in case of equal contents, according to the contents of the secondary layer |
| End | Closes the partlist processing. |
Records Menu
| Menu Item | Description |
|---|---|
| Add | By clicking this button, you can manually add a new data record to the end of the file. An empty dialog box will be displayed; where the parts list data can be entered. |
| Delete | By clicking this button, the data record currently selected in the part list on the right will be deleted from the file. |
| Add from File | By clicking this button, you can add the
data of a second parts list file to the current working file. You have to
select an additional file.
Please note that the content of the current file is permanently changed when using this option! |
Settings Menu
| Menu Item | Description |
|---|---|
| Edit Partlist definition | Opens a dialog, which is used to edit an
existing print layout or create a new one.
The Open dialog lists the *.lst files in the default OpenBridge Modeler > PartList path. The print layout specifies which parts list data to print in what format. You can freely design your layout and also add text and logos. Now you will see a list with the existing form layouts in the form of templates as well as a description and preview of the form. If you would like to edit a form just double-click the file name and the utility program "List & Label" (see intro to this chapter) opens. A detailed description of the functionality would extend beyond the scope of this manual. Please see the online help of this utility program for further details. If you would like to create a new form, enter a new file name, which will return an empty form ready for editing. |
| Edit Drawing Information Table | By clicking this option, you can edit the header of your parts list. The program will give you first the opportunity to import data from the drawing information ( Drawing Information Table) into the parts list header. |
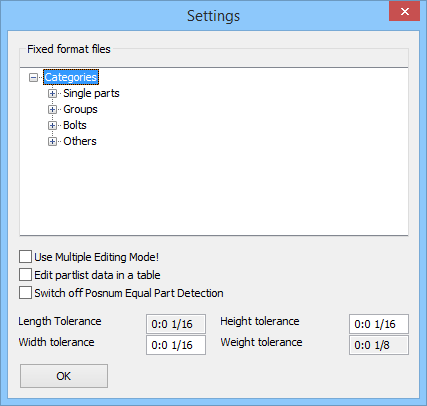
| Default Partlist Assignment and Tolerances | Click this entry to set the filter conditions if you want to output a parts list with filtered data Only data meeting the filter condition are output in the parts list. |
| Label Definition |
By clicking this button, you can preset standard print templates for single part, group and bolt lists. A dialog opens where you enter the print template files to be used as standard selection. You can also select these files by a File Selection Dialog. In addition, you can switch off error check here. If the field Switch off Posnum Equal Part Detection has been set, their position number only recognizes identical parts. If this field has not been checked (recommended), the parts are additionally compared with regard to name, length, etc. If these values don't match for component parts having the same position number, an error message is created. |
Delivery Menu
| Menu Item | Description |
|---|---|
| Create Group Partlist > (list) | Click this entry to output a construction
group list.
If you have imported parts using the Assembly List , you should select this output format. If you used the Create Parts List tool to import parts that do not belong to a group, these parts are added to the list. After selecting the command, you have the option to change the current Windows system or default printer. The data is now formatted according to the selected standard template (see "Preselection Parts List Names") and, if desired, presented in a preview before. You can now print the list. Please note that the selected form also fits a construction group list. Of course, it is possible to print a group list with a list form for individual parts but this output might not meet your expectations. Also remember that only those parts can be printed, which have been defined/imported previously ( Create Parts Lists). |
| Create Single Partlist | Click this entry to output a list featuring individual parts. The remainder of the process is the same. |
| Boltlist | Click this entry to output a bolt list. The remainder of the process is the same. |
| Other | Click this entry to output a list featuring individual parts, with only those parts that match the current filter conditions. Use the command ‘List Definition/Filter‘ to set these conditions. The remainder of the process is the same. |
| Select Construction Group List |
By clicking on one of these three entries opens the Open dialog that lists the *.lst files in the default OpenBridge Modeler > PartList path. For Construction group list, allows selecting a desired group part list file from the Open dialog. For single part, you can select a desired group list file, and for bolt list the bolting list file. The corresponding parts list will be output. The proceeding is identical with the group list. The only difference is that you have to select a format template here instead of using the set standard template |
| Select Single part list | |
| Select Bolt List | |
| Free Single Part List for Labels |
Opens the Open dialog that lists the *.lbl files in the default OpenBridge Modeler > PartList path. You can select the desired single part list label file for output delivery. |