To Place a Chain of Connected Line Segments and Arc Segments
-
Select the Place SmartLine tool (
split button).

- From the Segment option menu, choose the segment type.
- If this is the first segment, enter a data point to position the first vertex.
-
Enter data points to define the segment (follow the prompts in the status bar), snapping if necessary to previously defined segments.
Segment Type Enter data points to Similar to Lines Define endpoints of segments. None Arcs Define center. Define sweep angle.
Place Arc -
Do one of the following:
To define another segment of the same type, return to step 4. If you snap to the first segment but are not completing a shape or complex shape, turn off Closed Element before accepting the tentative point.
or
To choose a different type of segment, return to step 2.
or
To complete a line, line string, arc, or complex chain, Reset.
or
To complete a shape, circle, or complex shape, snap to the first vertex point, and accept the tentative point.
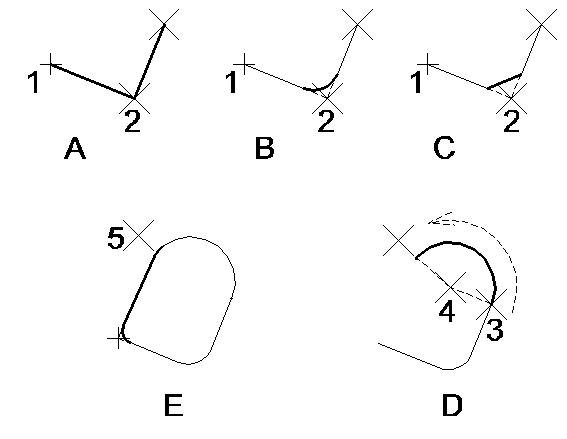
The following table explains illustrations of the Place SmartLine tool starting at the top left and moving clockwise.
A Constructing a line string by setting Segment Type to Lines, Vertex Type to Sharp, and entering data points 1 and 2. B Setting Vertex Type to Rounded and Rounding Radius to 3.00 causes the active vertex (at the location of data point 2) to be rounded with an arc. (If the data points entered do not allow a round of the specified radius, a sharp vertex is created. Only one vertex at a time is affected by the vertex settings.) C Setting Vertex Type to Chamfered and Chamfer Offset to 3.00. D After setting Vertex Type back to Rounded and entering data point 3, Segment Type is set to Arcs, and data point 4 is entered to define the arc center. The direction of the arc (clockwise or counterclockwise) is determined by swinging the pointer past the starting point. (The Vertex Type setting is disregarded.) E After entering data point 5 to complete the arc segment, setting Segment Type back to Lines and snapping to the starting point tentatively closes the element. To continue without closing the element, turn off Close Element prior to accepting the snap point. (While the snap point is active it is possible to change the vertex settings of the final vertex without affecting other vertices — here they are set to Rounded and 1.50. It is also possible to turn on Fill and change other tool settings related to closed elements while the snap point is active.)