MicroStation CONNECT Edition Help

Vue Rendering Dialog

Used to render a view using the VUE rendering engine.

Note: Vue Rendering will not work on generations of CPU which do not have AVX instructions. This would generally be CPU's manufactured before 2011.
You can access this dialog from the following:
  • Ribbon: Visualization > Home > Rendering > Render Scene


The Vue Render application is modeless and coexists with the standard application view windows. Since the Vue rendering process is multi-threaded, which means that once the preprocessing stage of a rendering is completed, you can continue to work while the rendering process is in progress.

SettingDescription
Render
Starts the rendering process to render a new solution of a selected view.
Cancel Render
(Enabled only when a rendering is in progress) Aborts the current rendering.
Fast Preview
Gives a fast preview of the rendering as per the settings in Preview section of Preferences Dialog, Render Category.
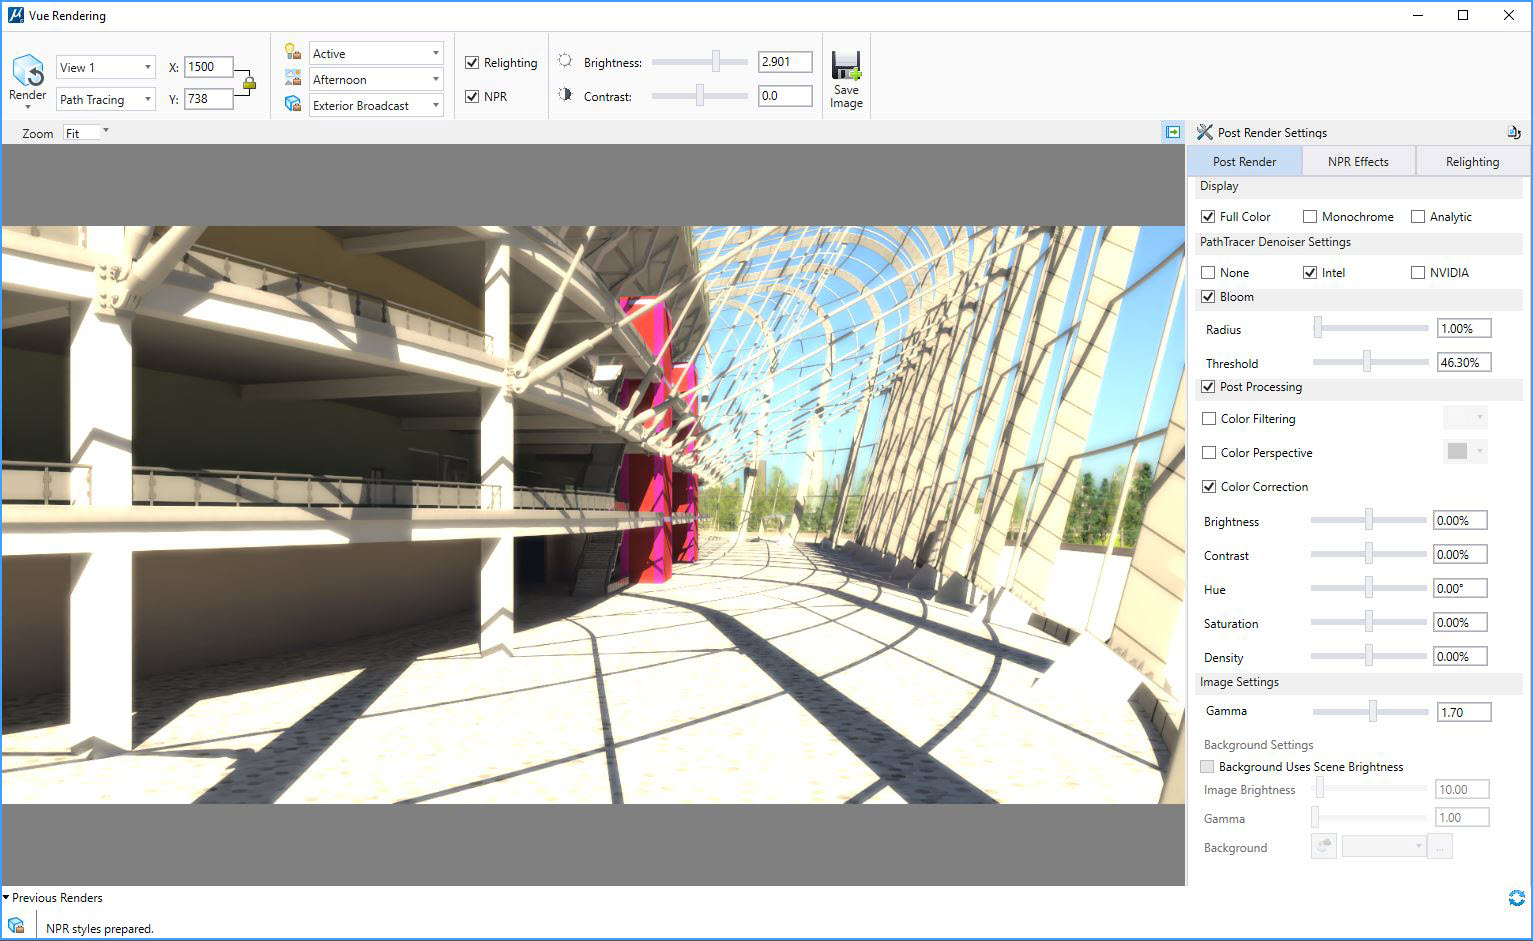
View Allows you to select the view that want to render. Default is the active view.
Tracing Allows you to select the tracing method. Options are, Ray Tracing and Path Tracing.
Render Image Size
Controls the size of the rendering. If locked, X and Y will be constrained to a fixed aspect ratio.
Select a light setup to render with Opens the Light Manager dialog, used to control light setups and the settings for both global and source lighting.
Select an atmosphere setup to render with You can select a predefined atmosphere setup from the drop-down menu. You can open the Atmosphere Editor dialog to edit Atmosphere settings.
Select a render setup to render with You can select a predefined render setup from the drop-down menu.
Relighting If on, enables relighting. You can fine tune the lighting in your scene without having to re-render it. You can adjust relighting settings in the Post Render panel under the Relighting tab.
NPR If on, enables non-photorealistic rendering. You can adjust NPR settings in the Post Render panel under the NPR tab.
Brightness (Tone Mapping Mode set to Brightness Adaptation, Brightness Multiplier) Controls the brightness for the rendering, in combination with the Brightness Adaptation/Brightness Multiplier toggle. You can type values directly or use the slider. The allowable range depends on the selected mode:
  • Brightness Adaptation – allowable range is 0.001 to 501188.0.
  • Brightness Multiplier – allowable range is -4 to 4.
Contrast (Tone Mapping Mode set to Brightness Adaptation, Brightness Multiplier, Reinhard) Controls the overall image contrast for the rendering.

You can type values directly, or use the slider. When set to Brightness Adaptation or Brightness Multiplier, the allowable contrast range is -2 to 2. When set to Reinhard, the allowable range is 0.3 to 1.0. If set to 0, the contrast is calculated automatically.

Pop-up Menu to select Tone Mapping Mode
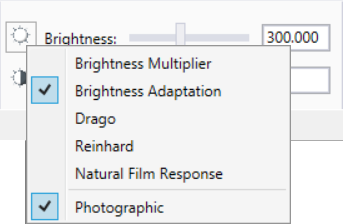
Clicking the icon in the Brightness section opens a pop-up menu with following tone mapping modes and settings:
  • Brightness Multiplier — scales all pixels by a specified factor in the next rendering. Brightness Multiplier mode is an automatic adjustment and when set to 1.0 means you use the automatic adjustment based on the brightness of the view. Higher numbers make the image brighter by that amount. As long as an image is displayed in the Vue Rendering dialog, the Brightness Adaptation and Brightness Multiplier levels synchronize with each other.
  • Brightness Adaptation — sets the brightness for the middle of the range. That is, the intensity (in lumens) that should be used as the middle of the display range for the next rendering. The Brightness Adaptation mode is an approximation of the way the eye works. When you focus on a certain part of a scene, your eyes adapt to the brightness on the point on which you focus. Brighter areas appear washed out, and darker areas lose detail. For example, imagine sitting in a dark room looking out the window towards a bright field. When you focus on the bright outdoors, everything in the room appears dark. If, instead, you focus on something in the room, (after a few seconds) you will see that clearly, but the outside scene looks washed out. The key to using Brightness Adaptation is that you are pick the actual brightness level (in lux) to which you want the eye to adapt.
  • Drago — Drago tone mapping imitates the response of the human eye. The Drago mode is used to display high contrast images on devices with limited dynamic range of luminance values. The method is based on compression of luminance values, imitating the human response to light, with good preservation of details and contrast.
  • Reinhard — Reinhard tone mapping is one of the most prevalent and it is based on the work of Erik Reinhard. This mode works best with complete images where all pixels are lit; does not work well when you have many unlit background pixels. Reinhard deals with the mapping of the potentially high dynamic range of real world luminances to the low dynamic range print or screen. The range of light we experience in the real world is vast; however, the range of light we can reproduce on our print and screen display devices spans at best about two orders of absolute dynamic range. Reinhard tone mapping mode is used to map measured/simulated scene luminances to display luminances to produce a satisfactory image.
  • Natural Film Response - If enabled, activates non-linear reaction to light typical of films.
  • Photographic — If enabled, photographic tone mapping is applied to the image. This setting produces an image that is similar to what your eyes see. This applies particularly to images with a small dynamic range (where the lightest pixel is only about 100 times brighter than the darkest). Where the image has a high dynamic range, the normal image may be better.

    Essentially, tone mapping is mapping the values of the pixels from lux (lumens per square meter) into the 0-255 range for graphics displays. No matter what, some tone mapping operator is always required. Comparing the two methods:

    • Photographic Tone Mapping tries to approximate the human visual system.
    • Non-Photographic Tone Mapping tries to spread the brightness across the range of the display.

    In general, Non-Photographic Tone Mapping always gives you a reasonable image; Photographic Tone Mapping gives you a more realistic image.

    Note: Vue renders to a 64-bit High Dynamic Range (HDR) image. These images must be tone mapped to display on non-HDR monitors.
  • Update Light Setup — Updates the active light setup with the currently selected Brightness, Contrast, Tone Mapping, and Gamma settings.

    Brightness, Contrast, Tone Mapping, and Gamma defaults used when beginning a new rendering are always taken (pulled) from the active light setup. This means that each image has a predictable starting point and Vue images created from other dialogs (such as Save Multiple) will have the same appearance.

    In a typical workflow, you can render an image in the Vue Rendering dialog, tweak your image settings with visual feedback, then push the settings back to the active light setup. You then can save the modified setup for later use in the Vue Rendering dialog or other rendering dialogs such as the Render Image To File or Render Multiple Images dialog.

As long as an image is displayed in the Vue Rendering dialog, the tone mapping modes synchronize with each other.

Exposure (Tone Mapping Mode set to Drago) Exposure value field and slider allows you to adjust the brightness of the output image to your displaying conditions, in the range of [-8, 8]. The default value (0) means that no correction is applied. Higher values make the image lighter whereas lower values make the image darker.
Intensity (Tone Mapping Mode set to Reinhard) The Intensity value and slider, in the range [-8, 8], controls the overall image intensity. The default value 0 means no correction. Higher values make the image lighter whereas lower values make the image darker.
Save Image


Opens the Create Vue File dialog, which lets you save the current rendering to an image file. Controls on this dialog are identical to those on the Save As dialog.

The standard image formats are available as well as "Radiance High Dynamic Range" (HDR). The HDR format stores high-definition imagery that you can post process in other applications.

Zoom Opens the Zoom drop-down menu, where you can set a custom percentage or select preset values for the magnification of the image. Alternatively, you can use the mouse wheel on the Preview Window.
Pan
Allows you to pan through the preview.
Preview Window Displays the rendering.
History (Enabled only when a previous rendered image is available) Clicking the icon lets you view the previously rendered image. Clicking the down-arrow previews the previous history images. You can use the Preferences Dialog, Render Category to set the number of history images stored (default 100).