| Save
|
Saves the selected item type and all its settings in the DGN
file.
|
| New Item Type Library
|
Creates a new item type library. An Item type library can
contain multiple item types and property types. You can also create item type
libraries in a DGN library file pointed by the
MS_DGNLIBLIST configuration
variable. These item type libraries will be displayed in your DGN file.
|
| New Item Type
|
Creates a new item type.
|
| New Property Definition
|
Creates a new property in the selected item type or property
type.
|
| New Property Type
|
Creates a new property type. A property type is a collection
of properties, which can be used by any item type in the same library. The
property type displays in the
Type drop-down list of property definition.
|
| Cut
|
Cuts the selected item type, property type, or property
definition.
|
| Copy
|
Copies the selected item type, property type, or property
definition to clipboard.
|
| Paste
|
Pastes the cut or copied item type, property type, or
property definition.
|
| Move Property Up
|
Moves the property definition up one position in this
dialog's hierarchy as well as in the
Properties dialog.
Note: You can also
use the drag-and -drop functionality to move the properties up.
|
| Move Property Down
|
Moves the property definition down one position in this
dialog's hierarchy as well as in the
Properties dialog.
Note: You can also
use the drag-and -drop functionality to move the properties down.
|
| Show Differences
|
Opens the
Item Type Library Differences
dialog, which is used to compare the properties of item type libraries. You can
compare the local item type library with the one in the DGNLib file. You can
also select any two item type libraries and click this icon to get the
difference between the selected item type libraries.
|
| Update from Library
|
If the selected item type library is imported from a DGN
library file, updates it to reflect changes in the DGN library.
ITEMTYPE UPDATE -nowarning
|
| Reset
|
Resets each selected item type to its previously saved
version.
|
| Delete
|
Deletes the selected item type, property type, or property
definition.
|
| Properties
|
The Properties section displays the properties of the
selected item type, property type, or property definition.
|
| Properties > Item Type
|
Displays the parameters and values of the selected
item type.
- Item Name -
Specifies the label for items created from the selected item type. You can
choose to use the name of the item type, or to use the value of one of the
property definitions.
- Use Item Name for
Element - If set to
Yes, and if the item type is attached to
an element, the element's label in the Explorer dialog and Properties dialog
will be the same as the item's label. If more than one item type attached to an
element has this option set to
Yes, then the label of the element will
be the first one that the product finds.
|
| Properties > Property Type
|
Displays the parameters and values of the selected
property type.
- Is Referenced -
Indicates whether the selected property type is used by another property
definition.
|
| Properties > Property Definition
|
Displays the parameters and values of the selected
property.
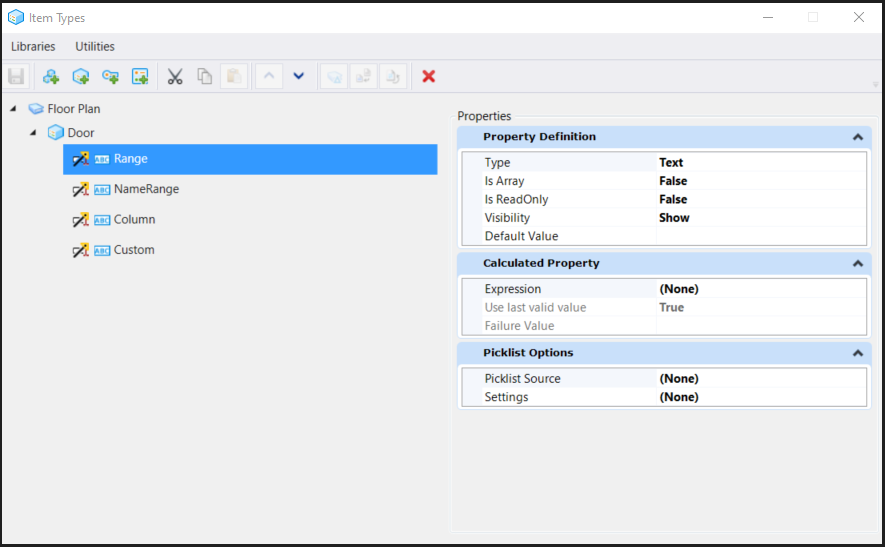
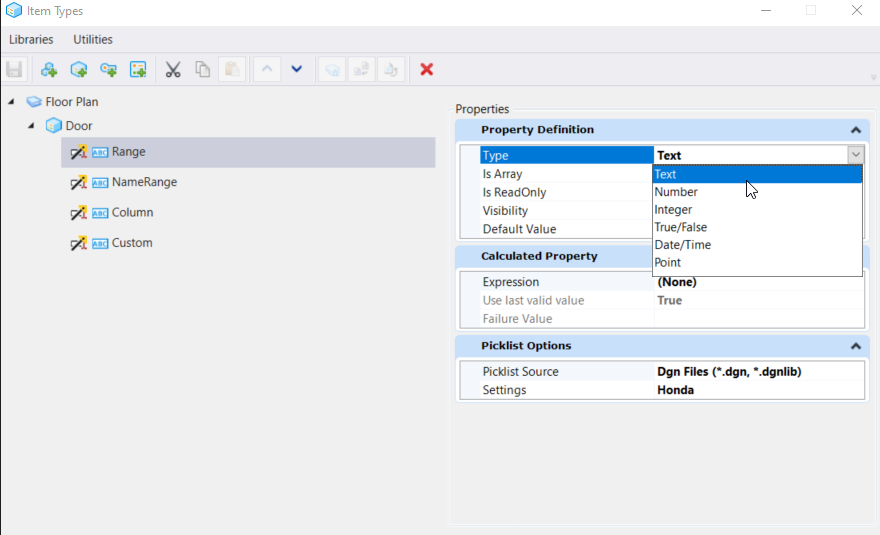
- Type - Selects the
type of property. By default there are following property types.
- Text
- Number
- Integer
- True/False
- Date/Time
- Point
You can also add a property type. For example,
you create a property type, say
Customer Info that has properties, say
Name,
Address, and
Phone Number. The
Customer Info type appears in the
Type drop-down list of a property
definition. When you select
Customer Info, the
Name,
Address, and
Phone Number properties are added as
parameters to the property.
- Is Array - Allows
you to create multiple values of the same property. If set to
True, in the
Properties dialog, where you
view the item properties, you can add multiple values of the same item type by
selecting
Add entry. For example, say you have a
property called
Team Members and you want to add names
of team members in your project. To achieve this, first set
Is Array to
True and assign the item type to an
element. Then select the element and open the
Properties dialog. In the
Properties dialog, in the
Team Members row, right-click and select
Add entry. An entry is created below the
Team Members row. In the right-side of
the row, enter the name of your project team member and press <Enter>.
To add more entries, again right-click on the
Team Members row and select
Add entry and enter the name of your
project team member. You can also remove an entry by right-clicking the row and
selecting
Remove entry. You can also remove all
entries at once by right-clicking the array property and selecting
Remove all entries.
- Is ReadOnly - if set
to
True, the property's value cannot be
edited in the
Properties dialog once the
item type is attached to an element. This value will display as a read only
value. If set to
False, the value can be edited in
the Properties dialog.
- Visibility - If set
to
Show, the property's value will be
displayed in the
Properties
dialog once the item type is attached to an
element. If set to
Hide, the value will be hidden and not
displayed in the
Properties dialog. You can
use this field to create hidden Item Type properties.
- Default Value -
Enter the default value of the property.
- Units - (Displayed
only when the Type is Number or Point) Selects the unit of the property.
- Picklist - Lets you
select a Picklist for the property.
|
| Calculated Property
|
Displays any expressions defined for the property:
- Expression -
lets you add an expression to the property or displays any expression
associated with a property.
- Use last valid value
- If set to True, will display the previous value for the property in the
Properties dialog. If set to False, will display the current value.
- Expression Failure
Value - Lets you set a value to be displayed in the item's property if the
expression fails to execute.
|
| Picklist Options
|
Allows you to choose the Picklist Source and Options:
- Picklist
Sources - Allows you to choose a source from where PickList can be
derived. You can choose from Dgn Files and Excel Files.
Note: Supported Excel file formats are
.xlsx (Excel Workbook) and .xlsm (Excel Macro Enabled Workbook 2007 or later).
-
Settings - You will see the below options based on your selection
in the Picklist Sources above:
-
None - The Picklist setting is not enabled.
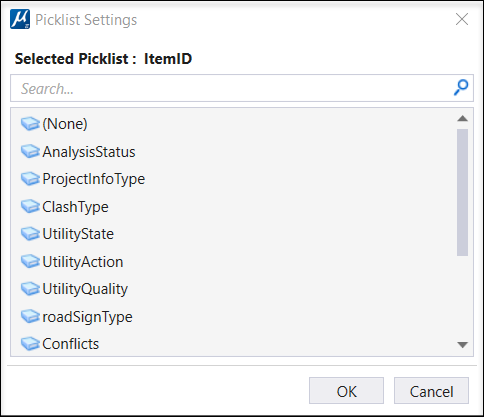
- Dgn
Files - The Picklist Settings window opens. The list displayed in
the list box matches the values displayed in the Picklist dialog.
-
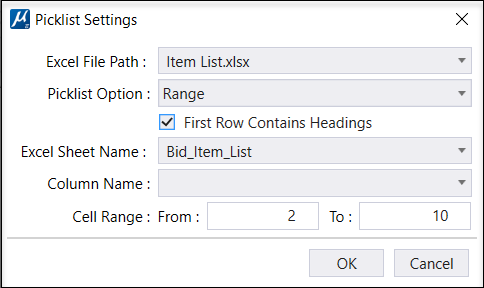
Excel Files - The Picklist Settings window opens.
Note: Set
configuration variable
ITEMTYPE_PICKLIST_EXCELPATH
to point to the location of the excel file.
- Excel
File Path- Allows you to choose the Excel File from the drop-down
list.
- Picklist
Option- Allows you to choose the Picklist option from the
following:
-
Range - Range in Excel is the difference between the maximum limit
and minimum limit of the available numbers in excel
Note: The
fields in the Picklist Settings are enabled according to the Picklist Option
selected
-
Named Range - On selecting this you
can view the Excel values in the drop-down list.
-
Column -On selecting this, all the column values are displayed in
the drop-down list.
-
Custom -On selecting this, you can filter the excel columns based
on the custom settings.
|
| Libraries > New
|
Creates a new item type library.
|
| Libraries > Save
|
Saves the selected item type and all its settings in
the DGN file.
|
| Libraries > Update from Library
|
Updates the selected item types in the DGN file that
are based on library item types to reflect changes in the DGN library.
ITEMTYPE UPDATE -nowarning
|
| Libraries > Reset
|
Resets each selected item type to its previously
saved version.
|
| Libraries > Save All
|
Saves all the item types and their settings.
|
| Libraries > Import
|
Used to import item types from a .dgn or .dgnlib
file. Opens the Open dialog from where you can select the .dgn or .dgnlib file.
|
| Libraries > Update All From Library
|
Updates all item types in the DGN file that are
based on library item types to reflect changes in the DGN library.
Item Type
libraries created using
Expressions feature in Update 13 will not be compatible in
Update 15. The
Units and
Use last valid value fields will not apply
to these library item types. To overcome this, you must use the key-in
ITEMTYPE UPGRADE ALL
This key-in will upgrade item types from older
libraries and will make them compatible with
Units and
Use last valid value fields. Refer image
below:
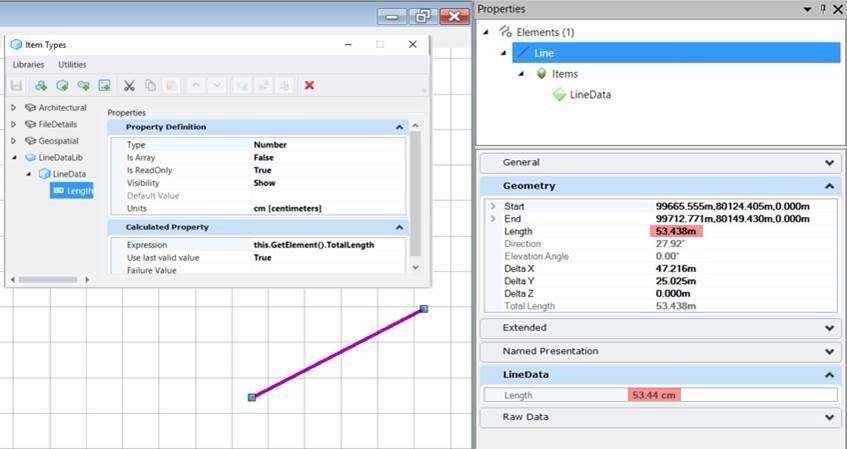 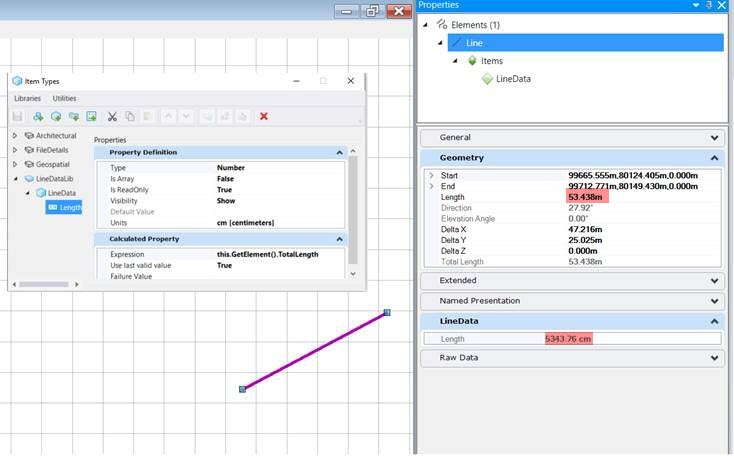
Top:
Update 13 Item Type library without upgrade - shows length 53.438 m as 53.438
cm after import \ Bottom: The same library with upgrade - shows correct unit
conversion after import
Use last valid value will
be set to True after this key-in is set.
|
| Libraries > Exit
|
Closes the Item Types dialog.
|
| Utilities > Preferred Units
|
Opens the
Preferred Units dialog that is used to select unit types
that you want to be displayed in the
Units property. The changes made in this
dialog are local to the active file.
|
| Utilities > Upgrade Tag Sets
|
Opens the
Upgrade Tag Sets dialog that is used to upgrade tags sets
to item types.
|
| Utilities > Edit Picklists
|
Opens the
Picklist Manager dialog that is used to create and manage
Picklists.
|
| Pop-up menu for Item Type Library
|
Right-clicking an item type library opens a pop-up
menu with following choices:
- New Item Type -
Creates a new item type in the selected item type library.
- New Property Type -
Creates a new property type. A property type is a collection of properties,
which can be used by any item type in the same library. The property type
displays in the
Type drop-down list of property
definition.
- Rename - Allows you
to key in a new name for the selected item type library.
- Save - Saves the
selected item type library and all its settings in the DGN file.
- Cut - Cuts the
selected item type library.
- Copy - Copies the
selected item type library to clipboard.
- Paste - Pastes the
cut or copied item type library.
- Delete - Deletes the
selected item type library.
- Open Library - If an
item type library is imported from a .dgnlib file, opens the .dgnlib file.
|
| Pop-up Menu for Item Types
|
Right-clicking an item type opens a pop-up menu with
following choices:
- New Property
Definition - Creates a new property in the selected item type.
- Rename - Allows you
to key in a new name for the selected item type.
- Cut - Cuts the
selected item type.
- Copy - Copies the
selected item type to clipboard.
- Paste - Pastes the
cut or copied item type.
- Delete - Deletes the
selected item type.
- Attach to Element -
Starts the
Attach Item tool using which you can
attach an item to an element.
|
| Pop-up Menu for Property Definition
|
Right-clicking a property definition opens a pop-up
menu with following choices:
- Rename - Allows you
to key in a new name for the selected property definition.
- Move Property Up -
Moves the property definition up one position in this dialog's hierarchy as
well as in the
Properties dialog.
- Move Property Down -
Moves the property definition down one position in this dialog's hierarchy as
well as in the
Properties dialog.
- Cut - Cuts the
selected property definition.
- Copy - Copies the
selected property definition to clipboard.
- Paste - Pastes the
cut or copied property definition.
- Delete - Deletes the
selected property definition.
|
| Pop-up Menu for Property Type
|
Right-clicking a property type opens a pop-up menu
with following choices:
- New Property
Definition - Creates a new property in the selected item type.
- Rename - Allows you
to key in a new name for the selected property type.
- Cut - Cuts the
selected property type.
- Copy - Copies the
selected property type to clipboard.
- Paste - Pastes the
cut or copied property type.
- Delete - Deletes the
selected property type.
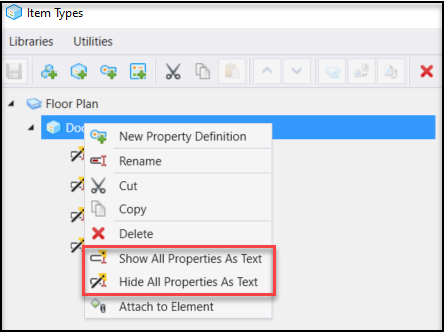
- (Technology Preview)
Show All Properties as Text - Allows you to Show all properties as Text.
- (Technology Preview)
Hide All Properties as Text - Allows you to Hide all properties as Text.
|


