To Create a Saved View from a Clip Volume
After creating a clip volume, the next step is to capture it in a saved view so that you can place the saved view on a sheet. Saved Views are created in the Saved Views dialog.
-
In the Saved Views dialog (
dialog launcher
), click the Create Saved View tool.
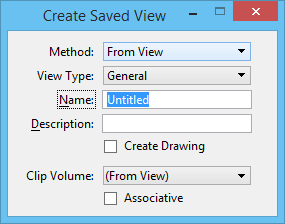
The tool settings window opens.
- Select the method for capturing the saved view: from the active view’s range (From View) or by specifying the range by two points (From 2 Points).
- Select a saved view type: Saved View, Section View, Elevation View, Detail View, or Plan View.
- Type a name and description for the saved view.
- To capture the previously created clip volume, select From View from the Clip Volume list box.
- (Optional) Select the Associative Clip Volume check box to associate multiple saved views to the same clip volume.
- Turn on the Create Drawing check box.
-
Enter a data point in the view window.
The Create Drawing dialog opens.
- Make the required settings in the Create Drawing dialog and click OK.