To Create a Cell
Note:
- If no cell library is attached, attach one before continuing.
- Draw the contents of the cell on the desired levels.
-
Do one of the following:
With the Element Selection tool, select all the elements to be included in the cell.
or
Place a fence that contains all elements to be included in the cell.

-
Select the Define Cell Origin tool ( split button).
The prompt in the status bar is "Define origin." The cell origin is the point that is used to position the cell in a design. When a cell is placed in a design, the cell origin will lie on the data point entered to position it.
-
Enter a data point to define the cell origin.
The origin stays active and displays until the next time the Define Cell Origin tool is selected.
-
Select
dialog launcher.
The Cell Library dialog opens.
-
Do one of the following:
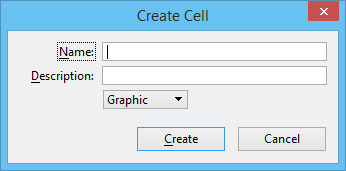
The Create Cell dialog opens.
- In the Name field, type a name.
- (Optional) In the Description field, type a description.
- From the list box, select the Cell type.
-
Click the Create button.
Note: Alternatively, you can define the cell origin (steps 2–3) before selecting or fencing the elements (step 1) to be included in the cell.Note: One or more cells can be made part of another cell, or nested. Just select the cells to be nested when you create the new cell. If a cell with the same name as the nested cell exists in the library, the nested cell is replaced by a reference to the cell in the cell library. When the cell is placed, the reference is expanded back to the original geometry.
 .
.