Markups Dialog
 Used to view markups made in an overlay file in Bentley Navigator. A markup can be annotation text, freehand redlining, pen and area highlighting.
You can access this dialog from the following:
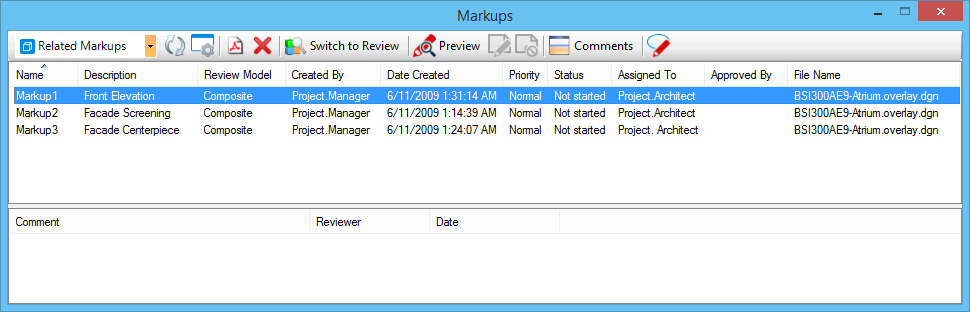
The Markups dialog is divided into two sections. The top section displays information about the markup. The bottom section automatically displays any changes made to the properties of the markup and any comments manually added by a reviewer. By default, the Markups dialog is docked to the bottom of the application window.
To change the columns of information displayed, right-click on the row of column headings. Use the menu to turn on or off the columns. To sort the items in each column in ascending or descending order, click the column heading.
If you use MicroStation to open an *.overlay.dgn file, the Markups dialog offers additional options such as deleting a markup or switching to a review mode.
| Setting | Description |
|---|---|
| Filter Markups | Drop-down menu allows you to choose which markups you want to display in the list box.
|
| Refresh Markups | (Related Markups or All Markups only) Used to force a search for Markups in configured Markup paths after new Markups are created or configured paths changed. |
| Commit Markup Changes | (ProjectWise only) Used to save any changes in the open file to ProjectWise, without having to close or check in the file. This item is enabled when there are changes in the file that have not yet been saved to ProjectWise. For more information, refer to the ProjectWise Explorer help document. |
| Markup Settings | Opens the Markup Settings dialog, which is used to set the path to the markup sheet files. |
| Print to PDF | Opens the Save Output PDF file dialog, which is used to save the view window with the displayed markup(s) to a PDF file. The controls in this dialog are analogous to those in the Save As dialog. You can select one markup or multiple markups to be printed to a PDF file. If you select a single markup, then the name of the markup is used as the name of the PDF output file. If you select several markups at the same time, the default name of the PDF file is Markups.pdf. |
| Delete Selected Markups |
(Available only if using an .overlay.dgn file) Deletes the markup model and related information. |
| Switch to Review Mode |
(Available only if using an .overlay.dgn file) Switches the active markup from Markup mode to Review mode. If already in Review mode, double-clicking a markup returns you to the Markup mode and applies the saved view. |
| Preview |
Opens the Markup Preview window, which displays the model and the markup information. If there are no markups in the Markups dialog, this option is not available. You can also open the preview window by selecting the markup in the Markups dialog, right-click and from the pop-up menu choose View. |
| Display Selected Markups | (2D files only) Turns on the display of the markup geometry. Only preserves the display for the current session. |
| Stop Displaying Selected Markup | (2D files only) Turns off the display of the markup geometry. |
| Show/Hide Comments | Shows or hides the Comments section of the dialog. |
| New Comment |
Opens the New Markup Comment dialog, which is used to add comments describing the markup. |
| Name | An editable field for the unique name of the markup model. If changed, the model and saved view also change. |
| Description | Optional field to add a description. |
| Review Model | Displays the name of the review model from which the markup was created. |
| Created By | Displays the name of the user who created the markup. |
| Date Created | Displays the date the markup was created. |
| Priority | Displays the priority of the markup. To change the Priority, click the field to display the menu with the options of Low, Normal or High. Note: You can customize the listings on the Priority option menu by editing the MarkupConfig.xml file, located in
..\Default\Data\
folder in MicroStation's program directory. The PrioritySettings section lists all of the valid markup priority strings. One of the priority strings must be designated as the default value by setting default="true". You can remove unneeded strings in the delivered file, add new strings or modify existing strings.
|
| Status | Displays the status of the markup. To change the Status, click the field to display the menu with the options of Not started, In progress, Completed, Waiting on someone else, or Deferred. Note: You can customize the listings on the Status option menu by editing the MarkupConfig.xml file, located in
..\Default\Data\
folder in MicroStation's program directory. The StatusSettings section lists all of the valid markup status strings. One of the status strings must be designated as the default value by setting default="true". You can remove unneeded strings in the delivered file, add new strings or modify existing strings.
|
| Assigned To | Left-click to open an editable field to type in the name of the person or department that is assigned to do the work on this markup. |
| Due Date | Sets the due date for the completion of the design changes specified by the markup. Click in the field to make changes. To use the default date, turn on the check box. Click the icon to open a calendar dialog to choose the due date. |
| Reviewed By | Sets the name of the person who will review the completed design changes. |
| Approved By | Left-click to open an editable field to type in the name of the person who will approve and verify that the markup is correct. |
| File Name | Displays the file name in which the markup is located. |
| Template | Sets the name of the template which will be used to display the markup. When you click the Template field, a drop-down menu displays all available templates. The default size and orientation of the template sheet is Letter (Landscape). |
| Location | Displays the location of the markup placement to use for spatial understanding in reports. |
| User-Defined 1–4 | You can add up to four categories that are customized for your needs. These customizations are made in the MarkupConfig.xml file, located in ..\Default\Data\ folder in MicroStation's program directory. Each field can be a text field, have a fixed set of values or a combination of a text field with a set of predefined values. |
| Display | A checkmark displays when you turn on Display Selected Markups. For 2D files only, you can click this field to display or hide the markup. |
| Comment | Automatically registers any changes made to the properties of the markup. Double-clicking on the comment opens the Markup Comment dialog, which displays all information regarding the comment. |
| Reviewer | Name of the reviewer. |
| Date | Date that the comments were made by the reviewer. |
| Pop-Up Menu | Right-clicking a markup opens a pop-up menu with following choices:
|


