Level Manager Dialog
 Used to control level
display and level symbology for the open DGN/DWG file and attached references.
Used to control level
display and level symbology for the open DGN/DWG file and attached references.
You can dock the Level Manager dialog to the top or bottom edge of the application window.
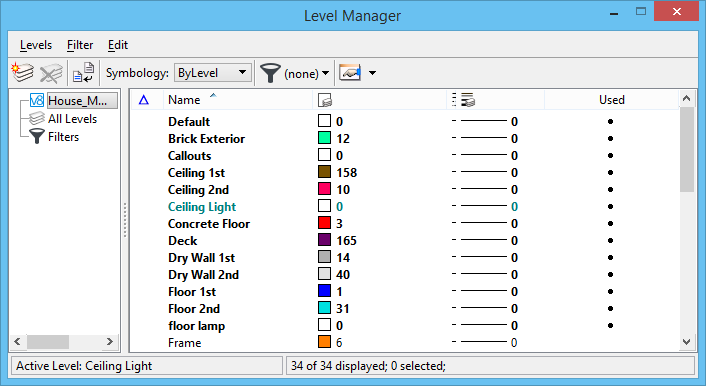
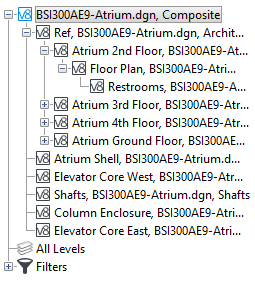
By default, the Level Manager includes a list of models, levels, and filters on the left, and a detail section on the right.
You can select multiple design files and/or reference attachments from the tree by holding the left mouse button down and dragging the cursor over the desired files. The levels for all the selected files display in the level list.
| Setting | Description |
|---|---|
| Model, levels, and filters list | Displays the models, levels, and filters for the
file.
|
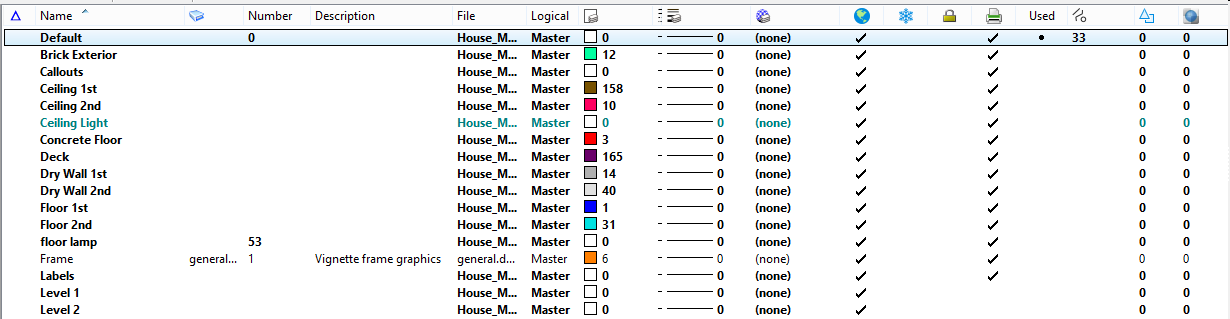
| levels list | Shows the attributes and properties of individual
levels for the selected file or reference. You
can
filter
this list
using the dialog's Filter option. The list entry for the Active Level is
displayed in the color cyan.
To modify attributes and properties for a level, select the level in the list, and click in a column. A level's list entry shows:
If you select one or more levels and right-click, a pop-up menu provides options for managing levels. These options are also available on the Levels, Filters, and Edit menus and the toolbar. In addition, you can choose:
Note: If a level is used in a model,
cell definition or dimension style it displays as bold. If level is nested, it
is normally dimmed. You can edit it using the
MS_LEVEL_EDIT_NESTED_ATTACHMENT_LEVELS
configuration variable.
|
| filters list | Lets you set the active level filter, (i.e., a level list for the model), as well as manage filters . |
| Levels > New | Creates a new level in the active model.
|
| Levels > Set Active | Sets the selected (highlighted) level to the active
level in the active model.
|
| Levels > Library > Attach | Opens the Attach Level Library dialog used to
attach a level library to the active model.
|
| Levels > Library > Detach | Detaches a level library from selected model. Only
active if a level library has been attached.
|
| Levels > Import | Opens the Import Levels dialog used to import level
libraries into the selected model.
|
| Levels > Export |
Opens the Export Levels dialog used to export a level library from the selected model to another DGN file. |
| Levels > Properties | Opens the
Level Properties
dialog,
which is used to modify the level's properties such as level
symbology and custom line styles.
|
| Filter > New | Creates a new filter. You must be in the Filters category for this selection to be active. |
| Filter > Save As | Opens the Save Filter dialog for saving a filter. You must be in the Filters category for this selection to be active. |
| Filter > Import | Opens the Import Level dialog, which is used to open a DGN and selectively control the filters that are imported using the Level/Filter Import dialog. |
| Edit > Select All | Selects all the levels listed in the dialog.
|
| Edit > Select None | Deselects all the levels listed in the dialog.
|
| Edit > Invert Selection | Selects all unselected and deselects all selected
levels listed in the dialog.
|
| Edit > Cut | Removes the selected (highlighted) level from the
model and copies it to the clipboard.
Use to paste the level and its attributes into another model. |
| Edit > Copy | Copies the selected (highlighted) levels to the
clipboard.
Use to paste the level and its attributes into another model. |
| Edit > Paste | Pastes the levels in the clipboard into the active
model.
|
| Edit > Delete | Deletes the selected (highlighted) level from the
model. If elements are on the level, the level will not be deleted.
Note: The key-in
above deletes the specified
"level-spec1". If the level has any elements,
then all the elements are moved to the specified
"level-spec2". The destination level
specification is optional. If it is not specified, then any elements of the
level to be purged are moved to the
"Default" level.
|
| Edit > Rename | Used to rename a selected level.
|
| New Level | Creates a new level in the DGN/DWG file. This icon
works the same as
. This icon only appears if you have the Master File
category selected.
|
| Delete Level | Deletes the selected (highlighted) level from the
file. This icon works the same as
. This icon only appears if you have the Master File
category selected.
|
| New Filter | Creates a new filter in the model. This icon works
the same as
. This icon only appears if you have the Filters
category selected.
|
| Delete Filter | Deletes the selected (highlighted) filter from the
model. This icon works the same
. This icon only appears if you have the Filters
category selected.
|
| Update Levels from Library | If the open DGN file is selected in the left pane,
clicking
Update Levels from Library synchronizes the
properties of levels in the open DGN file and in DGN files that contain
referenced models, with the properties of the corresponding source levels in
the attached level library.
If a reference is selected in the left pane, clicking Update Levels from Library synchronizes the properties of levels in the selected reference and in its attachments, with the properties of levels in the source file of the attachment. If a reference level is a library level, its properties are further synchronized with the properties of the level of the same name in the source level library. Administrators can limit the effects of synchronization to particular level properties by setting the MS_LEVEL_EDIT_ATTRIBUTE_LIST . Note: When the
MS_LEVEL_ALLOW_LIBRARY_LEVEL_EDIT
is set, changes to the level attributes will cause the library level to be
copied to the active file. This allows the changes to the library level
attributes to be saved in the active file.
Keying in
DGNLIB UPDATE LEVELS (short for
DGNLIB UPDATE LEVELS CUSTOM) is
equivalent to clicking
Update Levels from Library for the open
DGN file — that is, when the file is selected in the left pane.
Keying in REFERENCE SYNCHRONIZE LEVELS <reference_attachments> (short for REFERENCE SYNCHRONIZE LEVELS CUSTOM <reference_attachments>) is equivalent to clicking Update Levels from Library for a reference — that is, when a reference is selected in the left pane.
|
| Symbology | Displays elements with the same value.
|
| Level Filter | Lets you select the active level filter, which is
the filter used to limit the display of levels in the levels list box and
the active level list in the Attributes toolbox.
Select <none> to not use a filter, select All Levels to display all levels in all models, or select the filter name. |
| Dialog Settings (icon) | Pops up the Level Manager Settings dialog , which is used to set settings of the Level Manager. |