Navigate View
 Used to interactively move the view camera in a view. Using the mouse alone, you can move the camera forward or backward, along its viewing direction, with the scroll wheel. Moving the mouse up, down, left, or right, changes the viewing direction.
You can access this tool from the following:
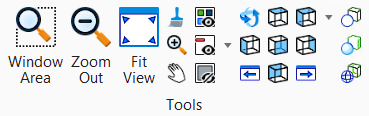
- Ribbon: split button
- Ribbon: split button
- Ribbon: split button
- Ribbon: split button
- View control bar
- Toolbox: View Control
- Default button assignment: <Ctrl+XButton1>
With this view control tool, you can navigate a view via:
- the mouse.
- the keyboard.
- a combination of keys and mouse actions.
- interactive modification of the view cone.
The view cone, for the view being navigated, is displayed in all other open views. It displays:
Handles on the view cone let you click and drag to move or modify the view cone. They are located at the Eyepoint, the Target, and in the center of the view cone (for moving the entire view cone).
If you try to navigate in a view that does not have a camera turned on, then the camera is turned on in three point projection mode for that view.
When using the mouse to navigate, you can use either of two methods:
- Click and drag — click and hold the button on the mouse as you move it. Releasing the button completes the operation.
- One click operation — click in the view to commence the navigation. Move the mouse as required (without holding down the button), then click again to complete the operation.
In both cases, the scroll wheel can be used to move the camera forward/backward.
When using the mouse to navigate, the following assignments are available.
| Key | Mouse Movement | Effect on view camera |
|---|---|---|
| . | Scroll wheel forward | Moves camera forward towards its target. |
| Scroll wheel backward | Moves camera backward away from its target. | |
| Forward | Rotates camera upward. | |
| Backward | Rotates camera downward. | |
| Left | Rotates camera to the left. | |
| Right | Rotates camera to the right. | |
| <Shift> | Forward | Moves camera upward (design Z axis). |
| Backward | Moves camera downward (design Z axis). | |
| Left | Moves camera to the left (horizontally). | |
| Right | Moves camera to the right (horizontally). | |
| <Ctrl> | Forward | Moves camera forward towards its target. |
| Backward | Moves camera backward away from its target. | |
| Left | Moves camera to its left. | |
| Right | Moves camera to its right. | |
| <Ctrl+Shift> | Forward | Moves camera upward (along its Z-axis). |
| Backward | Moves camera downward (along its Z-axis). | |
| Left | Moves camera to its left. | |
| Right | Moves camera to its right. |
You can control the navigation speed with the following key-in:
where <value> is a number that is interpreted as MPH (English) or KPH (metric) depending on the model's units. If no value is supplied then a default value of 3 MPH is used.
As well, you can use the keyboard for navigating the view. Settings for keyboard operation are as follows:
| Key(s) | Effect on view camera | |
|---|---|---|
| Up Arrow, <W>, or <I> | Moves camera forward towards its target. | |
| Down Arrow, <S>, or <K> | Moves camera backward away from its target. | |
| Left Arrow, <A>, or <J> | Moves camera to the left (horizontally). | |
| Right Arrow, <D>, or <L> | Moves camera to the right (horizontally). | |
| <Shift> | Up Arrow, <W>, or <I> | Rotates camera upward. |
| Down Arrow, <S>, or <K> | Rotates camera downward. | |
| Left Arrow, <A>, or <J> | Rotates camera to the left. | |
| Right Arrow, <D>, or <L> | Rotates camera to the right. | |
| <Ctrl> | Up Arrow, <W>, or <I> | Moves camera upward (along design Z-axis). |
| Down Arrow, <S>, or <K> | Moves camera downward (along design Z-axis). | |
| Left Arrow, <A>, or <J> | Moves camera to the left (horizontally). | |
| Right Arrow, <D>, or <L> | Moves camera to the right (horizontally). | |
| <Ctrl+Shift> | Up Arrow, <W>, or <I> | Moves camera forward towards its target. |
| Down Arrow, <S>, or <K> | Moves camera backward away from its target. | |
| Left Arrow, <A>, or <J> | Moves camera to its left. | |
| Right Arrow, <D>, or <L> | Moves camera to its right. | |
| Page Up/Down | Moves the camera Up/Down (along design Z-axis). | |
| Home, <Q> or <U> | Resets the camera's roll, elevation, and orientation. Pressing the Home key: Once — sets roll angle to zero. Twice — sets roll angle to zero, then elevation angle to zero. Three times — sets roll and elevation angles to zero, then sets the camera's orientation angle to zero. That is, it aligns the camera so that it is pointing in the positive direction of the model's X-axis. |
|
| <+>/<-> | Increase/decrease movement speed. | |
You can control the navigation speed with the following key-in:
where <value> is a number that is interpreted as MPH (English) or KPH (metric) depending on the model's units. If no value is supplied then a default value of 3 MPH is used.
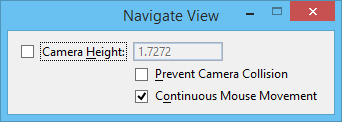
| Setting | Description |
|---|---|
| Camera Height | If on, lets you key in a value to set the height of the camera above the geometry in the model. When this setting is enabled, the camera will move forward/backward at a constant height above the geometry, rather than in the direction upward or downward that the camera is pointing. |
| Prevent Camera Collision | If on, camera detects collision with elements in its way and stops further movement. |
| Continuous Mouse Movement | If on, mouse movement controls the direction and the speed with which the camera will move/turn. After you move the mouse initially, the motion of the camera will continue, even if the mouse is stationary, until you enter a second data point (one click operation), or when you release the mouse button (click and drag operation). If off, mouse movement controls the direction and the amount that the camera will move/turn. The camera moves/turns only when the mouse is moved. |