| On |
If on, the light source is active. |
| Lux |
Displays the value for the brightness of the Sun with the current settings. If the Sun would be below the horizon, then No Sun displays. |
| Intensity |
Sets the brightness of the Solar lighting from 0 (no Sun) to 100 (full Sun). |
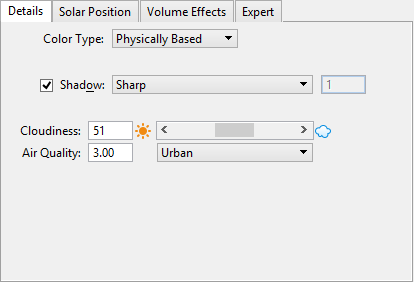
| Details tab > Color type |
Option menu that lets you select the type of color used.
- User Defined — Lets you set the color of the Sun manually, via the Color setting, or automatically via the Temperature setting.
- Physically Based — Color of the Sun is computed based on factors such as its position in the sky, air quality, and cloudiness.
|
| Details tab > Color |
(Color Type set to User Defined only) Sets the color of the Solar lighting. Clicking on the color swatch opens a color selector dialog, which is similar to the True Color tab and Color Book tab of the Active Color dialog. |
| Details tab > Temperature |
(Color Type set to User Defined only) Option menu that lets you assign a color temperature to Solar lighting. Where a color is chosen manually, with the Color setting, Temperature is set to Custom. |
| Details tab > Shadow |
If on, shadows are generated by the Solar lighting. Sharpness of the shadows is controlled by the Shadow option menu, which determines the number of samples used to calculate the shadows.
- Sharp — Number of samples — 1
- Soft - Coarse — Number of samples — 16
- Soft - Medium — Number of samples — 64
- Soft - Fine — Number of samples — 160
- Soft - Very Fine — Number of samples — 256
|
| Details tab > Cloudiness |
Sets the cloudiness of the sky. Values may be input in the field, or adjusted with the slider. Can vary from Clear (0) to Cloudy (100).
|
| Details tab > Air Quality |
Sets the purity of the air. Can vary from Perfectly Clean (0) to industrial (5).
An option menu provides a choice of commonly used settings.
|
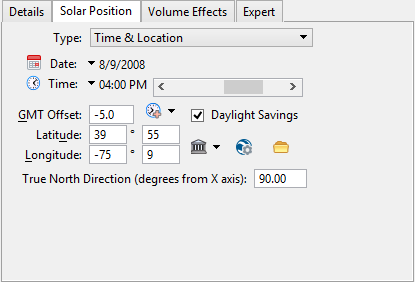
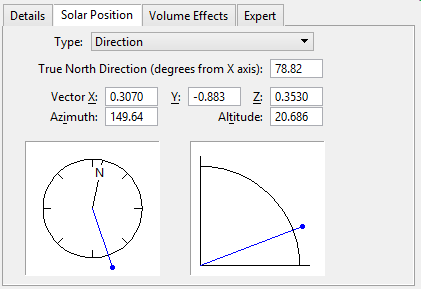
| Solar Position tab > Type |
Option menu that lets you select how the location of the Sun is calculated.
- Time & Location — Lets you set the direction of the Sun by specifying a time and location on Earth.
- Direction — Lets you set the direction of the Sun by vectors or by Azimuth and Altitude settings.
|
| Solar Position tab > Set Solar Date icon |
(Type set to Time & Location only) Lets you select a date from a Calendar dialog. |
| Solar Position tab > Set Solar Time icon |
(Type set to Time & Location only) Lets you input a time. |
| Solar Position tab > GMT Offset |
(Type set to Time & Location only) Displays the GMT Offset value for the location. This can be set manually, or you can use the Select Offset By Zone, or the Select Position By City options both of which include the GMT Offset for the selected zone or city. |
| Solar Position tab > Select Offset By Zone icon |
(Type set to Time & Location only) Lets you select from a pop-up list box, predefined GMT Offset settings for specific zones. |
| Solar Position tab > Daylight Savings |
If on, a one hour allowance is made in the time setting. |
| Solar Position tab > Latitude |
(Type set to Time & Location only) Sets the latitude at the model's location. |
| Solar Position tab > Longitude |
(Type set to Time & Location only) Sets the longitude at the model's location. |
| Solar Position tab > Select Position By City icon |
(Type set to Time & Location only) Lets you select from a pop-up list box, predefined latitude, longitude, and GMT Offset settings for specific cities. |
| Solar Position tab > Get Latitude Longitude from Google Earth icon |
(Type set to Time & Location only. Requires Google Earth to be installed) Launches Google Earth, if not already running. You then can place the pointer at the required location in Google Earth and <Shift+Click> to send the latitude and longitude settings back to the Solar Lighting settings in the Light Manager dialog. |
| Solar Position tab > Get Latitude Longitude from KML file icon |
(Type set to Time & Location only) Opens the Select Google Earth Placemark dialog, which lets you select a KML or KMZ file that contains one or more placemarks. The first placemark contained in the selected file is used to determine latitude and longitude values for Solar lighting. |
| Solar Position tab > True North Direction (degrees from X axis) |
Lets you define the direction of true north relative to the X axis. |
| Solar Position tab > Vector X, Y, Z |
(Type set to Direction only) Specifies the direction vector from the solar light. |
| Solar Position tab > Azimuth |
(Type set to Direction only) Sets the azimuth direction of the solar light (from 0-360). Azimuth values may be keyed in, or you can use the settings window below to interactively set the direction by clicking the compass at the required direction, or clicking and dragging the indicator as required. |
| Solar Position tab > Altitude |
(Type set to Direction only) Sets the angle of the Sun above the horizon (from 0-90). Altitude angle values may be keyed in, or you can use the settings window below to interactively set the altitude by clicking and dragging the indicator to the required altitude setting. |
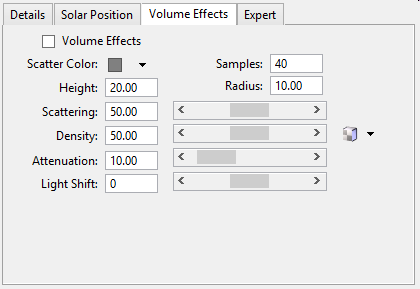
| Volume Effects tab > Volume Effects |
If on, volume effects are calculated for Solar lighting. |
| Volume Effects tab > Scatter Color |
Sets the scatter color value. Clicking the color icon opens the Light Color window in which you can select the color. Clicking the drop-down and selecting Color Map opens the Open Image File dialog. You can select a Custom Map to control or vary the scatter color to produce more interesting volume lighting effects. Scatter Color can be thought of as the color of the dust particles making up the volume through which the light is passing.
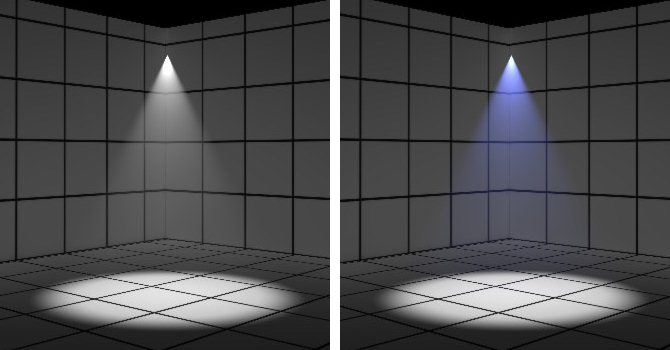
Scatter Color RGB values set to 94,94,94 (left) and 40,50,156 (right)
|
| Volume Effects tab > Samples |
Controls the accuracy of the volumetric effect underneath shadowing objects. Increasing the samples value improves the accuracy.
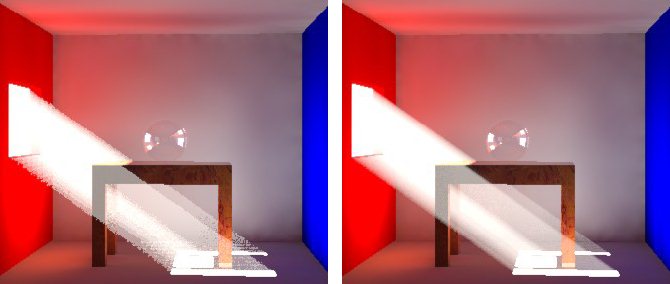
Samples set to 40 (left) and 200 (right)
|
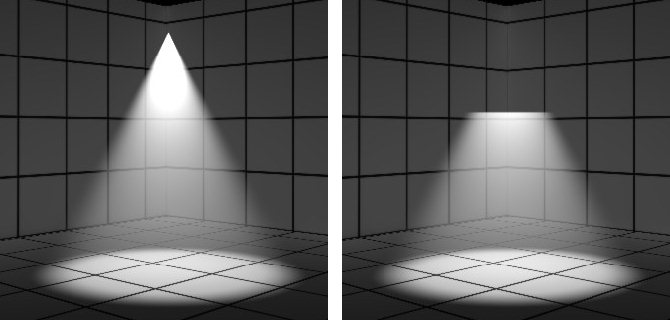
| Volume Effects tab > Height |
(Applies to Spot Lights, Directional, and Solar lights only) Sets the height in working units. The volume effect’s coverage depends on the type of light. For distant and solar lights this is cylindrical with a diameter and height. Height determines the length of the cylinder. For point lights the effect is radial, so this occurs within a defined sphere and the spot light’s volume effects occur within a defined cone.
Height set to 2 meters (left) and 0.5 meters (right)
|
| Volume Effects tab > Radius |
(Applies to Point, Directional, and Solar lights only) For Solar and Directional lights, Radius defines a cylinder radius. This, combined with the height, creates the volume through which scattering occurs. For point lights, Radius defines the radius of the sphere for the scattering volume.
|
| Volume Effects tab > Base |
(Applies to Spot lights only) Defines the offset from the spotlight at which the scattering can occur.
Base set to 0 meters (left) and 0.2 meters (right)
|
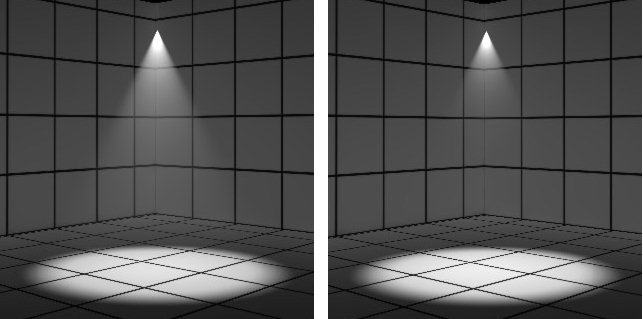
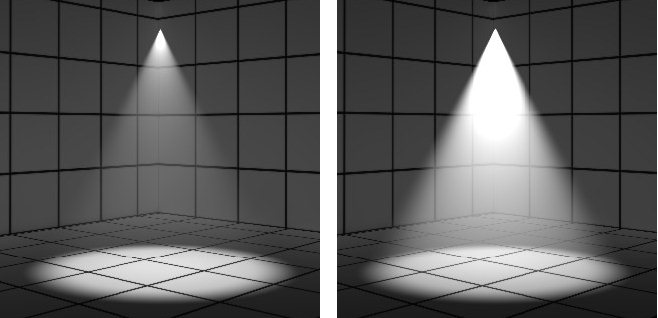
| Volume Effects tab > Scattering |
Controls the amount of light scattering which occurs inside the volume. Higher values result in more scattering.

Scattering set to 10% (left) and 80% (right)
|
| Volume Effects tab > Density |
Sets the density for the volumetric effect. Higher values will make the volume thicker and more opaque.
Density set to 10% (left) and 80% (right)
|
| Volume Effects tab > Volumetric Density Map |
Used to control or vary the volume density. For example, you can use a grayscale image like a bump or specular map to create more realistic volume effects. |
| Volumetric Effects tab > Attenuation |
Controls the amount of attenuation of the effect. A value of 0% gives a natural fall off and as the value increases the fall off becomes greater.
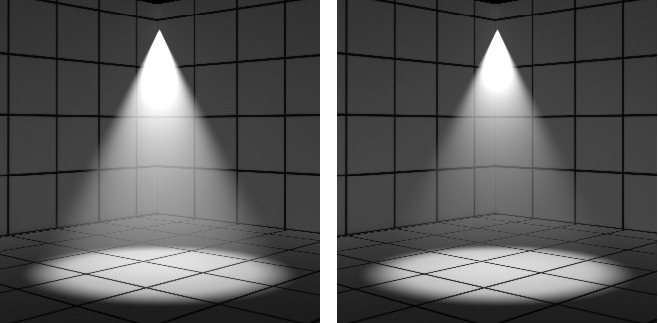
Attenuation set to 0% (left) and 50% (right)
|
| Volume Effects tab > Light Shift |
As the light is increasingly attenuated, certain wavelengths are absorbed or scattered. This setting can mimic these effects. Negative values push the color of the volume increasingly toward light blues, while positive values push the color towards warmer orange and red hues. The Attenuation value must be a number above 0% to see any effect. |
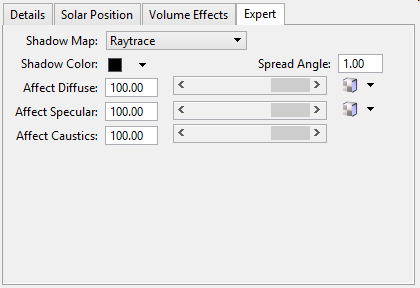
| Expert tab > Shadow Map |
This setting has two options, Raytrace (default) and Deep Shadow Maps. In instances when you want a light to cast a shadow, Ray Traced gives the most accurate results. Deep Shadow maps are useful for volumetric lights. |
| Expert tab > Resolution |
(Only when Shadow Map is set to Deep Shadow Map) Specify the resolution with the default being 1024. Higher values produce more shadow detail. |
| Expert tab > Shadow Color |
Controls the color of shadows from opaque objects. Options are Custom and Color Map. Using gray color rather than black for shadows, you can remove overly dark shadows from your scene even where only one bounce of light is used. Using a color map the shadow color can be varied rather than being a constant color. |
| Expert tab > Spread Angle |
This setting is used to soften the solar shadows. Small values result in sharper shadows and larger values produce softer shadows. A Spread Angle of 2 would produce reasonably soft shadows whereas a value of 10 to 15 would produce very soft shadows like you would expect on an overcast day. |
| Expert tab > Affect Diffuse |
This percentage value will control how much the light contributes to the final Diffuse shading of the scene. You can set this value to 0% if you want to hide the light from Diffuse shading. This allows the creation of a Specular only light source. |
| Expert tab > Affect Specular |
Controls the amount as a percentage that the light affects specular within the scene. A value of zero will produce no specular highlights. |
| Expert tab > Affect Caustics |
Controls the amount as a percentage that the light contributes to a caustic effect. A value of zero means that the light will not produce caustic effects. |