Material Editor Dialog, Palette Tree
The Palette Tree contains controls for managing material palettes and the materials contained in them, environment maps, and material assignments/attachments. The name of the current material table is displayed at the top of the list, followed by material palette files. A "+" to the left of an icon indicates that the item may be expanded (and a "-" indicates that you can collapse the item). Palettes shown in bold contain used materials, while those shown in blue have been modified in some way. You can use the pointer or the keyboard to navigate through the tree. Many of the standard Windows keystrokes can be used, such as "*" to expand an entire branch of the tree, right and left arrow keys to expand/collapse one level of the tree, and <Delete> to delete an item.
You can display/hide the Palette Tree by clicking the Show/Hide Palette Tree arrow icon to the left of the Palette item in the Material Editor dialog. Menus, and the icons in the Material Editor dialog let you control the display of the material tree. As well, right-click menus give you a selection of tools for many of these manipulations. Clicking on a material, automatically sets its palette file as the selected Palette in the Material Editor dialog, and the Apply Material tool settings.
You can use the Filter materials icon in the Material Editor dialog to filter the display of items in the material tree.
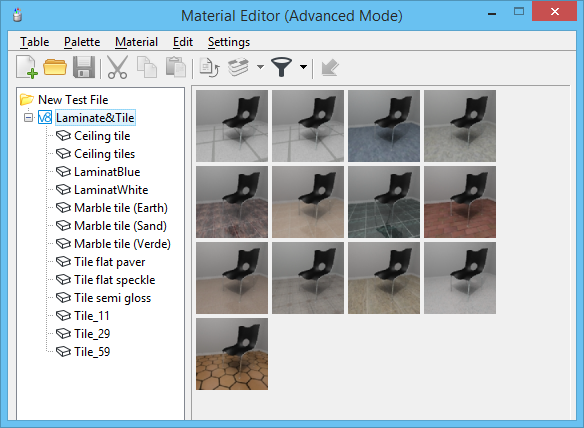
In the palette tree, when you click on a:
- Palette — samples of all
the materials contained in the palette are displayed in thumbnails on the
right.
Double-clicking on the selected thumbnail selects the material in the Palette Tree and displays the current settings on the right.
Right-clicking on a thumbnail opens a menu for the material.
- Material — settings for that material, plus a preview window, are displayed on the right.

Icons help to discern the various types of palettes that are loaded, as follows:
- Library palette saved externally to the DGN file.
- Local palette saved with the DGN file.
- Library 3DS palette (.mli file) — cannot be modified.


Similarly, materials have icons as follows:


Where a local material references a library material that still exists in the original library palette, then two cases are possible:
- The local material is equivalent to the library version.
- The local material is different from the library version.


If a material's name displays in italics, then it has the same name as a material from another palette. Materials with duplicate names are ignored, and cannot be applied or attached to elements.
| Setting | Description |
|---|---|
| Right-click menu for Material Table file | Located at the top of the tree is the current material table. Right-clicking on the material table opens a pop-up menu containing the same options as for the Table menu of the Material Editor dialog. |
| Right-click menu for Palette files | Listed under the material table are all the material
palettes that are currently loaded. Right-clicking on a palette entry opens a
pop-up menu containing the options that are available in the Palette menu of
the
Material Editor dialog, plus the following items:
|
| Right-click menu for Materials | Listed under each material palette are the
materials defined in that palette. Right-clicking on a material entry opens a
pop-up menu containing the options that are available in the Material menu of
the
Material Editor dialog, plus the following items:
|
| Material assignments | When a material is assigned by level and color, or attached to an element, the list of assignments and attachments is shown below the material. If the material is unused, no plus sign appears next to it in the tree. When the list of assignments/attachments is expanded, assignments can be identified by the icons, as follows: |
| Right-click menu for material assignments | Right-clicking on a material assignment opens a
pop-up menu containing the options that are available in the Material menu of
the
Material Editor dialog, plus the following items:
|


