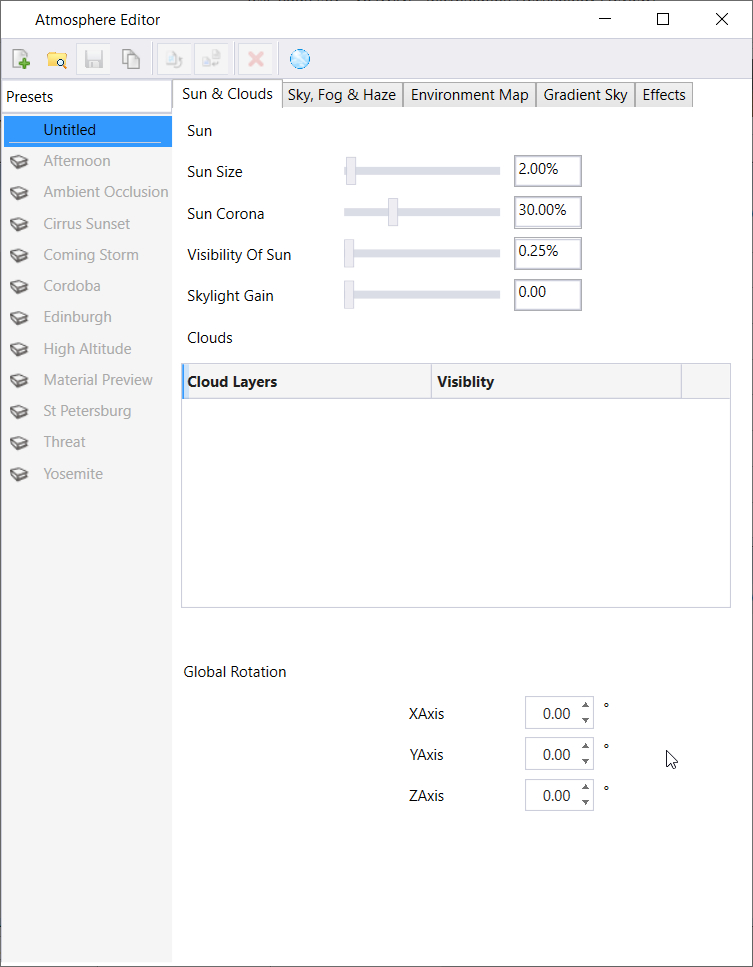
MicroStation CONNECT Edition Help

Atmosphere Editor Dialog

Used to edit Atmosphere settings to get realistic atmosphere effects in rendered views.

You can access this dialog from the following:
  • Visualization > Home > Rendering > RenderScene > Vue Render dialog


SettingDescription
New Preset

Creates a new preset for Atmosphere. By default, it is given the name Untitled, which you can edit to a name of your choice.

Load Atmosphere Lets you browse and choose a atmosphere file to use as a template and create a new atmosphere setup.
Save Preset When you change an existing preset, or create a new one, the Save Preset icon is enabled to indicate a save is possible. Names of presets that are yet to be saved appear in grey in the tree view.
Copy Copies the selected preset, if the preset exists in the DGNLibrary, a local copy is made.
Reset (Enabled only when you have made a change to a preset) Returns the preset to its previously saved state.
Update from Library Synchronizes the local setup to match the one in the DGN library.
Delete Deletes the selected preset.

Only local presets can be deleted.

If you have copied a preset that exists in the library, and then deleted it, the library symbol will change to gray when the local copy is deleted.

Presets that are local, and don't exist in an external DGN library, are permanently deleted.

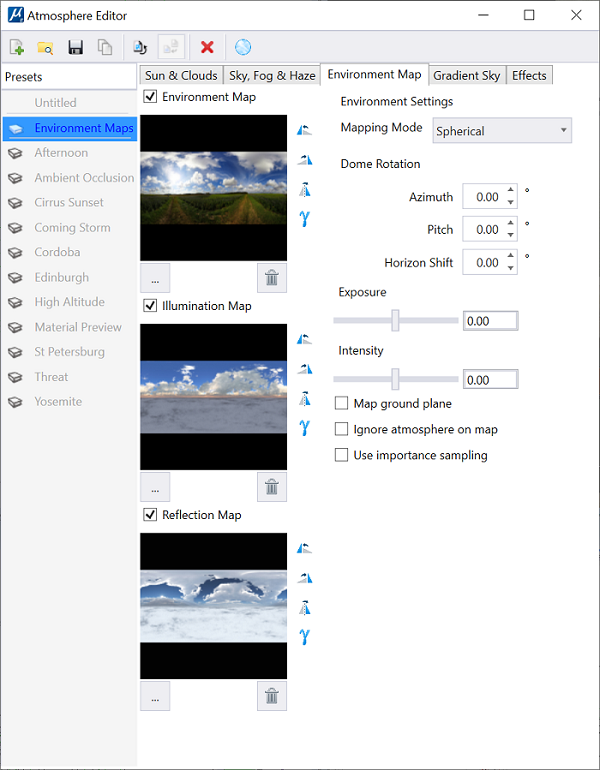
Render to Spherical Environment Map

Creates a spherical environment map of a photometric spectral atmosphere. Using a spherical environment map image allows faster rendering of views.

Sun and Clouds


SettingDescription
Sun Let's you adjust the sun's size, size of corona, visibility and Skylight settings in the rendered output. You can use the slider or type in values to adjust the same.
Clouds Adjust the visibility and cloud cover. Turn on the visibility checkbox to enable cloud visibility. You can adjust the amount of cloud cover using the slider or by typing in a value.

Sky, Fog and Haze


SettingDescription
Sky Lets you edit the sky settings:
  • Ground density - Controls the density of atmospheric gases at ground level.
  • Mean altitude - Controls the rate at which density of atmospheric gases drops with altitude.
  • Decay amount - Controls the amount of reddening that occurs as the sun gets closer to the horizon.
  • Decay Mean altitude - controls the rate at which the decay reduces with increase in altitude.
Fog Lets you edit fog settings:
  • Ground Density - controls the density of fog particles at ground level.
  • Mean altitude - Controls the rate at which density of fog particles drop with altitude.
Haze Lets you edit haze settings:
  • Ground density - Controls the density of dust and pollution particles at ground level.
  • Mean altitude - Controls the rate at which dust particles drop with increase or decrease in distance.
  • Glow intensity - controls the amount of glow of dust particles.
  • Scattering Anisotropy - Controls the overall shape of glow effect.
  • Clouds Anisotropy - Controls the scattering of light in clouds.
Global Settings
  • Ariel Perspective - Controls overall thickness of atmosphere. This is a scaling factor used to uniformly render the atmosphere.
  • Quality boost - controls the number of samples taken throughout the atmosphere.
  • Godrays checkbox - If enabled, clouds will cast shadows in the atmosphere resulting in rays of light showing through the clouds.
  • Projected shadows on clouds checkbox - If enabled, will produce shadows on clouds from other clouds or objects that are above the cloud layer.

Environment Map

SettingDescription
Environment Map If on, lets you edit environment map settings:
  • Mapping Mode - Select a desired environment mapping mode.
  • Dome Rotation
    • Azimuth - set azimuth angle. Azimuth will rotate image around vertical axis.
    • Pitch - set angle of pitch. Pitch will rotate image around horizontal axis.
    • Horizon shift - Horizon shift will adjust the height of horizon and skydome.
Load Lets you load an environment map.
Remove Removes the environment map.
Illumination Map If on, lets you edit illumination map settings:
  • Exposure - use the slider or type in a value to adjust exposure of environment map.
  • Intensity - adjust intensity of indirect light of the environment map.
  • Map ground plane - if on, lower half of the environment map is automatically mapped on to the ground plane.
  • Ignore Atmosphere on map - if on, effect of atmosphere like fog and haze will not be visible on the environment map.
  • Use importance sampling - if on, improves shadows from indirect lighting.
Reflection Map Lets you select a different image seen from the reflections of an object.

Gradient Sky


SettingDescription
Gradient Type Select type of gradient to be used for the environment.
Zenith Color Select the color that is directly overhead and ramps into the Sky color.
Sky Color Select the color that starts at the horizon and ramps upward.
Exponent Set the value for blending of the Zenith or Sky colors.
Ground Color Select the color for stimulating the ground.
Nadir Select the color that is directly below the camera and ramps into the Ground color.
Exponent Set the value for blending the Ground/Nadir colors.

Effects


SettingDescription
Stars If on, will add stars to the sky:
  • Number of stars - adjust the percentage of sky covered with stars.
  • Brightness - Adjust to increase or decrease the brightness of stars, higher value means brighter stars.
  • Twinkle - Adjust the amount of twinkling of stars in an animation.
  • Lens Flares - If on, adds flare effect around stars.
  • Colored Stars - If on, adds colored stars, else all stars will be white.
Rainbow If on, adds rainbow effect to atmosphere if the sun is behind the camera:
  • Intensity - Adjust the overall intensity of Rainbow effect.
  • Size - Adjust the thickness of Rainbow effect.
  • Falloff - Adjust how the intensity of the rainbow reduces with altitude.
  • Secondary bow - If on, adds an inverted, large and dimmer secondary bow.
  • Realistic colors - If on, shows rainbow in realistic color distribution.
Ice ring If on, adds Ice Ring effect. Ice rings are only visible when the sun is in camera view:
  • Intensity - Adjust the overall intensity of Ice ring.
  • Size - Adjust the overall thickness of Ice ring.
  • Parhelic Arc - If on, adds a secondary, much dimmer ring that appears at an angle of 46 along the direction of the sun.
  • Sundogs - If on, adds sundogs. Sundogs are horizontal flares of light that appear on either side of the sun.
  • Pillar - If on, adds sun pillar. A Sun pillar is a vertical flare of light that appears to extend from the central sun flare to the edges of the ice ring.