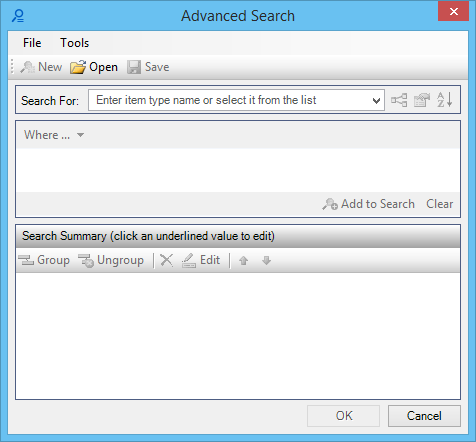
| New |
Clears the fields for the start of a new query. |
| Open |
Opens a dialog from which you can select an already saved query. |
| Save |
Opens a dialog which allows you to save the query with an .ecquery.xml file extension. |
| Search For |
The Search For section defines the object that will be queried. Select an item from the list or enter the item name directly into the field. As characters are typed into the field, a filtered list of objects displays. Double-click an object to add it to the query. The query form supports querying for items with common properties or multiple types of items. These types of queries are called property-based queries and are initiated when either <Items by common properties> or <Multiple types of items> is selected from the Search For option menu.
If <Items by common properties> or <Multiple types of items> is selected in the Search For field, the Add or Remove Items dialog opens, which allows you to add or remove items from the search. You get the same result by clicking Items in the Search Summary section of the dialog.
|
| Include item sub-types in results |
Clicking this icon will include the search results of the sub-types or derived types of the items. For example, say you want to find all elements that are red in color, irrespective of the element type. You can do so by selecting Elements from the Search For drop-down list, turning on this icon, and adding the criteria for color. The search result will list all the elements in color red, irrespective of their element types. |
| Add and remove properties to be selected in the search |
Opens the Properties To Include dialog, which allows you to add or remove properties and properties of related objects to the search. Same as clicking (including these properties) in the Search Summary section of the dialog. |
| Define the sort order of the search |
Opens the Select Sort Order dialog, which allows you to set the sorting options of the search results. Same as clicking (sorted) in the Search Summary section of the dialog. |
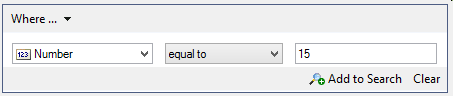
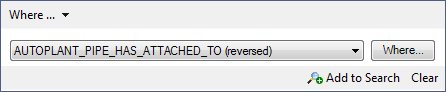
| Where (drop-down) |
The drop-down menu displays the option of searching by property or relationship information.
- Property value is - Allows you to enter object property information and conditions related to the search.
- Related item is - Allows you to add relationship information between objects to the search.
|
| <name> |
The drop-down menu alphabetically displays the properties available. You can enter the first letter of the property you want to select and you will be taken to the first instance of the property that begins with the letter selected. Pressing the same letter repeatedly causes you to skip from one property to the next one that starts with that letter. |
| <condition> |
The drop-down menu displays the operator choices. Most of the operators are commonly known except for "in," "like," and "not in." "In" means the value of the selected property falls within the specified string. "Like" is similar to "equal to" except that it takes the wildcard characters * (asterisk) for multiple characters and % (percent) for a single character. The "equal to" operator is required when the property value actually contains one of the wildcard characters.
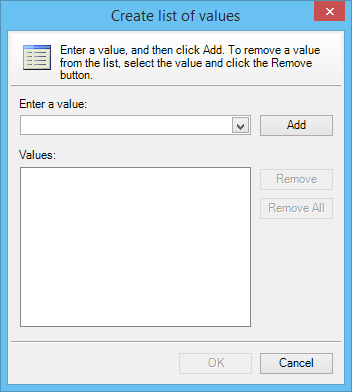
When you select "not in," an ellipses (…) button displays. Click this button to open the Create list of values dialog, which allows you to create a list of values that you do not want included in the search.
Once you add (or remove) the values you want to exclude and click OK, the excluded values display in the value field of the Advanced Search dialog.
|
| <value> |
Type a value in the field. |
| Where (button) |
(available when Related object is … is selected from the Where drop-down) Opens the Create Where Clause dialog, which allows you to add the conditional information to the relationship. |
| Add to Search |
Adds the criteria to the Search Summary box at the bottom of the dialog. When Edit is selected in the Search Summary box, Accept and Cancel options replace Add to Search. |
| Clear |
Clears the <name>, <condition>, and <values> fields. |
| Group |
Allows you to group the search criteria. To group one or more conditions, first select contiguous conditions in the search summary, then click the Group button. Beginning and ending parenthesis are added to the group. Nested grouping is supported. |
| Ungroup |
Allows you to ungroup the search criteria. To ungroup, select either the starting or ending group parenthesis. All of the group's conditions are highlighted. Click the Ungroup button. The beginning and ending parenthesis of the group are removed. Removing nested grouping is supported. |
| Remove |
Allows you to delete search criteria. To remove a condition, select a condition in the search summary, and click the Remove button. If the last remaining condition of a group is removed from a group, the group is automatically removed. |
| Edit |
Allows you to edit the search criteria. To edit a condition, select a condition in the search summary, then click the Edit button. The panel that originally generated the condition displays in the Where section with the appropriate fields populated. Modify the conditional information in the panel, click Accept in the Where section, and the new values are shown in the search summary. |
| Move up |
Moves up one condition at a time. Select a condition in the search summary, then drag the selected condition to the desired location. An insertion line displays while dragging the condition to indicate the location of the condition once dropped. You can also move a condition by selecting it in the search summary, then click the Move Up button. If the last remaining condition of a group is moved out of a group, the group is automatically removed after the move operation. |
| Move down |
Moves down one condition at a time. Select a condition in the search summary, then drag the selected condition to the desired location. An insertion line displays while dragging the condition to indicate the location of the condition once dropped. You can also move a condition by selecting it in the search summary, then click the Move Down button. |
| Selecting properties |
By default, all object properties and related properties are returned from the query. You can select individual properties and related properties to be returned from the query. Click the (including these properties) hyperlink in the Search Summary to display the Properties to Include dialog. You can then add or remove properties to be returned from the query. |
| File > New |
Clears the currently displayed query on the Query Form. The Search For and Conditions sections are cleared, and any conditional information added to the search summary are removed. |
| File > Open |
Opens a previously saved query file. The standard Windows file open dialog displays. The Query Form displays the conditional information in the exact order it was saved. |
| File > Save |
Saves the query to a file. The standard Windows file save dialog displays. Enter a file name and save the file. |
| File > Save As |
Saves the query in a different directory with a different name. |
| File > Close |
Closes the dialog. |
| Tools > Options |
Opens the Options dialog. From this dialog, you can define the default logical operator (And/Or) applied when conditions are added to the search summary. |
| Tools > Toolbar |
Turns on/off the display of the toolbar at the top of the Advanced Search dialog. |
 Used to define a query to search the repository for specific files or items to display in the respective tabs.