Creating an Analysis Project
An analysis project brings your model, simulation, analysis, and desired output together in one place. The resulting file is saved as a LEGION Analysis Project file (*.ana).
To create a new analysis project:
- Click
 or select File > New.
- Click the browse button
 to the right of the Data Source
box and select the appropriate LEGION Simulator File (*.ora) or LEGION
Simulation Results (*.res) file by navigating within the 'Open' dialog.
to the right of the Data Source
box and select the appropriate LEGION Simulator File (*.ora) or LEGION
Simulation Results (*.res) file by navigating within the 'Open' dialog.
- The Project Type is selected automatically, based on the Data Source. It will either be Simulation or Results.
- The Project Base Folder is automatically identified from the selected Data Source.
- The Model File is
automatically identified based on the Data Source file, but for this to work
both files must be in the same folder.
- To manually identify the
Model File (*.lgm), or choose a different one, click the browse button
 to the right of the Model File
box and select the appropriate LEGION Model File by navigating within the
'Open' dialog.
to the right of the Model File
box and select the appropriate LEGION Model File by navigating within the
'Open' dialog.
- You can also type in the file path. If the file does not exist, or there are other problems with the file, the outline of the Model File box glows red, and a tooltip describes the error.
- To manually identify the
Model File (*.lgm), or choose a different one, click the browse button
- LEGION Simulator will
attempt to identify all Scenario files for the selected Model File. If any are
detected, they are listed in the Scenario drop-down.
- Use the Scenario drop-down to quickly select the Data Source for the named Scenario, without needing to browse for it.
- LEGION Simulator tries to match the selected Data Source to an identified Scenario. If a match is found, the Scenario is automatically selected in the Scenario drop-down.
- If a match cannot be found, the Scenario drop-down remains blank.
- If a Model File does not contain Scenarios, the Scenario drop-down is disabled.
- If your simulation includes
Aimsun vehicles, check the box labelled Load Aimsun simulation result file,
click the related browse button
 to the right of the box and
select the appropriate 'xml' file.
Tip: If the Aimsun Result File is in the Project Base Folder, the path is automatically converted to a relative path.
to the right of the box and
select the appropriate 'xml' file.
Tip: If the Aimsun Result File is in the Project Base Folder, the path is automatically converted to a relative path. - When you have selected your project files, click OK.
- Click
 or select File > Save and
choose a name and location for your LEGION Simulation Analysis File.
or select File > Save and
choose a name and location for your LEGION Simulation Analysis File.


You are now ready to start your analysis session.
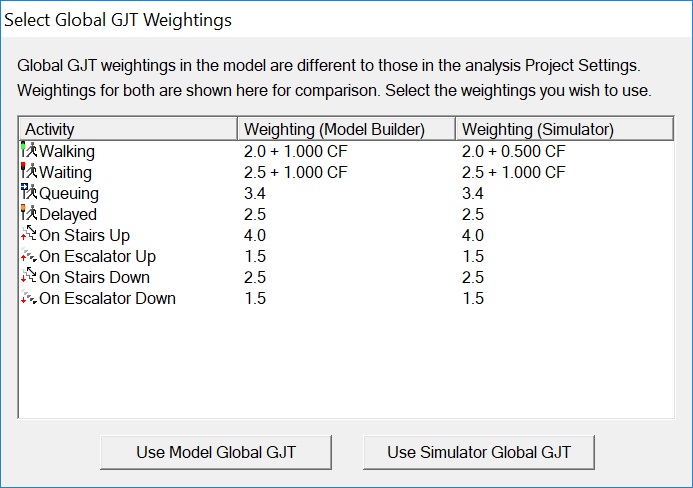
Note: When starting a session, you may be asked to choose between your
model's global Generalised Journey Time (GJT) weightings and LEGION Simulator's
GJT weightings. This occurs if the settings in the Data Source and Model File
don't match - perhaps because the LEGION Model settings have been changed, or
if the LEGION Model was created software earlier than Legion SpaceWorks R5. The
following dialog will be displayed, where you can decide on which weightings to
use in your analysis project. Click one of the two buttons at the foot of the
dialog.