Importing files
To import a CAD file:
-
Within
LEGION Model Builder,
select
.
The ‘Open’ dialog box is displayed.
-
Browse to the CAD file you want to import, select it and click
Open.
If there are any types of CAD object that LEGION Model Builder doesn’t recognise, the ‘Incompatible CAD Detected’ window is displayed. This lists all incompatible CAD elements by type and number.
-
Check the contents of the window and click
OK to move on.
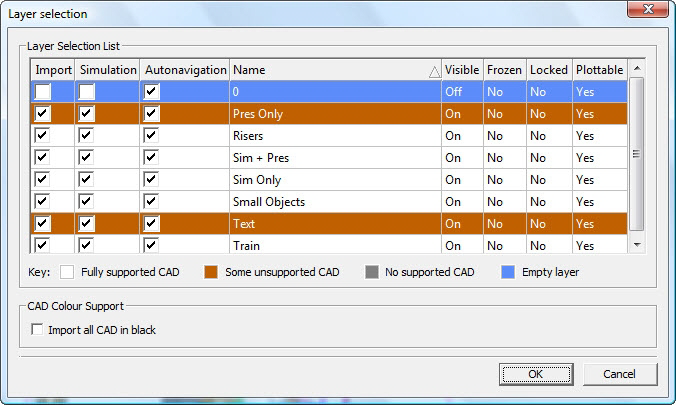
The ‘Layer Selection’ dialog box is displayed.
This lists all the layers available for import and enables you to select and de-select layers for inclusion as part of the import and also for inclusion in the eventual simulation. The layers are also colour-coded:
- For each layer you want to import, ensure that the ‘Import’ tick box is ticked. To exclude a layer, untick the box.
- For each layer you want to import as Simulation CAD, ensure that the ‘Simulation’ tick box is ticked. To exclude a layer, untick the box.
- For each layer that contains small objects that you would like Auto-navigation to ignore (this saves on memory and permits more accurate pedestrian movement), ensure that the ‘Auto-navigation’ box is unchecked.
- Click OK to continue with the import.
- To import all CAD lines as black lines, check the box marked Import all CAD in black.
-
Click
OK.
The CAD Import progress bar is displayed. When progress is complete, the ‘Drawing Units/Scale’ dialog opens.
- Ensure the Drawing units and Drawing scale settings are correct for the CAD plan being imported.
- Check the box marked Adjust model dimensions to fit imported geometry (this ensures that the LEGION model is large enough to contain the obstacles on your imported plan).
-
Click
OK.
The CAD file appears in LEGION Model Builder workspace and the Object Directory and ‘Layers’ dialog are populated with the new CAD layers and objects.
After importing CAD, make sure that the correct CAD Layer is ‘active’. See Making layers active .