Managing links into a Group Object
To define links by percentage weighting:
-
From the ‘Select target objects’ dialog, select the objects you
want to be able to receive links and click
OK.
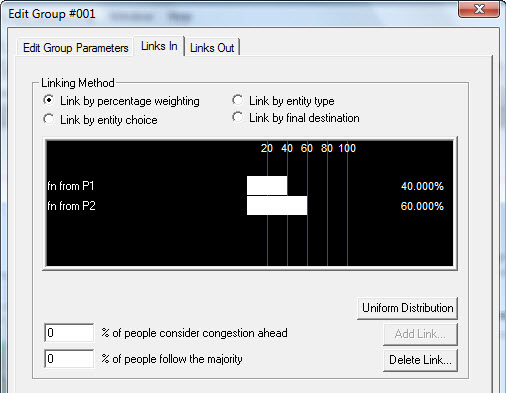
The objects will be listed in the dialog box along with a series of columns indicating percentage weighting.
-
To define the percentage of Entities you want to distribute to
each object, click on the name of each target and drag your cursor to the
right.
The horizontal percentage bar indicates the percentage of Entities you are assigning to each object (a split of 50/50% between two objects means that half of all Entities targeted to the group will go to each).
- Enter a value for the ‘% of people consider congestion ahead’.
-
Enter a value for the ‘% of people follow the majority’.
If you want to split percentages equally between all the selected objects, click the Uniform Distribution button.
- Click OK to save your changes.
To define links by Entity Type:
-
From the ‘Select target objects’ dialog, select the objects you
want to be able to receive links and click
OK.
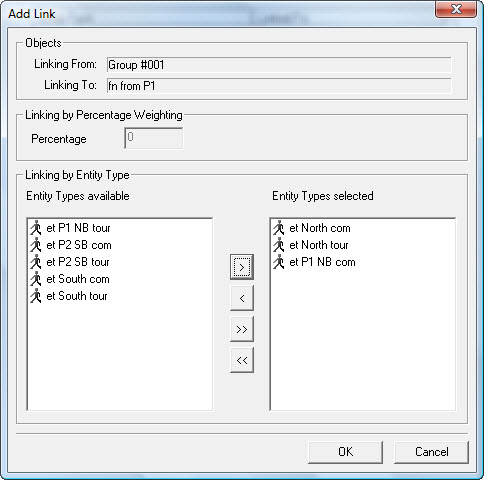
The ‘Add Link’ dialog is displayed.
- Select the Entity Types you would like to be able to link to the Group Object using the selection buttons >, >>, <, <<.
- Click OK.
-
If you added more than one object, the ‘Add Link’ dialog box for
each of the objects will be displayed in turn. Repeat steps 2 and 3 for each.
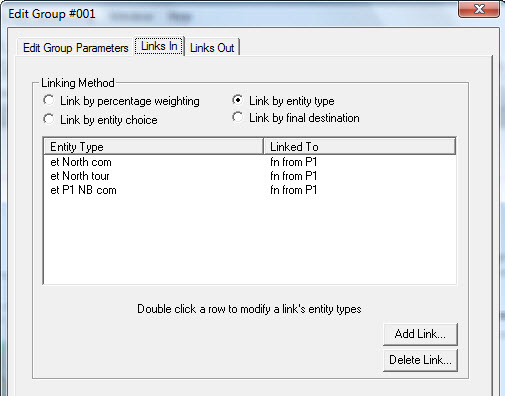
Your selected Entity Types and objects they are linked to are displayed in the ‘Edit <name> dialog box.
- Click OK to save your changes.
To define links by Entity choice:
-
From the ‘Select target objects’ dialog, select the objects you
want to be able to receive links and click
OK.
The objects are listed in the ‘Objects’ column.
- Enter a value for the ‘% of people consider congestion ahead’.
- Enter a value for the ‘% of people follow the majority’.
- Under ‘Entity Choice Decision Method’, select one of:
- Click OK to save your changes.
To define links by Final Destination:
-
From the ‘Select target objects’ dialog, select the objects
you want to be able to receive links and click
OK.
The ‘Add Link’ dialog is displayed with details of the first object selected.
- Select the Final Destinations you would like to be able to link to the Group Object using the selection buttons >, >>, <, <<.
- Click OK.
-
If you added more than one object, the ‘Add Link’ dialog for
each of the objects will be displayed in turn. Repeat steps 2 and 3 for each.
Your selected Entity Types and destinations are displayed.
- Click OK to save your changes.