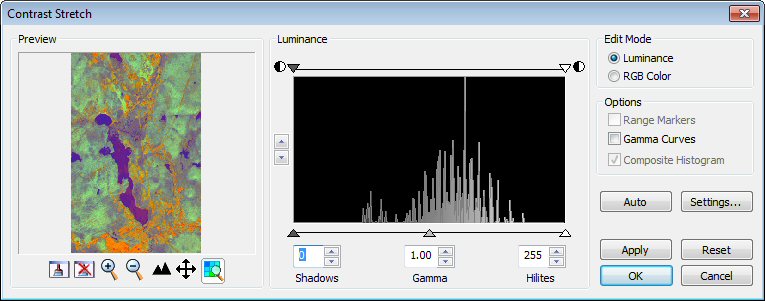
Contrast Stretch dialog
Used to display the histogram of the active image and to change the contrast of the image by using the histogram as a reference.
| Setting | Description |
|---|---|
| Preview |
The Preview pane provides visual feedback on the selected image by applying a highlight to all pixels included in the range. A set of controls allow you to explore the preview (Zoom In, Zoom Out, Pan, Fit, Update Preview, Update View and Restore View). |
| Luminance |
Displays the luminance histogram of the currently selected image when Luminance is selected in the Edit Mode group. The display of the histogram is a representation of the number of pixels having each of the 256 possible values, from 0 to 255. The Sliders are used to comprise in that range on the required values. All the pixels (values) comprised in that range are highlighted on the image. The Up/Down controls at the left of the graph are used to adjust the Vertical Scale of the histogram. The Sliders and text boxes are used to position the start and end points of the range. The Center Slider is used to move the ranger across the histogram. |
| Channel |
Displays the channel histogram of the currently selected image when RGB Color is selected in the Edit Mode group. The display of the histogram is a representation of the number of pixels having each of the 256 possible values, from 0 to 255. The Sliders are used to comprise in that range on the required values. All the pixels (values) comprised in that range are highlighted on the image. The Up/Down controls at the left of the graph are used to adjust the Vertical Scale of the histogram. The Sliders and text boxes are used to position the start and end points of the range. The Center Slider is used to move the ranger across the histogram.
|
| Edit Mode |
Use to determine the Edit Mode to be used in the histogram. |
| Luminance |
When selected, the histogram of the image, if not already done so, is converted to LUV where the L is used to display the histogram and enhance the image. |
| RGB Color |
When selected, the histogram of the image is displayed in RGB. A Combo box displays the following choices: RGB, Red, Green and Blue. |
| Range Markers |
When ON, the Shadows and Highlights values of each channel is displayed in the histogram graph using a pair of vertical lines in the same color of the channel. The lines are positioned on the graph at the position representing the values of the channel. The Range option is automatically turned ON if the combo box selection returns to Lightness or RGB and where channels have been modified. When two or more channels have the same value, the vertical line is displayed in black. When OFF, the vertical lines are not displayed in the histogram graph area. |
| Gamma Curves |
When ON, the gamma values of each channel is displayed in the histogram graph using a diagonal line in the same color of the channel. The Gamma Curves option is automatically turned ON if the combo box selection returns to Lightness or RGB and where the gamma has been modified. When two or more gamma channels have the same value, the diagonal line is displayed in black. When OFF, the diagonal lines are not displayed in the histogram graph area. |
| Composite Histogram |
When ON, displays the histogram in the Composite mode When OFF, displays three histogram outlines using each channel color. |
| Auto |
The Auto button produces an automatic Contrast Stretch. To automate the process, the Shadows and Highlights clipping values are computed by excluding a specified percentage of pixels for both extremities. The percentages are predefined by default values and can be tweaked by the user. The values are taken from User Preferences. The Settings button can be used by the user to change these values. When the user clicks on the Auto button, the shadow and highlight values are computed and the sliders are positioned accordingly. In addition, the gamma is reset to 1. |
| Settings |
The Settings button opens the Descartes Settings dialog, automatically selecting the Contrast Stretch Tab. The tab presents the new Auto Clipping Limits group with two user defined settings, Shadows and Highlights. You can change the values, click OK and return to the Contrast Stretch Dialog. You must click Auto again to apply the new values. If you previously clicked Auto, the Stretching is done on the new histogram. User must use the Reset button to apply the new values to the original histogram. |
| Apply |
Click to apply the contrast stretch to the image without exiting the Density Slicing dialog. |
| Reset |
The Reset button resets to default values all dialog settings. |
| OK |
Click OK to apply the contrast stretch to the image and exit the Density Slicing dialog. |
| Cancel |
The Cancel button closes the dialog and resets the values to their default. No changes are applied to the image. |