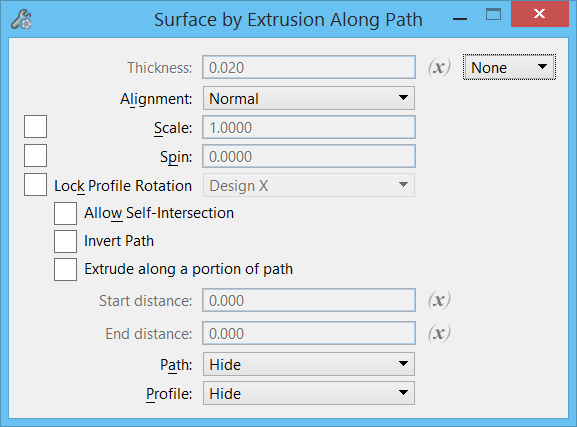
| Thickness |
Sets the wall thickness when a hollow solid, or a surface with thickness is required.
- None — Disables the Thickness setting.
- Inside — The thickness is protruded on the inside face of the extrusion.
- Outside — The thickness is protruded on the outside face of the extrusion.
- Center — The thickness is equally protruded on both faces of the extrusion, respecting the total thickness value entered.
|
| Variable Link |
Let's you use an existing variable to set the input value, defined in the Variables dialog. Note: If no variables exist, you will be alerted to create one first.
|
| Alignment |
Determines the orientation of the profile element as it is extruded.
- Normal — As the profile is extruded it maintains a fixed relationship with the normal plane of the path.
- Parallel — As the profile element is extruded, it remains aligned parallel to its original position.
|
| Scale |
Lets you apply a scale factor to the extrusion. The profile is scaled about the selected scale point as it is extruded. Prior to accepting the extrusion, you can adjust the scale point by dragging the scale point graphic (sphere) to a new location. |
| Spin |
If on, the profile is rotated by the angle specified in the angle field as it is extruded along the path. |
| Lock Profile Rotation |
If on, lets you define the direction for the orientation of the profile as it is extruded along a non-planar path. If off, the orientation of the profile is controlled by the geometry of the non-planar path, possibly causing unwanted twisting.
|
| Allow Self-Intersection |
Allows self intersecting geometry. If on the operation will take longer if the geometry intersects. If off and geometry intersects then the operation will fail. |
| Path |
Sets the behavior of the path after the feature is created.
- Hide - The path is associated with the feature to allow for later modification, but is not visible. To use or modify the path again, you will need to use Show Input Element command from the reset pop-up menu from the "extrude along" feature icon.
- Show - The path is associated with the feature to allow for later modification and is visible. This allows you to quickly reuse the same path in another 3D operation. Modifying the path will affect both operations.
- Copy and Hide - Similar to Hide; except that a copy of the path is made first, leaving the original path unassociated. This allows you to quickly reuse the same path in another 3D operation that you do not wish to be associated with the previous feature.
|
| Profile |
Sets the behavior of the profile after the feature is created.
- Hide - The profile is associated with the feature to allow for later modification, but is not visible. To use or modify the profile again, you will need to use Show Input Element command form the reset pop-up menu or the Show Input Element tool.
- Show - The profile is associated with the feature to allow for later modification and is visible. This allows you to quickly reuse the same profile in another 3D operation. Modifying the profile will affect both operations.
- Copy and Hide - Similar to Hide; except that a copy of the profile is made first, leaving the original profile unassociated. This allows you to quickly reuse the same profile in another 3D operation that you do not wish to be associated with the previous feature.
|