Main Application Window

Backstage button

Opens the ContextCapture cloud processing console backstage. See "Backstage" section for more information.
Submit button
Opens the 3D model processing dialog. See "3D model processing" section for more information.
Add photos or point cloud
Add a selection of photo or point cloud files to the project. Use Shift or Ctrl to perform a multi-selection.
Import positions
The Import photo positions dialog allows you to import photo positions and rotations from a text file.
Use this option to set image positions and/or rotations from third-party data.
Various kinds of text files are supported. The common condition for all formats is that each photo must be represented by a single line.
The imported data must include at least the photo references, and the 3 coordinates for the photo positions. Rotations are optional.
*<_________Photo_File____________><____Easting___><___Northing___><_____Height___><______Omega___><_______Phi____><_____Kappa____>
   f:\project\images\4655.tif       47268.5080    -517764.1880       1514.7160         -0.2352          0.2168         -2.3779
   f:\project\images\4656.tif       46434.1570    -517745.9920       1513.0090          0.0662          1.1163         -2.2503
   f:\project\images\4657.tif       45618.8710    -517748.2010       1516.4190          0.0227          0.6976         -1.2857
   f:\project\images\4658.tif       44815.0070    -517756.2330       1520.3310          0.6212          0.1720         -0.6776
   f:\project\images\4659.tif       43971.6950    -517762.4530       1519.1290          0.3699          0.2398         -1.9075
   f:\project\images\4660.tif       43116.7510    -517767.1580       1518.0000         -0.4866         -0.4373         -2.8745
   f:\project\images\4661.tif       42266.8970    -517754.3210       1519.9090         -0.3243          0.8787         -2.6415
   f:\project\images\4662.tif       41407.3450    -517763.1880       1525.5080          0.0320          0.2612          0.0047
   f:\project\images\4663.tif       40520.2080    -517783.6610       1523.6580          0.1627          0.7922         -2.7976
Example of text file with positions and rotations
Camera devices
Opens the Camera Devices dialog. See "Camera Devices" section for more informaton.
Surveys
Used to add Control points, User tie points and Positioning constraints. See "Surveys" section for more informaton.
Region of Interest
Use to define a region of interest for the reconstruction with a custom bounding box or a custom polygon. See "Region of Interest" section for more information.
Reconstruction constraints
Use this tool to add a 3D polygon or mesh as a constraint to the Reconstruction. Can be used to fix reconstruction issues on water bodies for example. See "Reconstruction Constraints" section for more information.
Measurements
Opens the Measurements dialog. See "Measurements" section for more information.
Quality metrics
Available after an aerotriangulation has been performed, use the quality metrics tool to display various quality information in the 3D view. See "Quality Metrics" Section for more information.
Home
Restores the default camera position of the 3D view.
Navigation mode
Lock on Photo
This mode activates an immersive view of the scene through a selected photo. See "Lock on photo" section for more information.
Photo Navigation
Filter
Filter photo view by file name, Camera Model and components (main component/no component).
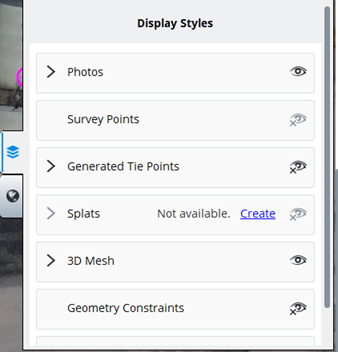
Display Style
Use the display style tool to choose what to display in the 3D view and adjust the display settings of the photos, survey points, automatic tie-points, geometry constraints, reality meshes, etcetera.
Basemap
Click the + sign to open the basemap manager. The basemap manager allows you to enter known coordinates of a bounding box that corresponds to the location of the dataset currently loaded in ContextCapture cloud processing console. The basemap manager uses this bounding box to query the GeoCoordination Service for terrain and imagery data to be used as a basemap.
Status bar

- Notifications: Opens "Messages" dialog to see notifications from ContextCapture cloud processing service.
- Version: Select different versions.
- New version: Create a new version by using the drop-down menu when clicking on the version button.
- Read-Only: Displays when a model is being processed or already processed. When a model is read-only, it's not possible to add photos, import positions, modify camera devices or add surveys.
- View reports: View Production, Acquisition and Calibration reports.
- Share: Share the ContextShare link to the 3D model of the current view.
- Open output directory: Opens folder that contains intermediate, calibration and result files.
- View Layout: Choose between photos only, 3D view only, or photos and 3D view.