Creating Queries
A query is a valid SQL expression that you construct in the Query Builder dialog box. You create and manage queries in the Queries Manager. You also use queries to filter FlexTables and as the basis for a selection set.
To create a query from the Queries Manager:
- Open the Queries Manager by clicking View > Queries.
- Perform one of the following steps:
- To create a new hydraulic model query, highlight Queries - Hydraulic Model in the list pane, then click the New button and select Query.
- To create a new shared query, highlight Queries - Shared in the list pane, then click the New button and select Query. You can also right-click an existing item or folder in the list pane and select New > Query from the shortcut menu.
- In the Select Element Type dialog box, select the desired element type from the drop-down menu. The Query Builder dialog box appears.
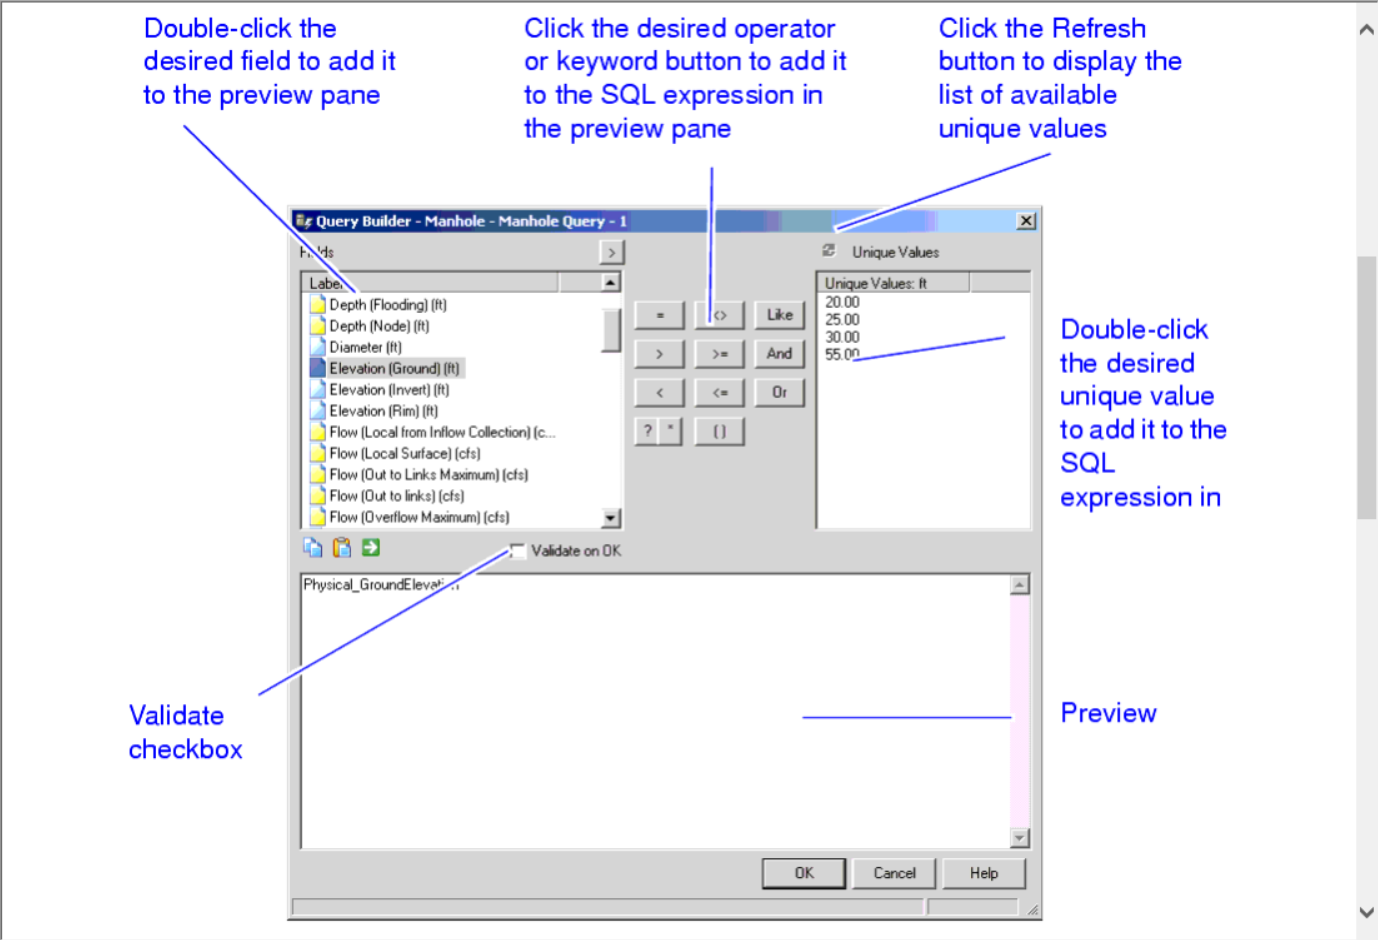
- All input and results fields for the selected element type appear in the Fields list pane, available SQL operators and keywords are represented by buttons, and available values for the selected field are listed in the Unique Values list pane. Perform the following steps to construct your query:
- Double-click the field you wish to include in your query. The database column name of the selected field appears in the preview pane.
- Click the desired operator or keyword button. The SQL operator or keyword is added to the SQL expression in the preview pane.
- Click the Refresh button above the Unique Values list pane to see a list of unique values available for the selected field. Note that the Refresh button is disabled after you use it for a particular field (because the unique values do not change in a single query-building session).
- Double-click the unique value you want to add to the query. The value is added to the SQL expression in the preview pane. You can also manually edit the expression in the preview pane.
- Check the Validate box above the preview pane to validate your SQL expression when the query is applied.
- Click the Apply button above the preview pane to execute the query. If the expression is valid, the word "VALIDATED" is displayed in the lower right corner of the dialog box.
- Click OK.
- Perform these optional steps in the Queries Manager:
- To create a new folder in the tree view, highlight the existing item or folder in which to place the new folder, then click the New button and select Folder. You can create queries and folders within folders.
- To delete an existing query or folder, click the Delete button. When you delete a folder, you also delete all of its contents (the queries it contains).
- To rename an existing query or folder, click the Rename button, then type a new name.
- To edit the SQL expression in a query, select the query in the list pane, then click the Edit button. The Query Builder dialog box appears.
- To quickly select all the elements in the drawing pane that are part of the currently highlighted query, click the Select in Drawing button.
Query Builder Dialog Box
You construct the SQL expression that makes up your query in the Query Builder dialog box. The Query Builder dialog box is accessible from the Queries Manager and from within a FlexTable.
The top part of the dialog box contains all the controls you need to construct your query: a list pane displaying all available attributes for the selected element type, a SQL control panel containing available SQL keywords and operators, and list view that displays all the available values for the selected attribute. The bottom part of the dialog box contains a preview pane that displays your SQL expression as you construct it.
All the dialog box controls are described in the following table.


