Trench Router
The Trench Router option displays the following dialog to allow you to define the parameters for the trench.
Accessed from: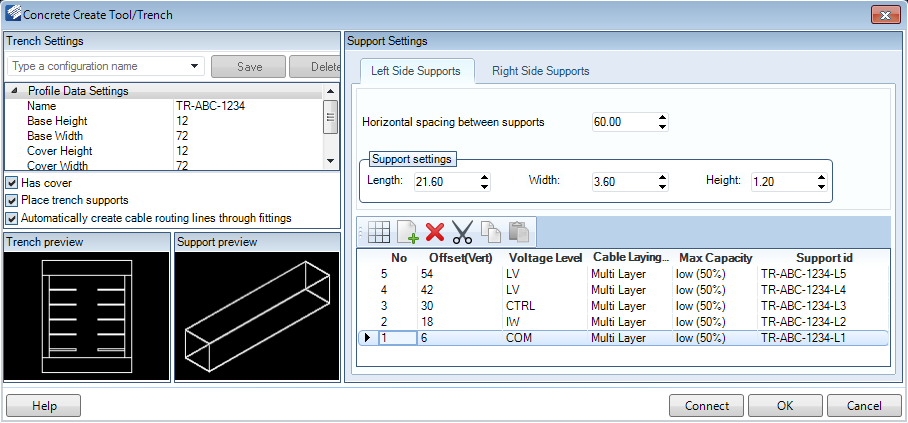
Trench Settings
The trench settings section of the dialog allows you to define the parameters for the trench and save the configuration for future use.
| Setting | Description |
|---|---|
| Configuration Name | Enter a name for the current trench configuration in
the field and Save the settings to reuse throughout the project.
Note: The software saves
the configurations that you create in the location specified in the
configuration variable named, ‘BRCM_USER_DEFINED_CONFIGS.’ By default this is
set to the local user’s app data folder. See
BRCM Configuration Variables for more information on this
variable
|
| Profile Data Settings | Define the physical parameters of the trench using the fields available: |
| Has Cover | This check box toggles whether a cover is included with the trench. If you enable this option, the cover will display in Preview section. (The cover is included in the image above.) |
| Place Trench Supports | This check box toggles whether trench supports are placed with the trench. If you enable this option, the supports will display in the Trench Preview section as shown: |
| Automatically create cable routing lines through fittings | When Enabled, this cable routing lines will be automatically routed through Trench fittings such as Tees, Elbows etc. When Disabled, you will need to manually route these cable lines when fittings are encountered. |
| Trench Preview | Provides a preview image of the trench. As you click in any of the physical parameter fields to define it, the section is highlighted in the preview image. Toggling other options, such as Has Cover and Place Trench Supports, will also toggle the display of these options in the Preview. |
| Support Preview | Provides a preview image of the support. As you define the Support settings, Length, Width and Height, the changes are reflected in the preview. |

Support Settings
The Support Settings section has tabs for Support Left and Support Right, which provide settings for supports which are located on either side of a trench run.
| Setting | Description |
|---|---|
| Horizontal spacing between supports | This defines how far apart the supports are placed along the length of the trench run. You can enter the value directly into the field, or use the arrows to increase/decrease the spacing. |
| Support Settings | These settings define the dimensions of the supports: Enter the value directly into the field, or use the arrows to increase/decrease the value. The changes made are displayed in the Support Preview pane and in the Trench Preview if the Place trench supports option is turned on. |
| Trench Supports Configuration | In this pane, you can define settings for the cable
supports to be included when the trench is routed. For each support the
following parameters can be defined:
|
Setup Grid

|
Displays the Setup Cable Supports Configuration dialog where you can define the number of supports and the spacing between supports. |
Add

|
Adds a new support above the selected support in the trench support configuration section. |
Delete

|
Deletes the selected support record and its values. |
Cut

|
Cuts the selected row to the clipboard. The values of the cut row can be pasted into another row if desired. |
Copy

|
Copies the values in the selected row to the clipboard. These values can be pasted into a different row if desired. |
Paste

|
Pastes the values copied/cut to the clipboard to the selected row. |
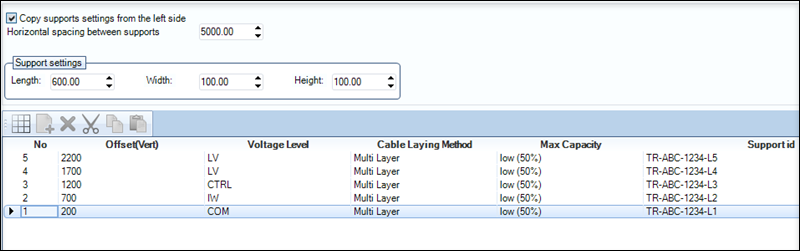
| Use Settings from Left Side (Support Right Tab Only) | This option is only available in the Support Right tab. As it states, it will use the values defined for the Left side supports for the Right side. When this option is enabled, the options defining the support configuration are disabled as shown: |
| Connect | When this icon is selected, you will be prompted to connect to an existing Trench run and continue from the end of that. |
| OK | Click OK to route the trench. You are prompted for a starting point to begin routing. |
| Cancel | Closes the dialog an cancels the command. |