Saved Views
Working with Saved Views.
Saved views allow you to easily jump to points of interest in the model. A saved view remembers the camera location and orientation along with the categories and models that have been set to display. Saved views can be pre-published in the i-model or created in Navigator.
Saved views can be accessed from two locations: the i-model Index screen or the Saved View tab from the Status Bar.
i-model Index screen

The i-model Index screen shows the list of saved views stored in the i-model as well as any saved views you created. The i-model Index screen appears after you select a file or when you are in a model. You can access the i-model Index from the Backstage panel.
Saved View Tab
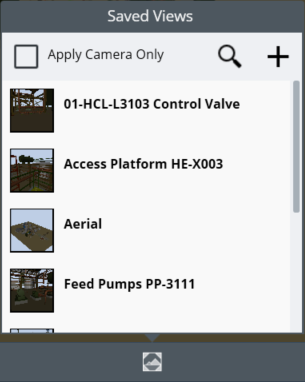
The Saved View tab gives you the ability to apply views as well as to create new views that you can recall later. Views display as thumbnails sorted alphabetically. You can filter the list by selecting the search icon and using the search bar that displays.
 button which displays to the
right of saved views in the list in the Saved View tab. When a saved view is
shared, the Shared
button which displays to the
right of saved views in the list in the Saved View tab. When a saved view is
shared, the Shared
 icon displays next to the saved
view name. Shared saved views can be synced with other members of your CONNECT
project by selecting the Sync button from the Backstage Panel.
icon displays next to the saved
view name. Shared saved views can be synced with other members of your CONNECT
project by selecting the Sync button from the Backstage Panel.
When you select a view from the Saved View tab, the model view moves the camera and changes the display of categories and models. If you do not want the categories and models changed, enable the "Apply Camera Only" toggle in the tool bar.
To create a saved view, just navigate to the point of interest and select the add icon in the tool bar of the Saved View tab. You are asked to provide a name for the saved view and the saved view is created.