Configuring the FTR Service
Full text retrieval (FTR) allows the text within files in AssetWise to be indexed and stored in a database. You can then search for files in AssetWise based on that text.
To configure FTR you must:
- Configure your database
server for FTR.
The database product you use for FTR depends on which database you are using for the AssetWise datasource / community. If your community uses SQL Server, then FTR will use SQL Server; if your community uses Oracle, then FTR will use Oracle.
FTR with SQL Server requires a SQL Server database with FILESTREAM storage enabled. You also need to install the iFilters for the file types you want to index.
FTR with Oracle requires configuration of Oracle Text components within Oracle.
See the "Database Setup" section of the AssetWise Implementation Guide for details.
- Install
FTR Service and
Storage Service.
FTR Service and Storage Service are both options of the AssetWise Server installer. Both services are installed by default and are listed as FTR Service and Storage Service, respectively, in the installer.
You can use the FTR Service and Storage Service running on your main AssetWise Server (AssetWise Information Integrity Server) computer. You can also use the AssetWise Server installer to install FTR Service and Storage Service on the same computer as your database server, or even on a standalone computer.
Depending on the amount of files that need to be indexed, you may want to consider installing another instance of FTR Service on a separate computer. For example, if you are configuring FTR for the first time for an existing community that contains a large number of files, you may want to install a second instance of FTR Service on another computer to distribute the work and shorten the time it takes to index all the files. However, once all the existing files in the community are indexed, a single instance of FTR Service may suffice going forward, because any new files will be automatically submitted for indexing shortly after they are added to the community.
- If you plan to index DWG
files, the
FTR Service and
ProjectWise InterPlot Server must be installed on
the same machine (check for the latest supported Windows Server for
ProjectWise InterPlot Server).
By default, AssetWise uses ProjectWise InterPlot Server to create a PDF rendition of the DWG file to be indexed. Once the PDF exists, AssetWise indexes the PDF instead of the DWG file.
- Enable both the
FTR Service and the
Storage Service for your community in
AssetWise System Management Console.
The steps for configuring FTR Service are slightly different depending on whether you are using SQL Server-based FTR or Oracle-based FTR.
Enabling the Storage Service is already documented elsewhere in this guide; see To Enable the Storage Service for Your Community .
- Select which classes of
documents you want indexed.
In a new datasource and community, there are no document classes defined yet. You create document classes in AssetWise Director. Document classes must exist in order to add files to the community, but also, they must exist in order to configure FTR because part of the configuration involves selecting which classes you want to include in FTR indexing. AssetWise will only index text from files whose documents belong to the classes you select for inclusion in FTR indexing. Once you create document classes in AssetWise Director, they will be selectable in AssetWise System Management Console for inclusion in FTR indexing.
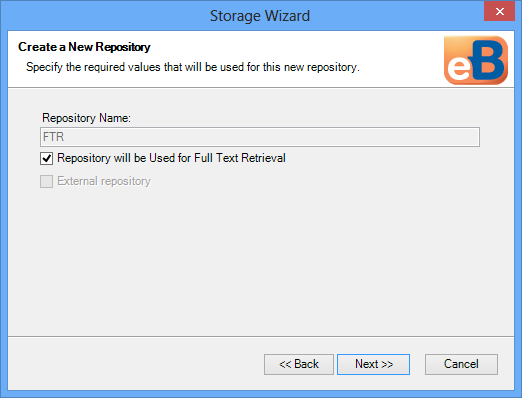
To Manually Create an FTR Repository
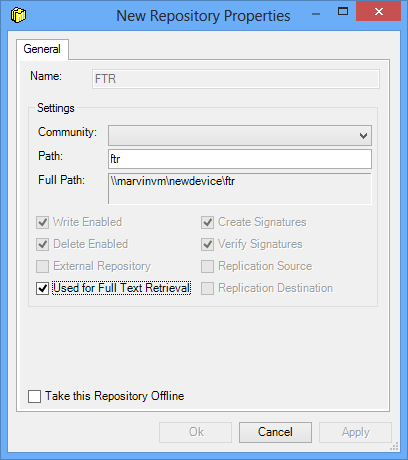
When files in your community are submitted for indexing, they are copied from their original repository to a dedicated FTR repository where they can be processed. Creating an FTR repository is basically the same as creating a regular repository, except that you must turn on the option stating that the repository is Used for Full Text Retrieval. That option is what makes it an FTR repository. There can only be one FTR repository per community. The path to the FTR repository must be accessible with read permissions as a UNC drive from the database server.
To Enable the FTR Service for Your Community - SQL Server
This task is for communities that are using a SQL Server database.
-
In the Explorer pane, expand .
-
Select the FTR node.
-
In the Communities Served list, check the check box next to your community.
-
Log in to the community if prompted.
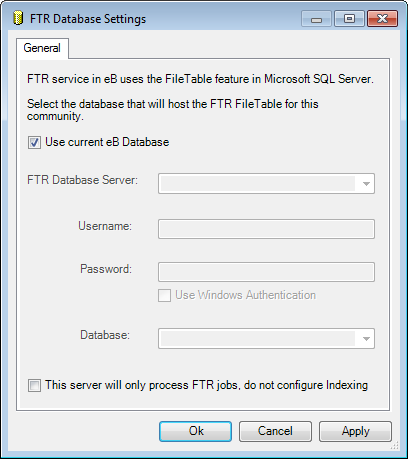
The FTR Database Settings dialog opens. Here you select which database will contain the FTR FileTable. The database you select must be a SQL Server database with FILESTREAM storage enabled.
-
In the
FTR Database Settings dialog:
-
Turn on
Use current eB Database if you want to
store the FTR FileTable inside the community's database, or turn off
Use current eB Database to select another
SQL Server database in which to store the FTR FileTable, then do the following:
- In the
FTR Database Server field, enter the
name of the computer where SQL Server is installed.
If your SQL Server installation has named instances, enter the name of the computer, followed by a backslash, followed by the SQL Server instance name you want to connect to. For example: computername\SQLServerinstancename
- Specify the account you want to log in to the specified SQL Server instance with, either by entering the Username and Password of a SQL Server account, or by turning on Use Windows Authentication to log in to SQL Server using your current Windows account.
- In the Database list, select the database in which you want to store the FTR FileTable.
- In the
FTR Database Server field, enter the
name of the computer where SQL Server is installed.
-
Click
OK.
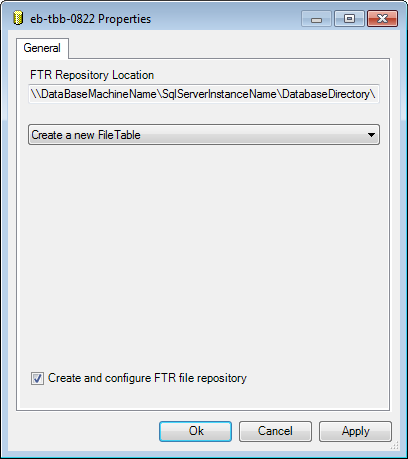
Another Properties dialog opens. Here you select whether to create a new or select an existing FileTable in the selected database. In most cases you will create a new FileTable. If you select an existing FileTable, it must be empty and not used for any other community.
-
Turn on
Use current eB Database if you want to
store the FTR FileTable inside the community's database, or turn off
Use current eB Database to select another
SQL Server database in which to store the FTR FileTable, then do the following:
-
In the
Properties dialog:
- Select Create a new FileTable if the selected database does not already have one, or if you want to use an existing (and empty) FileTable in the selected database, select Use existing File Table and select the FileTable from the list.
- Turn on Create and configure FTR file repository.
-
Click
OK.
This creates a storage device and an FTR repository in AssetWise System Management Console, along with the physical folder for the repository on the SQL Server computer at the location supplied in the FTR Repository Location field. While you can turn off Create and configure FTR file repository and create an FTR repository manually, allowing the FTR repository to be created automatically ensures that the proper syntax is used for the UNC path.
- Make sure that the user account under which the Storage Service is running has access to the new FTR repository on the SQL Server computer. It is the job of the Storage Service to copy the files submitted for indexing over to the FTR repository on the SQL Server computer. Therefore, make sure the Storage Service has access to that folder.
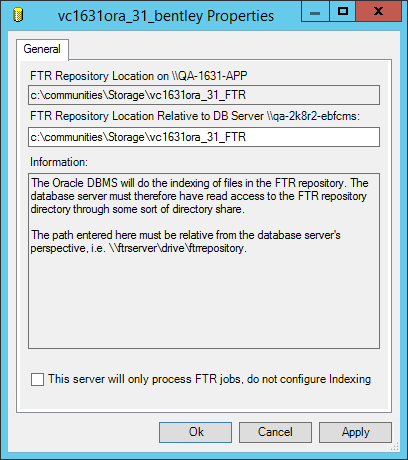
To Enable the FTR Service for Your Community - Oracle
To Select the Classes of Documents Whose Files You Want to Index
-
In the Explorer pane, expand .
- Expand your community and select the FTR node.
-
In the content pane, check the check box next to each class of documents whose files you want to be indexed. If you do not want a particular document class's files to be indexed, keep that class's check box turned off.
If there are no files in your community yet, then you are done with the FTR configuration. Any new file that gets added to the community and that is associated with one of the selected document classes will be automatically submitted to the queue for FTR indexing.
To Synchronize Files with Selected Classes
- Expand your community and select the FTR node.
-
In the content pane, do the following:
Check the check box next to any new class of documents whose files want to be indexed.
Uncheck the check box next to any previously selected class of documents whose files you no longer want to be indexed.
-
Click the Synchronize Files with Selected Classes
 icon.
icon.
- Click Yes when prompted to save your changes.
-
Click OK on the confirmation dialog.
If you turned off any document classes, then upon synchronization, any existing files in the community that are associated to those classes and that were previously indexed are removed from the FTR repository, and the text from those files are removed from the FTR catalog.
If you turned on any document classes, then upon synchronization, any existing files in the community that are associated to the newly selected document classes will be submitted to the queue for FTR indexing. Also, from this point forward, any file that is added to the community and that is associated to one of the selected document classes will be automatically submitted to the queue for FTR indexing.
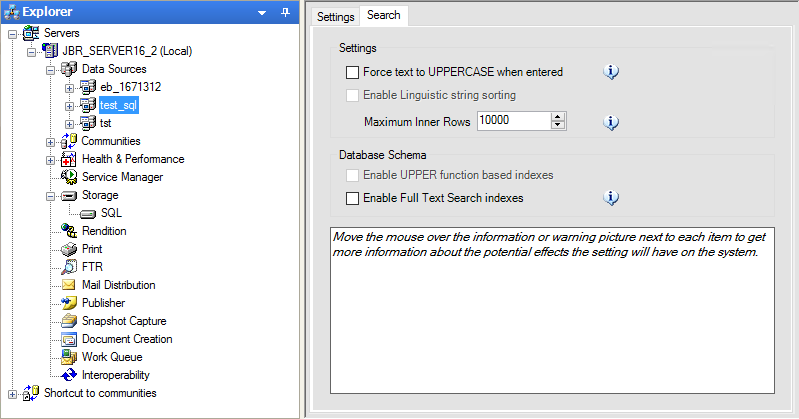
Default Search Settings (Datasource - Search tab)
To see or change your default search settings for a datasource, select your datasource in the Explorer pane, then select the Search tab in the content pane. The settings on this tab are database dependent and are disabled if not applicable.
A number of new search settings have been added to address issues relating to case-sensitivity in Oracle databases.