Configuring the Print Service
You can print files from AssetWise in one of two ways:
- Local printing - Lets users print files one at a time by downloading the file from AssetWise and opening it in its native application for printing.
- Server printing - Lets users print files in batch by selecting one or more documents (or the entire search results list) and then submitting a print job to send all of the selected files to the print server for printing.
This section describes how to configure server printing. No configuration is required for local printing.
When a user submits a print job for server printing, they are prompted to select a print template which contains instructions for how and where to print the selected files. The print template and other settings are defined in AssetWise System Management Console. Depending on how you define the template, the user may or may not be able to change some or any of the print options.
General Configuration
- Install the following
items on each of your print servers:
- Print Service (Print Service option in the AssetWise Information Integrity Server installer)
- Bulk Transaction Support (Bulk Transaction Support option in the AssetWise Information Integrity Server installer)
- ProjectWise InterPlot Server CONNECT Edition - 10.00.02.29 (a separate download, available from Bentley's Software Downloads )
or
Install all of the items above on a computer that is not the print server, and then install your printer's print drivers on that computer.
- In
AssetWise System Management Console do the
following:
- Enable Print Service (see To Enable the Print Service for Your Community ).
- Add one or more
printers (see
To Add a Printer to a
Community
).
In this step you select an existing printer that is running on a computer where Print Service, Bulk Transaction Support, and ProjectWise InterPlot Server are installed and running.
- Create one or more
print templates (see
To Create a Print
Template for a Community
).
Each template points to a printer you added in the previous step, and defines various print settings.
- There is a setting in AssetWise Director called Engine to use for Rendition and Server Printing. In a new community, this setting is set to Interplot by default, and there is nothing you need to do. However if your community was upgraded from an earlier version of AssetWise that used the Spicer rendition engine, you will need to change the setting from Spicer to Interplot. This setting can be found in AssetWise Director by opening the System Admin tab () and selecting .
When creating the template, you can configure the template to force users to use specific print settings (such as paper size or orientation), or you can configure the template to use the selected printer's default settings and allow users to override them if they want. You can also set up custom watermarks, headers, and footers in the template which will be automatically applied to the printed output.
Server Printing Workflow
- Submit - A user submits a server print job.
- Queue - The print job goes to the print queue.
- Service - Print Service gets the job from the queue and sends the files to ProjectWise InterPlot Server for processing.
- InterPlot - ProjectWise InterPlot Server processes the files and sends the processed files to the print driver.
- Driver - The print driver sends the processed files to the printer.
- Printer - The printer prints out the processed files.
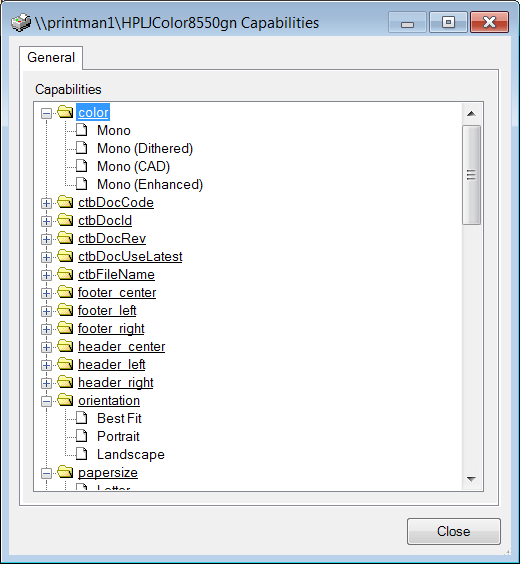
When a user submits a print job, AssetWise looks at the selected template's defined print settings (also called the template demands) and compares them to the actual printer's capabilities. AssetWise also looks at the submitting user's permissions, and scope to which the template belongs. It may be that AssetWise security is configured in such a way that certain users or groups of users may only be permitted to use certain printers.
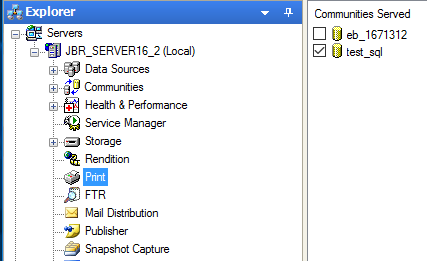
To Enable the Print Service for Your Community
-
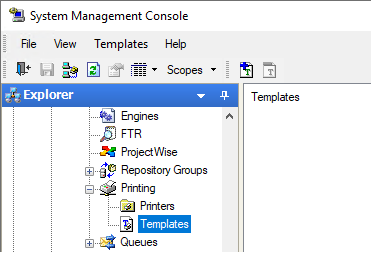
In the Explorer pane, expand .
- Select the Print node.
-
In the Communities Served list, check the check box next to your community.
-
Log in to the community if prompted.
The Print Service running on this computer is now configured to serve the selected community.
- If you want to use more than one Print Service for a single community, repeat these steps for each installation of Print Service so that all instances of Print Service are enabled for your community.
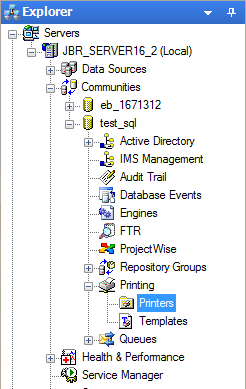
To Add a Printer to a Community
- In the Explorer pane, expand .
-
Select the
Printers folder and click the
Add Printer
 icon.
icon.
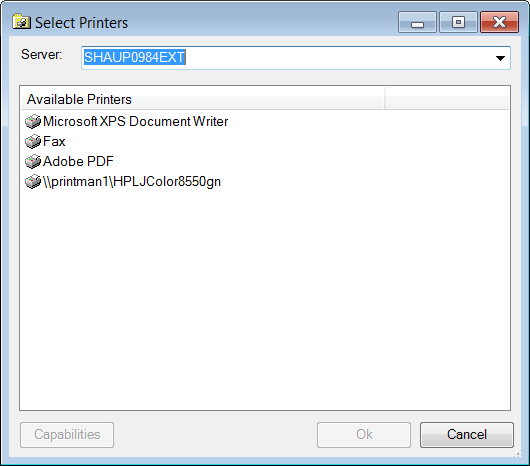
The Select Printers dialog opens, with the local computer name selected in the Server list.
-
Do one of the following:
If the local computer contains the printer(s) you need, then leave the local computer name selected in the Server list.
or
If you want to select a printer running on another computer, then select your print server from the Server list, or just enter the name of the print server computer in the text field.
Note: Whatever server you select here, Print Service must already be installed on that computer and the service must be running (started).The Available Printers list shows the printers running on the selected server that are available to the user account under which Service Manager is running on that computer. This user account is specified during AssetWise Server installation, and can be changed later through the local Services window if needed. This should be a domain user account with administrative rights on the computer.
- Select a printer from the list and click OK.
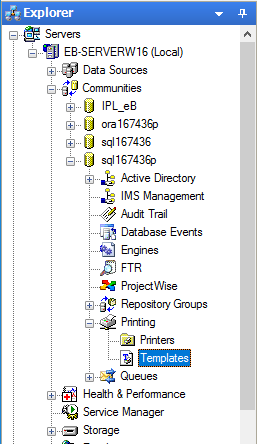
To Create a Print Template for a Community
- In the Explorer pane, expand .
- Select the Templates folder.
- (Optional)
If your community contains more than just the delivered Global
scope, click the
Scopes button in the toolbar to set the
default scope under which the new template will be created.
The Scopes button changes to the name of the default scope once set. For example, Global.
-
With the
Templates folder still selected, click the
Add Template
 icon.
icon.
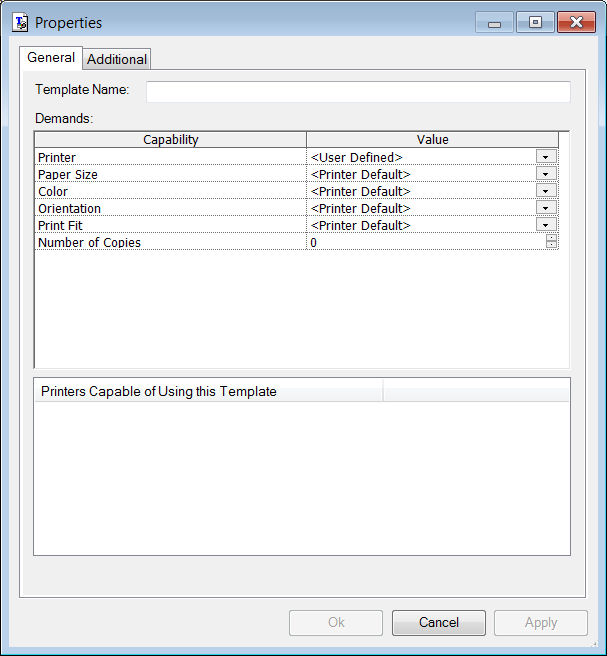
The Template Properties dialog opens, to the General tab.
-
In the
Template Name field, enter a descriptive name
for this template.
Make the name of the template clear, so that it is obvious to your users when they are selecting which print template to use.
- (Optional)
In the
Demands section, from the
Printer list, click
<User Defined> and select a printer.
This sets the printer that this template will use. If this list is empty, it means you have not added any printers yet. See To Add a Printer to a Community .
Tip: If you leave the Printer set to <User Defined>, then the user will be able to select any of the printers in the community when they submit the print job.The rest of the print options in the Demands section are by default set to <Printer Default>. This means that the selected printer's default value for that print option will be used unless the user changes it upon submitting the print job. If you set a specific value for a particular print option here, then users are forced to use that value when they print. Therefore, only use <Printer Default> if you want to allow the user the possibility of changing that particular print option.
- (Optional)
In the
Demands section, change the value for any
print option you want to force users to use:
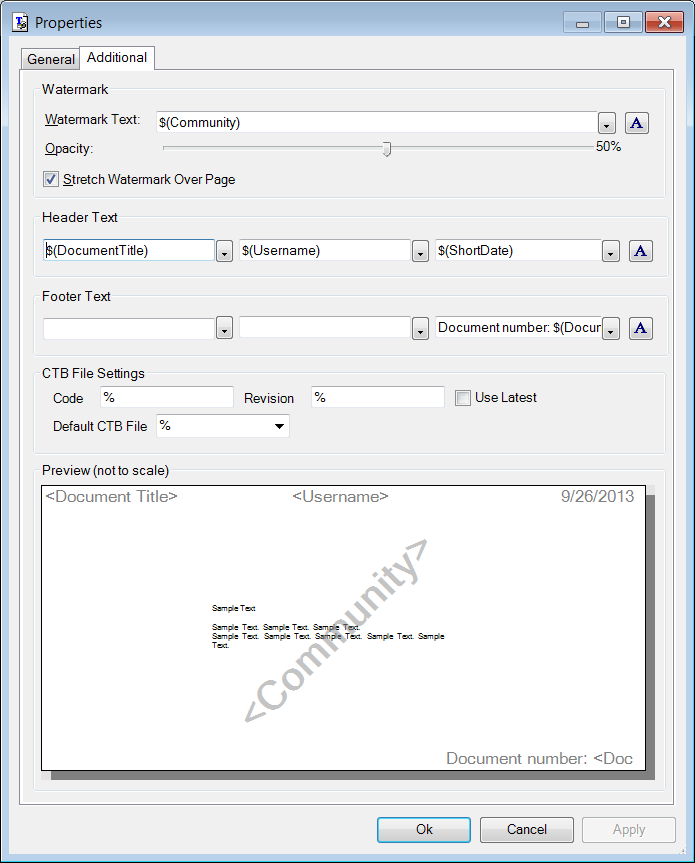
Note: The Additional tab is used to add custom watermarks, headers, and footers to the printed output. Please note that the actual results depend on the capabilities of selected printer's print driver.Note: Unlike the controls on the General tab, which are always seen by the user and may or may not be changeable by the user, the controls on the Additional tab are not seen by the user at all when they submit a print job. Whatever you set on the Additional tab will be used by all users who use this template.
- (Optional)
On the
Additional tab, set any of the following:
Watermark section
Used to print a diagonal (lower left to upper right) watermark of text across each printed page.
- Watermark
Text field
Sets the text that will appear in the watermark. You can enter your own text, or you can insert variables from the list (click the down arrow), or you can use a combination of variables and your own text.
- Font button

Sets the font, style, size, and color of the text used in the watermark.
-
Opacity
Sets how opaque or transparent the watermark text will be. Move the slider to the right to make the watermark more opaque. Move the slider to the left to make the watermark more transparent.
-
Stretch Watermark Over Page
If on, the selected font size is ignored and the watermark text is stretched across the page. If off, the size of the watermark text is controlled by the selected font size.
Header Text
Sets the text that displays across the top of each printed page.
- Header fields
(unlabeled)
Use the left, middle, and right header fields to set the text that displays in the left, middle, and right portions of the header, respectively. You can also leave one or all of the header fields blank.
You can enter your own text, or you can insert variables from the list (click the down arrow), or you can use a combination of variables and your own text.
- Font button
Sets the font, style, size, and color of the text used in the header.
Footer Text
Sets the text that displays across the bottom of each printed page.
- Footer fields
(unlabeled)
Use the left, middle, and right footer fields to set the text that displays in the left, middle, and right portions of the footer, respectively. You can also leave one or all of the footer fields blank.
You can enter your own text, or you can insert variables from the list (click the down arrow), or you can use a combination of variables and your own text.
- Font button
Sets the font, style, size, and color of the text used in the footer.
Variables for Watermarks, Headers, and FootersVariable Description $(Username) At print time, inserts the AssetWise user name of the user who is printing the document. $(Community) At print time, inserts the name of the community the document comes from. $(ShortDate) At print time, inserts the current date in short date format (for example, 9/26/2013). $(LongDate) At print time, inserts the current date in long date format (for example, Thursday, September 26, 2013). $(ShortTime) At print time, inserts the current time in short time format (for example, 2:51 PM). $(LongTime) At print time, inserts the current time in long time format (for example, 2:51:55 PM). $(DocumentTitle) At print time, inserts the document title of the document that is being printed. $(DocumentNumber) At print time, inserts the number (<prefix> <middle> <revision>) of the document that is being printed (for example, SAN01238 1.0). CTB File Settings
Used to specify a default AutoCAD color table file (CTB) to use for printing DWG files, when users submit server print jobs that contain DWG files. The CTB file must be stored in a document in the community.
To specify a default CTB file, do the following:
- In the Code field, specify the document number of the document that contains the CTB file.
- Use Latest (revision) is on by default; if the CTB file you want is stored in an earlier revision of the document, turn off Use Latest and specify which revision of the document you want to use in the Revision field.
- Finally, select a CTB file from the Default CTB File list.
- Watermark
Text field
-
Click
OK.
To Remove a Printer from the Community
You can remove a printer for any reason as long as it is not currently being used. Printers that AssetWise no longer detect (whether they have been renamed or removed from the server) will be indicated by an error. If a printer that you are using is renamed, you need to remove and then re-add the printer.