Defining Default System Settings
The System Defaults section in the System Admin tab is where you define the default system settings that affect the behavior of the entire community. Most of these settings are undefined in a new community, so you will need to configure them.
System settings are grouped into the following categories:
To Define or Change a Default System Setting
-
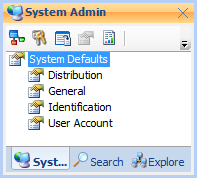
Open the System Admin tab ().
-
Click the System
Defaults icon
 .
.
-
Select the category containing the setting(s) you want to define or change:
- Distribution - see System Defaults - Distribution Settings
- General - see System Defaults - General
- Identification - see System Defaults - Identification (Masks)
- User Account - see System Defaults - User Account Settings
The category of settings opens as a tab in the Content pane.
- Set or change the value of individual settings as needed.
-
Save your changes when finished.
Save individual changes by clicking the Save icon next to the setting you changed.
Save all changes at once by clicking the Save icon from the Main toolbar.
System Defaults - Distribution Settings
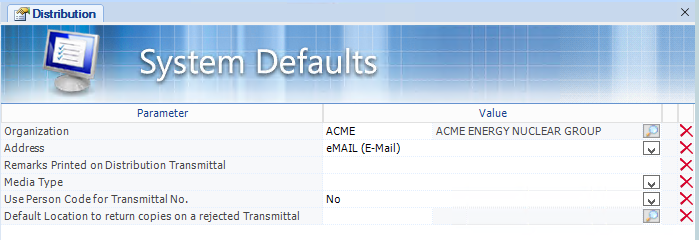
| Parameter | Description |
|---|---|
| Organization | Specifies the organization distributing the items |
| Address | Specifies address to return distributed items. List of possible addresses consists of the organization's Directory Entries. |
| Remarks Printed on Distribution Transmittal | Specifies the default text printed on a Transmittal |
| Media Type | Specifies the default media type for distributing items |
| Use Person Code for Transmittal No. | Select Yes or No to use the Person code for the Transmittal number. |
| Default Location to return copies on a rejected Transmittal | The default location to return copies on a rejected Transmittal. |
System Defaults - General
| Parameter | Description |
|---|---|
| Directory Entry type for E-Mail | Specifies the default address type to use for e-mail, for example "Business". |
| Default Repository Group | Specifies the default repository group that will be presented to users. |
| Watermark Text for Renditions | The text entered here is used as a watermark on every rendition created from this community. |
| eB Browser URL | Specifies the URL of the AssetWise website. |
| Auto Approve Item Baselines | |
| Template for Disposition Order Capture | |
| Number of days to keep Completed Queue Jobs | |
| Exclude Historic revisions from the Item Baseline | |
| Late Work Task notification repeat interval (hours) | |
| Copy server list (semi-colon separated) | |
| Copy Batch Size | |
| Engine to use for Rendition and Server Printing | This setting determines which engine will be used by both the Rendition Service and the Print Service. In an new community, this setting is set to Interplot by default, and there is nothing you need to do. However if your community was upgraded from an earlier version of AssetWise that used the Spicer rendition engine, you will need to change the setting from Spicer to Interplot. |
| Skill Based Work Exchange | This setting determines the visibility of Work in progress folder under user skill in Work Exchange navigator and enables users to reassign work tasks to themselves even when the tasks are already accepted by a different person with the same skill. |
| ALIM Browser QuickLink URL | |
| Reference Coordinate System (EPSG: ####) | |
| Tolerance for geometric operation | |
| Map Engine URL |
System Defaults - Identification (Masks)
This section is used to define a default numbering mask for each object type. This mask is then used to auto-generate the number or code that gets assigned to an object when that object is created using a form. For example, if you define a Person Mask below, and you create a person using a form, the new person's Person Code attribute is automatically populated with the next available number, which gets auto-generated based on the Person Mask.
The mask is a combination of alphanumeric characters and / or special characters (do not use % or *) along with one or more number signs (#). The number of number signs you enter represents the number of digits to be used when auto-generating the number.
Using the Person Mask as an example, assume that your organization's standard person code format is to use a few letters and a dash as the prefix (PER-) followed by several number signs denoting the person's employee number. So here you would enter PER-##### as the Person Mask. This mask would auto-generate the codes PER-00001, PER-00002, PER-00003 and so on for each new person created using a form, assuming that code is not already in use. To use another example, maybe the first 100 employees are added as persons in the community through another mechanism, and then after that you create each new person using a form. So based on the current mask (PER-#####), the next person you create (employee 101) would become PER-00101.
| Masks |
|---|
| Budget Mask |
| Change Request Mask |
| Condition Mask |
| Contract Mask |
| Deviation/Waiver Mask |
| Disposition Order Mask |
| Distribution Order Mask |
| Distribution Transmittal Mask |
| Document Copy Mask |
| Document Mask |
| Event Mask |
| Interface Mask |
| Location Mask |
| Modification Mask |
| Organization Mask |
| Person Mask |
| Physical Item Mask |
| Pricelist Mask |
| Program Mask |
| Project Mask |
| Report Mask |
| Restriction Mask |
| Serialized Item Mask |
| Survey Mask |
| Survey Question Mask |
| Tag Mask |
| Task Mask |
| Task Order Mask |
| Virtual Item Group Mask |
| Virtual Item Mask |
| Work Order Mask |