Creating Documents
Before You Create Documents
Before you can create documents, the administrator needs to define the appropriate lookup tables and include the attribute and relationship data that is required to appropriately identify the new document(s). If data required for your document is not on the appropriate selection list, your documents may not be properly indexed. If this seems to be the case or the system will not allow you to create a document, contact your company’s data administrator for assistance.
The following tasks are recommended for administrators:
- Define a classification structure with related user-defined attributes (document characteristics)
- [Optional] Define all your list values such as Cross Reference Types to allow alternate numbers to be defined for a document. This is accomplished in the System Admin tab (Maintain List Values).
- [Optional] Define a numbering mask in the System Defaults, if a system generated document number is required.
See Maintaining List Values and Defining Default System Settings .
To Create a Document Using a Form
-
Select .
The Document form opens in the Content pane.
-
Fill out the form as needed.
The following fields are required:
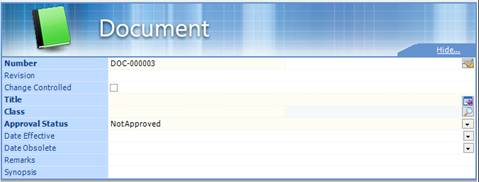
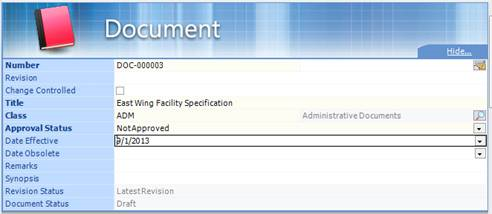
Number, Title, Class, Approval Status
Setting Description Number A unique number or code that identifies the document. The Number attribute has two fields. The first field is required, the second field is optional. For example, a document number might be DOC-00005 (with only first field defined) or it might be DOC-00005 SPEC (with both fields defined). The Number attribute along with the Revision attribute forms the prime identifier for the document. The first Number attribute field is either auto-generated based on a predefined mask, or it can be manually configured if there is no predefined mask or if you need to override the auto-generated number.
To manually configure the document number, in the first Number attribute field either enter a fixed value (for example, DOC-12345), or enter a mask (for example, DOC-#####) and then click the Auto Number icon to generate the next available document number. For example, if you enter DOC-##### as the mask and the highest document number in the community is DOC-00100, the next available document number would be DOC-00101.
In the second Number attribute field you can enter an additional code (either a fixed value or a mask) that further defines the number. If you enter a mask in the second part of this field, then you need to click the Auto Number icon to generate the next available number.
Revision Indicates which revision of the document this is (revision 1.0, 2.0, 3.0, and so on). You can enter up to eight alphanumeric characters. This field is only required if this document is subject to change control (if the Change Controlled setting below is on). Change Controlled Turn this option on if the item should be under change control. If off, the item is not under change control. Title Enter a name or meaningful description of the document. Class Assign a class to the document to indicate what type of document this will be. If you know the code of the class you want to assign you can enter that code in the Class field and press the <Tab> key. You can also click the Class Lookup icon to select the class you want from a list of classes. Once a class is entered, the Class field displays the class code followed by the class name. For example CAD | CAD Document Approval Status Click the list and select the current approval status of the document (Planned, Not Approved, Approved). Date Effective The date when the document is first released or used. Sometimes this coincides with the release date. Click the list to select the date from a calendar. Date Obsolete The date when the document will be marked as obsolete, and it becomes historic. Click the list to select the date from a calendar. Remarks Enter additional information about this document. Synopsis Enter a summary about this document. -
Click the Add icon
 in the action bar.
The document is created. You can now define additional relationships for the document.
Use the Hide button to hide all attributes and relationships that do not currently contain data and the Show All button to show all information regardless of whether they contain data or links.
- Make the appropriate additions to all required attributes and relationships.
-
Click the Save icon
 in the action bar.
To Create a Document from a Template
To Make a Copy of a Document
- Open the document you want to make a copy of in the Content pane.
-
Click the Copy icon
 in the action bar.
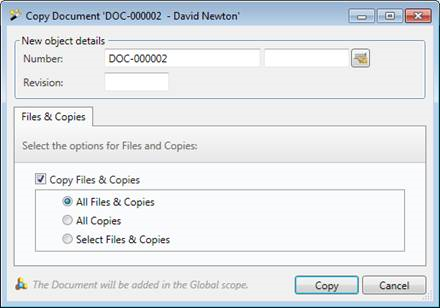
The Copy Document dialog opens.
- Change the default document number, or enter a number mask and select the Auto Number icon or simply type in the required document number and revision.
-
Select the options for files and copies, and click Copy.
The Copy Operation Complete dialog opens.
-
Click OK.
The new document is added with the status of Not Approved, and its details display in the Content pane. You can make changes to the new document at any time until its status is changed to Approved.